 Design a Grungy, Rock & Roll Gig Poster
 Photo Manipulate a Beautiful Snow Queen Scene
 Photo Manipulate a Cute Flying Pig Scene
Have every post delivered to your inbox and get access to hundreds of useful design freebies.
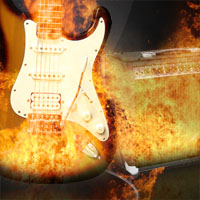
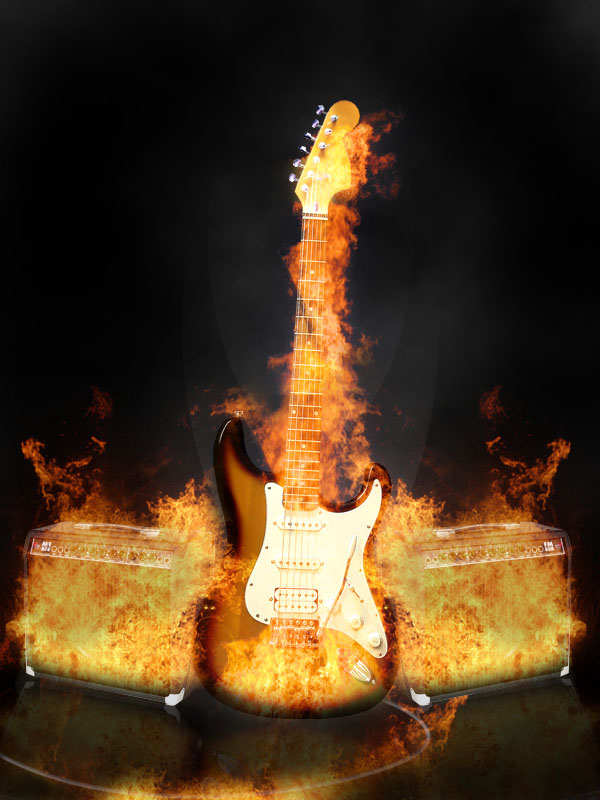
This is the final image that we’ll be creating:

For decades guitars have been associated with fire – let’s be honest, they’re two pretty powerful images. This tutorial will teach you how to create a cool design that involves both!
To start with open up a new document (600X800px) and fill it with black.

Now paste a photo of a guitar into the center of your document. I cut out my photo from it’s original background using the lasso tool, but you can use whatever method you like.

Now paste in a photo of a bonfire over your guitar (position it at the base of the guitar). Make sure that your fire photo has a black background, and then set the layer’s blend mode to ‘screen’ in order to make the black become transparent – giving the impression that the flames are in fact over the guitar.

Now use a large, soft eraser brush at roughly 25% opacity to erase the bottom of the flames so that they fit roughly around the shape of the guitar.

Now paste in an image of a guitar amp and fit it just to the right of the guitar. Duplicate this layer, and then go to edit>transform>flip horizontal and move the flipped duplicate to the left side of the guitar. Then merge this layer down and call the merged layer ‘amps’.

Now go to image>adjustments>brightness/contrast and apply the settings shown below to achieve the following outcome:

Now paste in another image of some fire on a black background and set the layer’s blend mode to ‘screen’ again. Position this fire over one of your amps. It’s also important to note that whilst your amp layer will be behind your guitar layer, this new fire layer should be above all other layers.

Now, I can see an immediate problem with my new fire layer. There are clear outlines of branches, remaining from the original photo, but clearly there wouldn’t be any branches in our image. To fix this I select the clone stamp tool and clone patches of fire without and branches to cover up the branch outlines.
Then I use my eraser brush to erase away parts of the fire that overlap the edges of my amp too much (particularly below the amp) and also brush away over the buttons at the top of the amp to expose them a bit more.

Now duplicate your fire layer and flip it horizontally. The move it over your left amp. After dong this I noticed a few harsh edges caused by the edges of the various photos, so I went through each of my 3 fire layers and erased away and harsh edges or points where the various images didn’t merge together well.

Now I add some more flames to the neck and top of the guitar. This actually uses several photos, but I can blend them together very realistically by simply setting their blend modes to ‘screen’ and erasing the borders between images until they blend nicely. At this point our image is already looking pretty hot! (Sorry couldn’t resist the terrible pun).

Now I begin working on my background. I create a new layer above my black background layer called ‘clouds’ and go to filter>render>clouds. Then I reduce my layer opacity to 10% and erase away all of my clouds apart from those around the neck of my guitar. This creates a subtle eerie looking background, and the smoke fits well with the fire.

Now create a new layer above your ‘clouds’ layer called ‘lights’. Create a large oval selection roughly the width of your guitar and fill it with a radial gradient (white to transparent) – dragging your gradient up from the base of your selection. This should create a kind of reverse spotlight effect. Reduce this layer’s opacity to around 10%. Then duplicate it and resize the duplicate to be about 3/4 of the size of the original. Finally move this duplicate light image up from the original to be more central in your document and reduce it’s layer opacity to around 5%.

Now create a new layer called ‘light reflect’. Create an oval selection centrally beneath your guitar and fill it with solid white. Then create two more ovals under your amps and fill these with white. Finally merge all of these shapes into a single layer.

Now use a 30px eraser brush at 5% opacity to erase the edges of this white shape. The point is to provide a kind of highlight or lighting effect cast by the flames. It should be very subtle, as we’ll be combining these kinds of subtle effects to create a great end result.

Now hide all of your background layers, leaving only your guitar layer and the fire layers associated with the guitar (not the one’s meant for the amps). Then go to layer>merge visible. Copy your merged image and then undo the layer merge in your history palette. Paste the merged fiery guitar image into your image and then go to edit>transform>rotate 180 degrees. Also set the layer’s blend mode to ‘screen’ in order to hide the stray areas of black background. Move the image below your original guitar and reduce the layer’s opacity to around 20% to act as a reflection.
Finally use a low opacity, soft eraser brush to erase away the bottom of your reflection.

Now repeat the last step, but using the guitar amp/amp fire layers. Once you’ve pasted in your merged image you’ll notice that you will have to fit the reflections with the angles of the original amps. This is a bit of a problem as both amps are part of the same layer now. To fix this simply selection half of your merged amp image and copy/paste it onto a new layer. Then delete this half of your original merged image.
You can’t simply rotate this two amp images 180 degrees, as the reflection wouldn’t be accurate. Instead, flip them vertically and then use your edit>transform>distort tool to distort the reflection so that it fits the amps edge. I found that the easiest way of doing this is to do this with one amp, reduce the layer opacity and erase the bottom of the reflection etc… and then simply duplicate this layer, flip it horizontally and fit it below the other amp.

Now create a new layer called ‘guitar cable’. Draw out a path line from the base of your guitar to the edge of your canvas. Then select a 4px white brush (100% hardness) and with your path too selected right click on your path line and click ‘stroke path’. This should create a basic cable shape stemming from your guitar.

Now apply the inner shadow and inner glow blending option settings shown below to make your cable look more realistic:


Now copy some of the fire from your amps and position it over your guitar cable layer. Use a large, soft eraser to erase away all parts of the fire apart from those around the cable itself. Try to create a subtle effect of the flames licking along the cable, reducing in intensity as they get further away from the guitar.
An important thing to remember when working with fire is that it’s not uniform. Right now my image is looking too symmetrical, especially the fire on my amps. You don’t need to drastically change fire to make it appear random, just change a few parts of your image. I use a large, soft eraser brush at a low opacity to erase the left edge of the fire above my left amp (partly behind the fire on the guitar neck suggests that the fire is being blown in the opposite direction). Given this wind direction I also erase part of my fire over the right amp that is blowing to the left. This is very easy to do, but not my image looks a lot more natural, and the little touch of the consistent wind direction really helps the realism.

To polish off my image I want to add some sparks coming from the fire on my guitar neck. I select a watercolor brush set, as the shapes are fairly flame like (a normal round brush wouldn’t look natural enough). To get the color right I simply use my eyedropper tool and select a piece of flame from one of my amps.
I start by applying quite a few 2px sized brush marks around my guitar neck, and then several more that are drifting off into the air. Then, I up my brush size to 4px and apply marks nearer to the guitar neck (and less of them). Then I up my brush size to 6px, and paint even less strokes (again very near to the guitar neck). This technique is fairly simple, but can achieve some very effective results.
And that’s it! I hope that you found this tutorial, and that you can see how some techniques available to all levels of Photoshop user can achieve some fantastic results.

Tom is the founder of PSDFAN. He loves writing tutorials, learning more about design and interacting with the community. On a more interesting note he can also play guitar hero drunk with his teeth.


Do you know the basic tools in Photoshop but feel that your work is still looking average? Join our creative community at FanExtra and get the direction you need to take your work to the next level.


good 2 see u back and a really good tut m8….
thanx a lot…
Hot tut tom! good that your back!
rock on! \m/
Lovely tutorial! and yes – nice to see You submitting something new
Thanks guys, it’s great to be back
A headbanger’s dream come true!
just a little heads up, the jack plug is supposed to go in the jack that’s ON the guitar, not under… there’s nothing there… other than that nice tut
great tutorial you should really upload your render of a guitar and any other images you use because i cant cut pics out at all and i cant find a pre cut pic of a guitar
Eezo: Gah! My mistake. It’s because my guitar has the jack on the bottom.
Jamie: Why don’t you use the lasso tool to cut out your pictures? Otherwise, I’ll be offering the layered .psd files for all my tutorials next week as part of a new membership system.
[...] October is a very busy month for me personally, but I manage to crank out a few nice tutorials – This tutorial on creating a firey guitar is detailed and hopefully practical for people. [...]
[...] Adding Fire to Create a Realistic Flaming Guitar [...]
like it thanx for the tut….
fentastic work man……………..!!!!!!!!!!
feel great 2 c yr styles………..
wow…this is a great tut…but i saw a little mistake…the refection of the guitar is wrong just look at the white part of the guitar its on the right side in the reflection its on the left?…haha…but thats fine ive learned new tecniks from this tut after all…