 Members Area Tutorial: Photo Manipulate the Atmospheric Vampire Piece ‘Nocturna’
 Apply a Quick & Easy Vintage Photo Effect
 Design a Bold, Stylish Club Night Poster
Have every post delivered to your inbox and get access to hundreds of useful design freebies.
The basic step in photo retouching is to correct overall tonal problems: darkening the shadows, brightening the highlights, adjusting the midtones. To do that, Photoshop’s Levels adjustment probably the most powerful tool. Usually, to correct the tonal problem, we just move the slider on Photoshop’s Level adjustment to the edges where the histogram begin. But it is not good enough, especially in cases where we want to focus only on some part of the image (the model for example). Because histogram represent the whole image, not just the model. So, in this tutorial, we’ll learn how to correct overall tonal problem by using Photoshop Levels adjustment tool in more advanced way, non destructive, to get the optimal results. Let’s get started.
As always, this is the final image that we’ll be creating:

Open the image. Here we can see that the image is suffer some tonal problems. The highlight is not bright, and the shadow is not dark enough. Both of these problems lead to poor contrast.

Open the histogram to see if we can spot this problem via a graph. Just go to window> histogram. Check Expanded View on the dropdown menu to get more accurate report.

The histogram tell us that the main problem of this image is a gap at the highlights (right) and shadows (left) areas. Notice how the edges of the histogram do not extend all the way to the right and left. This tells us that there is currently nothing in this image that’s pure white and pure black. Which means the highlights are not as bright as they could be, and the shadows are not dark as they could be. We will try to solve this problem by using Levels adjustment tool.

Go to Image > Adjustment > Levels (Ctrl + L) to open the Levels Adjustment window. As we can see, the histogram on Levels adjustment window is the exact same histogram we saw earlier in the histogram palette. Pure black is 0, pure white is 255, Grey is 1.00 (127.5. But to correct the tonal problem, we will use those three eyedropper to set the black, grey and white point. Which means we will convert the darkest area in this image to become pure black, and brightest to become pure white. The midtone too of course.
We won’t correct the entire image (model and the background), but focus on the model only. This is the advantage of this technique which will we use later, beside its more accurate. So the pure black, pure white and real midtone will be on the model, not on the background.

Cancel the Levels Adjustment, because we need to trace the darkest, brightest and midtone area first. To do that, duplicate the image by hit Ctrl + J on the keyboard. Then, turn off the visibility of the original layer (Background), by clicking the eye icon on the layers palette. Next, double click the background copy layer. This will brings up the Layer Style dialog box.

Under the Blend If section on Layer style window, we can see two rows gradient: This layer and Underlying layer. On the first row, drag the white triangular until about 18, which means we remove almost all pixels in the image starting from the brightest pixels. So, what remains in the image now is the darkest spot. You can narrow the spot by dragging the white triangular to far more left. But always remember to focus only on the model, not the background. And don’t make it too narrow or it will be difficult to take the sample later. Turn on/ off the background layer visibility to help you focus only on the model when tracing. If you satisfied with the result, click OK.

Go to Color Sampler Tool (Shift + I), change the sample size to 3 by 3 Average. Then click precisely to the one of those remaining spot in the image, the biggest spot. We have got sample 1: the darkest sample. You can hit Ctrl + 1 to view the image in actual pixel mode if needed.

Double click the Background copy layer again to open Layer Style dialog box. To trace the midtone, drag the white and black triangular near 255/2 = 127.5 equally. I set 130 for white triangular, and 125 for black. What remains in the image now is the midtone.

Click OK to close Layer style dialog box, and then like what we did on step 7, click the Color Sampler tool precisely to the one of remaining spot(remember focus only on the model, ignore the background). We have got sample 2: The midtone.

Double click the Background Copy layer again. To trace the brightest spot, move the white triangular to its original post. For the black triangular, drag it until about 202. In this step, we can create temporary black layer under the background copy layer, to help tracing the brightest spot. Just click on create a new layer icon on Layers palette, drag it under the background copy layer, then fill with black by hit D on your keyboard, then Alt + Backspace. Turn on/off those black layer and background layer, to make sure you focus only on the model when tracing. Click OK.

Like previous, to mark the Brightest spot, click Color Sampler tool precisely to one of those remaining spot. The biggest spot is on the model’s clothes. We have got sample 3: The brightest sample.

Now we can delete the black layer by dragging it in to trash icon at the bottom of layer palette. Double click the background copy layer again for the last time, and reset all triangular to the original post. Click OK.

Now we will use those three samples to convert the darkest, brightest and the middtones of the model. Target background copy layer, go to Image > Adjustments > Levels (Ctrl + L) to bring up the Levels adjustment palette. Click the eyedropper for sample in image to set black point, then point and click to sample 1. You can hold Alt key to display clipping preview.

Next, select the eyedropper for sample in image to set gray point, and click it to sample 2 precisely.

Last, select the eyedropper for sample in image to set white point to sample 3. Click OK to see the full results.

The image is much better now, the highlights are now nice and bright, and the overall image contrast and details has been greatly improved. If we look the histogram palette, we can see the effects of the changes we have made.
Go to window > Histogram, to view the histogram. As we can see now the right and left side of the histogram extends all the way to the edges. This tell us that this image now has a pure black and pure white. The tonal range is currently being distributed well between it. As for the tall spike on the far right, it indicates that some image detail on the highlights area has been lost, which is on the background of this image. Because we did "sacrificing" the background when doing the adjustment.

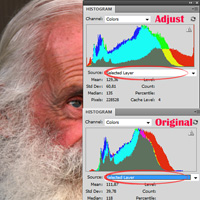
We can compare the histogram now with the original one by turn on the visibility of Background layer. But first, we must change the Source section on histogram palette to Selected Layer. Click on Background and Background copy layer in turn to see the difference.

You can view the final outcome below. I hope that you enjoyed this tutorial and would love to hear your feedback on the techniques and outcome.

Tri is an author and graphic designer. He loves writing, designing, reading and share knowledge to others. At this time he is a freelancer, and some of his articles has been published by several media. You can follow him on Twitter: @tree_hand.


Do you know the basic tools in Photoshop but feel that your work is still looking average? Join our creative community at FanExtra and get the direction you need to take your work to the next level.


Thanks for the opportunity Tom, and agree with the new title too. The wrong screen shot on step 17 is my mistake. Sorry
No problem Tri, thanks for a great quick tip tutorial! Step 17 has been fixed up .
.
Nice tutorial bro ,very useful information…thanks
To be honest with you, I almost preferred the original picture than the corrected version for some reason I think the final result tends to lean in Red tints than a natural skin tone. Sorry, but that’s my opinion on the matter. Great tutorial though’ well conceived.