 Members Area Tutorial: Follow Along With a Professional Beauty Retouching Process
 Design a Grungy, Rock & Roll Gig Poster
 Design a Dark, Professional Website Layout
Have every post delivered to your inbox and get access to hundreds of useful design freebies.
I just wanted to give you guys a quick explanation as to why the site has been down for the last 12 hours. Basically my bandwidth for PSDFAN got used up due to a recent surge in traffic, and I missed the warnings from my host due to the internet problems I’ve had recently. Anyhow, I hope that the downtime wasn’t too much of an annoyance for everyone and can assure you that I won’t let it happen again. I’m upgrading my hosting package to cope with the site’s growth first thing tomorrow! Enjoy the tutorial ![]() .
.
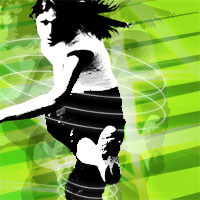
This is the final image that we’ll be creating:

Open up two documents in Photoshop, one 1024X768px and one 3000X3000px. The first document will be for our final wallpaper, and the second larger document will be for creating our main background. We’ll start off in the larger document. Go to view>show>grid to make a grid visible over your image. Then using the rectangular marquee tool create a rectangular shape that spans across your entire grid but is only one grid square high. Fill it with 0FC113 (medium green). Then using your grid select half of your rectangle, and go to edit>transform>distort and pull together the corners of the edges of your rectangle until you have a nice point. Then repeat this for the other side of your rectangle so that each side of the shape ends in a sharp point. Then copy and paste this shape repeatedly, at equal distances along your grid until you fill the entire grid, making sure to leave 1 grid square gaps between each shape. If you want to speed this process up just merge down your shape layers when you have about 5 and then copy and paste your merged image.


Now merge all of your shape layers until you have them all on one single layer. Go to edit>transform>perspective and drag in the top corners of your image, creating a nice amount of perspective. Go to edit>transform>rotate, inputting -45 as the rotation angle. Your shape will now be partially outside of your visible space within your document, so to make it easier to transform the part of the shape that we want simply select all of your document, and then copy/paste the visible part of the shape onto a new layer. Then go to edit>transform>distort and distort the shape until it looks like the image below.


Now paste your shape into your 1024X768 document. Go to edit>transform>scale and widen the shape until it fills most of your image. Then again, select all and copy/paste to a new layer so that your shape that you’re working with is completely visible.

Go to the layer’s blending options and apply a gradient overlay at an angle of 180 degrees ranging from 054006 (dark green) to 0FC113 (medium green).

Now paste in a photo of a soccer player, and cut them out using the lasso tool. (original photo)

Now go to image>adjustments>desaturate. Then go to image>adjustments>brightness/contrast and up the contrast by +88.

Now duplicate your footballer layer and reduce the opacity to 20%, then move the layer below the original and move it slightly to the side. Repeat this step a few times until you have a build up of layers. Then use the circular marquee tool and create circles on top of your duplicated layers. Fill the circles with a black to transparent gradient, and then reduce their opacity to 20%.

Now create a new layer beneath your background lines layer, and fill it with green (99E01C). Then reduce the background lines layer’s opacity to 50%.

Paste an image of some cool light effects onto a new layer above your footballer. Desaturate the image, and then go to layer>apply layer mask>reveal all. Select a radial gradient ranging from black to transparent and then drag outwards from the center of your image to fade out the edges of the image. You can find the original photo here: www.sxc.hu/photo/1043950.


Now use the circular marquee tool and make an oval selection. Fill it with white and go to select>modify>contract, and contract the selection by 1px. Then rotate your 1px ring manually and duplicate the layer a few times until it looks like there are rings going around the footballer.

Use an eraser brush to brush away the parts of the rings that should be behind the footballer. Then apply an outer glow effect to the layer using the settings shown below:


Repeat this technique on the right arm and left leg, and to save time applying the outer glow simply copy the layer style from your original ‘light circles’ layer and paste it onto your new layers.

Now open up a new document 400X250 and turn on your grid. Using the grid and your rectangular marquee tool create the basic frame for a goal. Then use the single row and single column marquee tools to draw in your net, using the grid as a guide.

Paste your goal back into your original image. Then go to image>adjustments>invert to invert it’s color from black to white. Go to edit>transform>distort and make your goal fit along one of your background green lines.

Now paste an image of a football into your image. You can find the original image here: www.sxc.hu/photo/983279.

Now duplicate your football layer. With the original layer selected apply a motion blur: angle 25, distance 500.
Put some text in the bottom right of your wallpaper. I used Helvetica Neue Condensed Bold, 72pt, with -50 kerning.

Now copy your football image and paste it onto a new layer above your text layer. Resize it, and copy it several more times to cover up your text. Then merge your small ball layers. Hide this merged layer, and then using the magic wand tool selection around your text and the gaps within the letters. Go back to your small footballs layer and hit delete, leaving you with some cool text, patterned with footballs.


Apply a drop shadow and stroke to your text using the settings shown below. Reduce the football pattern overlay layer’s opacity to 90%.


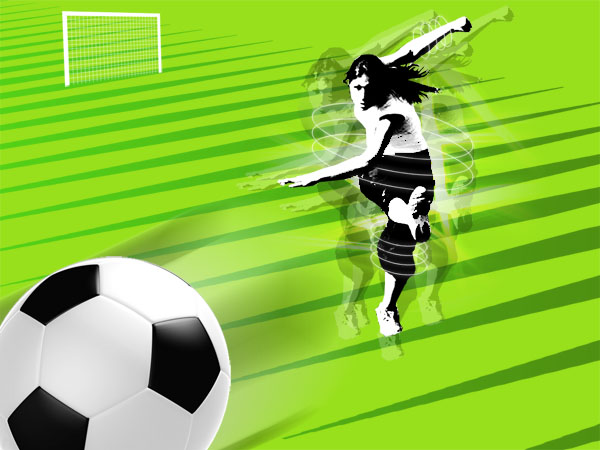
Here is the final image. You can see the full sized version by clicking it. I hope that you enjoyed this tutorial and would love to hear your comments.


Tom is the founder of PSDFAN. He loves writing tutorials, learning more about design and interacting with the community. On a more interesting note he can also play guitar hero drunk with his teeth.


Do you know the basic tools in Photoshop but feel that your work is still looking average? Join our creative community at FanExtra and get the direction you need to take your work to the next level.


a great on there as usual.trying it out shortly
Thanks twopo! I’d love to see your outcome if you’d like to post it here
Great tutorial!
Thanks Alt I hope that you’ll consider subscribing!
Oh and as always guys submitting to social networks is much appreciated
I really like the background lines on this one – nice touch.
nice tutorial , good outcome , i loved the scaling effect of striping line learned this technique, thanks
Thanks guys I’m glad you found the tut useful, it was fun to come up with that technique for the background.
nice tut but don’t really like the outcome
it’s a little bit mcdonalds world cup 02
I’m glad you enjoyed it Frans. I see what you mean about the outcome But I hope that it’s still useful for people.
Nice tutorial, easy step and understanding.
Thanks
Cheers 2R, I hope that you’ll consider subscribing to the feed.
very nice
thanks dear
No problem Glad you enjoyed it.
nice…)))
Thanks rmnarts
Great tutorial thanks a lot for the tips
simply best tutorial but give a clear explanation to us. simply beat
Great tut. But I can’t find “cool light effects” image at sxc.hu
how are you doing to day
Good, but the goal line is not likeable
Good job, it looks great!
Nice work! Can see that alot of thought was put into this, must take ages to really come up with the final design for something like this.
Superb techniques
Well, its totally an awesome tutorial. I will try with different colors.
This amazing!
This footbal wallpaper is very cool!I like it also because you chosed the green color for the background
Very special,it look so beautiful!