
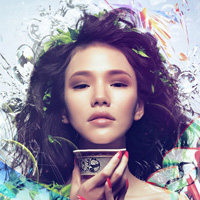
 Learn How to Photo Manipulate the Colorful Portrait ‘Transcendental’
 Tutorial Removed
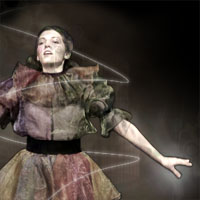 Creating ‘Smokey Dancer’ (Using Lighting/Texturing Effects)
Have every post delivered to your inbox and get access to hundreds of useful design freebies.
Sorry about the few days absense, but I’ve had zero internet access unfortunately for the past few days. Don’t worry though, I’m back with a new tutorial and have no plans of slowing down with the site. I hope that you enjoy the tutorial.
This is the final image that we’ll be creating:

Open up a new document (600X600px) and create a rectangular selection in the center of your document. Fill it with black.

Now paste in a photo of a tree. Cut it out from it’s background using the lasso tool, and then apply a black color overlay. Then resize the tree to fit nicely in the top right of your black square.


Paste in a photo of some fir trees and mountains. Go to select>color range then select shadows, and use the settings shown below. This will create a selection around the fir trees, which won’t be perfect, but can be used for this kind of grungy, rough design. With the area around the trees selected hit delete, and then resize your image and give the layer a black color overlay effect.


The images below show this technique of color range > shadows > delete > color overlay repeated, and me building up the edge of my black rectangle using various photos of greenery.


This grungy outline is looking pretty cool, but it’s a little too square and boxy right now. To fix this I grab my eraser brush set on a grunge brush and erase away parts of the corners of my ‘black rectangle’ layer. I also add a few more parts to the edge to round off the corners and erase these too.

Now I paste in a wood texture underneath of my current layers to provide a cool background.

To achieve a more neutral background color I add a color overlay to my wood texture layer. I set an overlay of EFDBAA and 86%.

I paste a photo of some symmetrical clouds over my background texture layer. I want the clouds to be at the top and bottom of my image however, so I simply select the relevant parts of my image and move them to the top/bottom of my document. Then to fill the gap between I select a thin strip of the blue sky that divides the clouds and stretch it so that it joins them. Finally I set my layer’s blend mode to overlay and reduce it’s opacity to 60%.


We’ll get back to the background shortly, but for now I want to add some text to my cool black grungy area. A really nice tip for achieving a grungy artistic effect is to type out your text, and then select each individual layer and choose the font below the last one you used for the previous layer. The variety of fonts and white on black contrast is a very simple way to achieve great results.

To add to the grungy theme I add in some Photoshop custom shapes and erase parts of them using a grunge brush set at a low opacity. I reduce these shape layer’s opacities to between 20-40%.

Now a select a large grunge brush and set it’s hardness to 0. Then I apply 4 brightly colored marks roughly at each quarter of my canvas. I set my layer’s blend mode to ‘vivid light’ and then go to filter>blur>radial blur and apply a radial blur of 74 strength, blur method: spin, quality: good. The images below show the effect with our floating island hidden and then made visible.


Now I paste in an image of some mountains above my radial blur layer. Then I set my layer blend mode to ‘overlay’. This creates a really nice effect not only giving the mountains some bright colors, but making it appear as if they are coming out of the clouds at the base of our image.


Now paste in some more mountains into the top of your image. Remember to set the blend mode to overlay and then use a large, soft eraser brush to blend them in properly and get rid of any harsh edges.

Paste in a paper texture on a new layer below your floating island and above your background layers. Position it so that it takes up all of your image apart from the bottom where your main mountain image is, but be careful to have it overlap the tops of the mountains. Then set your layer’s blending mode to multiply, and with the mountain layer showing through, use the lasso tool to cut away the bottom of your paper texture where it overlaps the mountain tops. Then reduce your paper texture layer’s opacity to 50%.


Now paste in an image of a sunburst shape (see our latest PSDFAN freebie for the image download). Again, cut away the part of the image that overlaps the mountains. This time rather than bother with the lasso tool simply selection your paper texture layer and click where the mountains are positioned using the magic wand tool. Then revert back to your new sunburst layer and hit delete. Then go to the layer’s blending mode and change it to ‘color burn’. Reduce the layer’s opacity to 16%.


Now select the ‘grungy’ text from ‘man this is grungy’ and copy it. Create a new text layer above your mountain layer and paste in the copied text, changing it’s color to 0A375A. Then increase it’s size to 155pt – this should take up most of the width of your image. Rasterize the layer and position it so that the tops of some of the letters are above the top edge of the mountain.

To finish select the mountain using the magic wand technique shown previously, invert your selection and hit delete to cut off the tops of the letters. Reduce the text layer’s opacity to 10% and set it’s blending mode to ‘color burn’.

Tom is the founder of PSDFAN. He loves writing tutorials, learning more about design and interacting with the community. On a more interesting note he can also play guitar hero drunk with his teeth.


Do you know the basic tools in Photoshop but feel that your work is still looking average? Join our creative community at FanExtra and get the direction you need to take your work to the next level.


Cool post, fun result. Thanks for all your hard work on these tuts, I love the site.
Thanks Andrew Super fast comment by the way haha. I felt bad about not posting for a few days, but I’ve been going out of my mind trying to sort out my internet problems.
Great tutorial, I really like the post you keep putting out.
- John
Thanks for the tutorial.
love this one – my favorite so far.
nice to see this look done without vector clipart
Very nice, it would be great if you could include the link where you got the stock photos that you are using like PSDtuts does and maybe telling what font you used stuff like that. The more info the better! But great site!
John: Thanks, I hope that you’ll keep checking back and subscribe to the feed. Welcome to the PSDFAN community by the way
Twopo: No problem
Beets: Really glad you enjoyed this one. I’m not really into vector stuff so much so do like to find alternative ways of designing.
Nicole: Thanks for commenting also, I’m glad you’re enjoying the site. That’s a great point about the detail. For my future tuts I’ll definitely try to include links to photos and font’s used etc…
I hope you’ll all check back soon for my next tut!
Great tutorial but the only criticism:
it would be better if you gave the website names for the pics you used so we can get them wihle we make the pic.
Thanks Hannah. One of my other visitors suggested citing the photo sources, so I’ll definitely be sure to include that in future tutorials.
Nice tutorial man, I prefer it without mountains though, I’ve just added a texturized layer with low opacity intead.
Cheers Gav. I’d love to see your version if you want to post it
mine turned out slightly different but that’s ok, I like it! Thanks for the tut it’s great.
Nicole – you can get fonts for free at http://www.dafont.com and I found a few of this stock photos he used in this tutorial at a royalty free stock photo site the link is http://sxc.hu
Thanks again!
Thanks lacey, and thanks for the links. Nicole – I actually lost the original urls for the photos, but if you go to sxc.hu and search for ‘mountains’ ‘clouds’ etc… I’m sure you can find them.
Way too many useless layers. Also, I feel like your site is a poorly done ripoff of PSDtuts.com, and your tutorials are subpar.
Do you even have a design background? Or are you just copying every other tutorial you’ve seen out there?
josh if you think that you know better than any body on the site in the first place why didn’t you show to us what you got by exhibiting your skill and knowledge for us all to learn?
A little piece of advice and I think if you learn it, it will best help you.
Please learn how to speak no matter how a situation may arise
and also appreciate the efforts being put in place by others ok and please if you can praise somebody for a hard work done please don’t degrade them.
we all are friends and we learn from each other for survival as graphic designers.
Josh: I considered deleting your comment, but figured this isn’t the best way to run a site, as everyone is entitled to their opinion. Anyway, I didn’t feel that the layer’s were useless, it all adds to the final effect. If you don’t like my tutorials then feel free to read other sites, but I believe that it’s benefitial to read as many tut sites as possible to broaden your knowledge. And yes I have design background – 8 years designing websites for people to be specific. This tutorial is not a rip off of any that I’m aware of and I don’t rip off other tutorials on this site…
awesome and useful, thx
Thanks Frans
great tut. thank for the hard work.
Josh if you can do better then show us your skill.
I like to see.
Thanks Jack, I appreciate your support
One of the best tutorials you offer I’d say. Also, well done on the interview. Good luck.
Thanks a lot Matt, I hope that you’ll consider subscribing .
.
Thanks for the help, it was nice to get back into photoshop since I forgot some key steps!
Thanks for commenting Steve. I’m glad that the tutorial helped you out, and that you’re taking the time to get back into Photoshop
I’m fresh in here. The tutorial strengthens my thinking.
thanks. I like it.
Welcome to the community 2R, and thanks for commenting. I’m glad you liked the tut.
cool cool!
I’d like to comment on Josh’s post:
I have to say the layout of the site does remind a bit of PSDtuts. But that’s a good thing as PSDtut is a resource for high-quality tutorials and there can’t be enough websites like that out there.
I have been checking out so many tutorial websites and PSDtuts and Tom here do have the best tutorials. There is nothing worse than tutorials written in poor English, which are then hard to understand and follow.
So Josh, everyone obviously is entitled to criticism but why don’t you try to be a little more constructive in future?! Instead of just complaining about one thing or other, give suggestions on how to make it better.
Tom, I like your site (only found it two days ago). It is a pleasure reading tutorials here and it’s a source of inspiration and tips. So keep those interesting posts coming.
And before you say it again, I have already subscribed :p.
TwoFace: Thanks mate.
Stef: Thanks so much for the support. I’m really glad that you like the site so much. Comments like yours mean so much more than Josh’s, and I really hope you’ll stick around.
Awesome. I would like to know where you can get an texture like in step 6. It looks great man. i Have to have this
I used sxc.hu and searched ‘wood texture’.
Excellent tut – thanks! I doodled this conceptual CD cover (flickr link) based on it (in Inkscape and Gimp, for a bit of extra challenge.)
Dani that looks seriously cool! Thanks for commenting and trying out one of my tutorials. I’ll actually launching a Flickr group very soon so I hope that you’ll take the time to submit this piece to the group .
.
Hey, nice job with the site; I really like the creativity of this. The effects of the colors and the rising sun patterns used together really caught my eye and I loved the final result ^__^.
I’ll check this place out for more submissions considering I plan on becoming a website designer or developer as a future career.
Thanks for the inspiration =]
Thanks for commenting Zack. I’m glad you enjoyed this tut, and hope you’ll check out some of the others.
hey
great tutorial, man
just wondering…
how do you do a colour overlay in step 7?
thanks
ben
^_^
lol dw i worked it out!
hahahahahha
^_^
Sorry I didn’t get back to you soon enough Ben, I’m glad you figured it out though!
Here’s some constructive criticism, as I know you enjoy to hear it from people to learn and become better =].
The text inside the cloud and along the mountains with the word ‘grunge’ in them seems to me to…Push the effect in your face [for a lack of terms].
For instance, for our Comm. Tech. class, we had to pick a word from a list and portray it using Photoshop WITHOUT any words.
It just seemed to me that using the word ‘Grungy’ twice in the picture pushed it a little too far maybe?
And to finish up my criticism, here’s what I would’ve suggested =]:
I do like the text at the bottom along the mountain, so you could have left that in, but the text inside the island maybe could have been changed to something without the word ‘grunge/grungy’?
That’s just my thoughts on this tutorial anyways, but don’t get me wrong Tom, I absolutely love what you’re doing and all of the tutorials, including this one!
Thanks for the continued support Wolfie, you’re proving to be a great community member already. I really appreciate your constructive criticism, as it’s that kind of feedback that helps me try to improve my posts/designs here.
I’m always glad to support something that helps me out in return! And without a doubt, this great photoshop tutorial site has indeed helped me with my photoshopping skills.
When I finish your tutorials I’m more then glad to give some criticism on how I think they can be made better, or just to tell you good job and that the tutorial was as perfect as it gets!
really nice tut.. very easy to follow.. thanks a lot kuya..
make more..
-from philippines ^^
Hey Tom.
Ive’ been following your work for a while now, always wanted to leave a comment, haha. Your work is legendary! You are like a god to me! Thanks to you I am achieving awesome results, and I don’t need to rely on tutorials as much to achieve them. Although, I’ll always check up on your site!
Keep posting these awesome tuts man.
Very nice! =) I loved this. Here was my result…
Very awesome I like this one very lovely, thank you for sharing this one.
Noice tutorial!!
I’m totally psyched to try this one out!!
i am doing it for my computer graphics final. I should get an A on this. haha
Thanks so much for all the kind comments guys! I really appreciate the support.
Mr Wrenchy: Love the result, keep it up.
[...] Design a Grungy Floating Island: [...]
Thanks Tom for this sexy tutorial!
I have one question – can i finde your template at some pages like http://www.istockphoto.com/index.php
can i buy this template anywhere?
hi……..i am a beginner to photoshop……..i love the work u have done above….i am a fan of grunge works…can u please be little more detailed on the first two steps i.e. gettin the shapes around the rectangle
For beginners like me, this tut was easy to follow and fun!
(L)
[...] Massive $600 RSS Subscription ContestRetro Theme (Comment Giveaway)Design a Professional Laptop AdvertSuggest a TutorialDesign a Grungy Floating Island [...]
Referring to Josh:
I felt the same way at first in terms of it seeming very similar to PSDTuts, but then I realized that this layout is very standard but very elegant. It seems that PSDTuts and Tom both picked a similar layout, but honestly how many different layouts can you do?
He’s already got 10x the subscribers I do (although I don’t write many tutorials, it’s mainly a blog), and most of tutorials are actually quite good.
I was working on my design for theycreated.com and it ended up looking like the same layout this site and PSDtuts have…it’s just a common, well-formed structure.
*Before I get flamed, I am different Josh to the one above*
Anyhow, it’s another awesome tutorial and I love the final outcome. There are one of two things I’m not too keen on but generally very nice
I would love to make this with a more urban look on the outside
i also want it to say Alter ego in the middle
please help
Zach
Zacharygray.blogspot.com
zachman1234@aol.com
Nice! Personally I’d prefer to stop at step 10 though, feel that the design is at its strongest there, the additional steps kinda distracts from it.
Just my thoughts.
it looks very very nice…i could use free brushes instead of photos
This is Great site and Great tutiorials… Thanks for these tutorials.
P.S. What is wrong with the date of comments? all of them are on 23rd july 2008
Great tutorial, thanks, great site
hello
Great post!!!
you’re designs are great.. and i really like them.. this few days i’m searching for a websites and posters design and found yours and i think i can refer to you’re designs.. cool!
Excelent! Very nice!
I like the colors of the final result. Very nice tutorial, congrats. I’m also writing Photoshop tutorials and this one is a keeper for the inspiration bookmarks.
thanks
The final result yeahh!
i like the result
thank you for your share
i will try it
That was a great tutorial Tom and I also believe the layers were necessary for the overall effect. Josh was wrong about the psdtuts.com comment and your tutorials being subpar. I for one would love to see his tutorials. Seeing as he knows everything about Photoshop and all
Hello.This article was really fascinating, especially because I was searching for thoughts on this issue last Sunday.