
Have every post delivered to your inbox and get access to hundreds of useful design freebies.
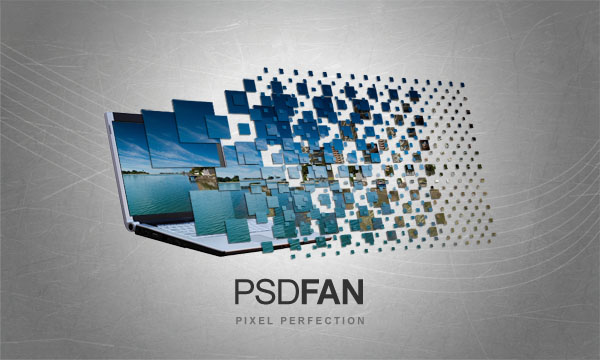
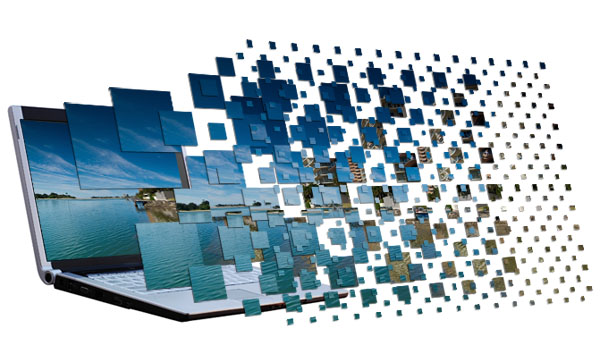
Here is the final image that we will be creating:
Open up a new document 1000px wide and 600px high. Then paste an image of a laptop into your document. Create a new layer set called ‘laptop’ and put the layer containing your laptop image into this layer set.
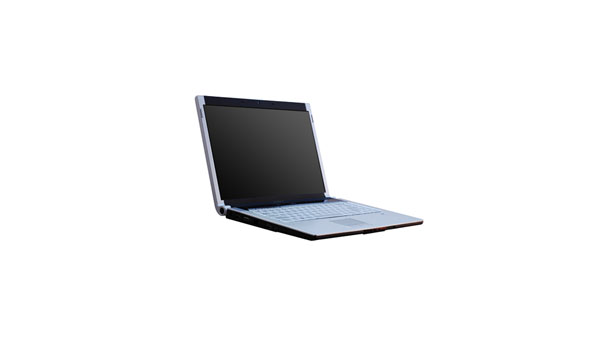
Now I want to create a vanishing point for the screen of the laptop. Many Photoshop users, including myself, don’t yet have Photoshop CS2 or CS3, so this tutorial won’t utilize the useful vanishing point filter available in these versions. Instead, we’re going to manually create a fake vanishing point.
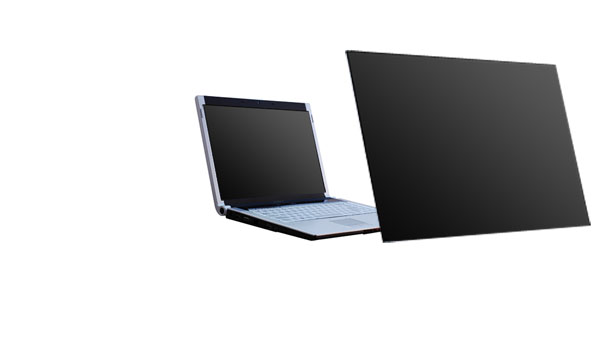
Select the screen part of your laptop using the lasso tool. Then copy your selection, create a new photoshop document, and paste in the selection. Go to image>image size and double whatever your image size is. In this case the original screen was 204px wide, so I simply doubled this to 408px.
Then paste this new larger screen back into your original document. Positioning it roughly where you think it looks good in terms of perspective.
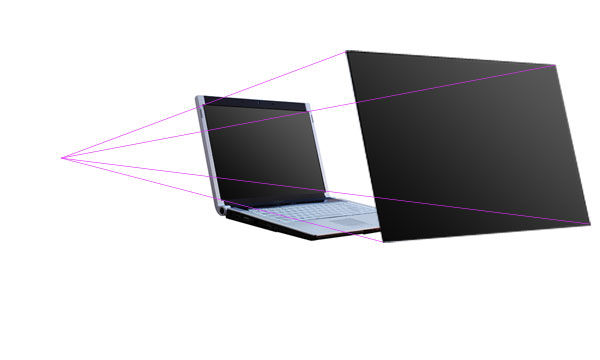
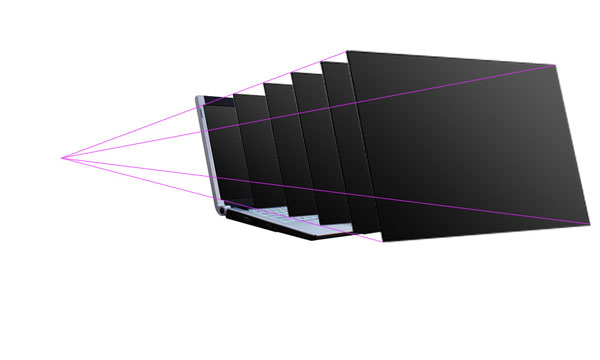
Now select your line tool and a nice bright color for it and draw lines each corner of your large screen through to the matching corner of the original screen and past to a vanishing point. Do this with each corner of the laptop screen, until you have something like the image below:
Now duplicate your larger laptop screen and select edit>free transform. Then in the menu near the top of your screen (see diagram below) change the W (width) and H (height) percentages from 100% to 90%.

Move this resized image so that it matches up with the perspective lines that you created earlier. Be sure to place this resized screen layer behind the largest screen layer but above your original laptop photo layer.
Repeat this process of duplicating/resizing/aligning using the resizing percentages of 80%, 70%, and 60% from your large screen layer. Remember that your original laptop photo is 50% of this large screen layer.
This is how your image should look after you have created this new screens and lined them up correctly:
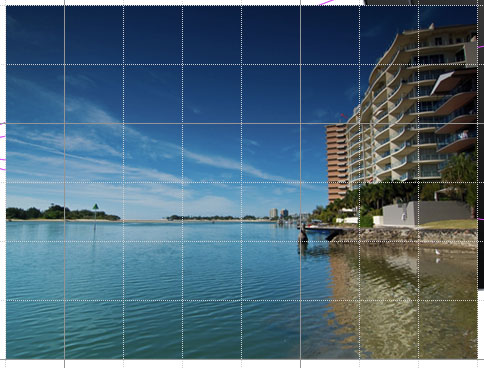
Now create a new layer set called ‘photo 1′. Paste in the image that you want to manipulate. View a grid over your image and then use the free transform tool to resize your photo to fit nicely into the grid squares. Make sure that the photo fits into an even number of grid squares for it’s height and width. In this example the photo is resized to be 8 grid squares wide and 6 high.
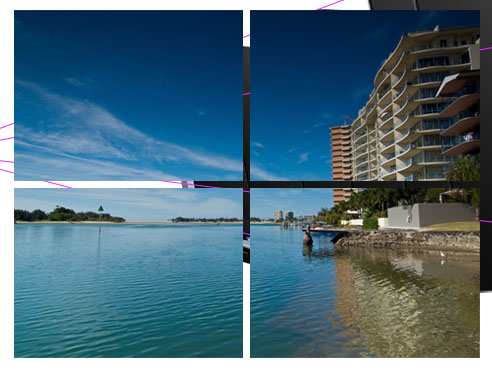
Now duplicate your photo layer, as you want to retain a copy. Be sure to hide the duplicate layer and go back to your original. Select your single column marquee tool from your selection palette (it’s under the Rectangle and Elliptical marquee tools). Using your grid click the grid line that marks the center point of your image and delete a central 1px column. Then switch to the single row marquee tool and do the same to delete a 1px line across the center of your image. You want these lines to be a little larger than 1px though, so grab your magic wand tool and click somewhere outside of your photo image. This will select all of the area surrounding the photo, but also the 1px lines cutting through it. Then go to select>modify>expand and expand the selection by 3px. Then hit delete to achieve an effect like the image below:
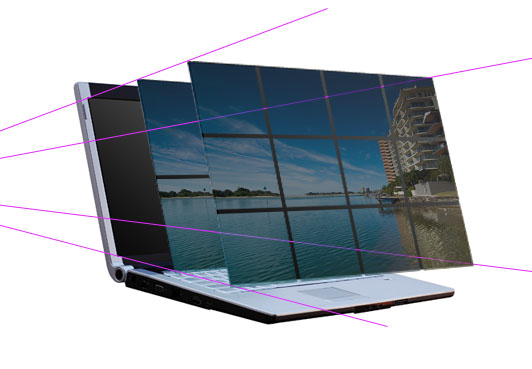
Now hide all of your duplicate laptop screens except the smallest one (the one that is 60% of the size of your largest). With your photo layer selected (the one you’ve just cut up using the grid) go to edit>transform>distort and distort the photo so that it fits exactly over this smallest laptop screen image. To fit it well you make need to reduce the layer’s opacity to allow the screen underneath to show though. The image below shows the transformed photo layer at 57% opacity, allowing some of the screen underneath to show through. Be sure to move this photo layer below the next largest laptop screen layer, so that it is mostly covered by it.

Now go back to your original photo layer. Duplicate it again, and using the same technique as before with the single row/column marquee tools cut it into 2X2 squares using the grid. As the image is 8 squares wide and 6 high, this will result in 12 squares each 4 grid squares in size. Again, use your magic wand tool to select the area around the photo and the lines cutting through it, then expand your selection by 3px and hit delete. Then use the distort transform tool to fit your new image to the 2nd smallest laptop screen. Remember again to move this photo layer behind the next largest laptop screen layer. The image below shows the result of this, with the photo layer again at 57% to allow me to nicely fit it to the screen image beneath.
Now repeat these steps, but make your squares half the size each time. So using the grid that will then be 1X1, 1/2X1/2, 1/4X1/4. To cut the photo into 1/2 and 1/4 grid square pieces I would recommend just using your judgement, but if you want to be really picky you can use rulers. Another tip is to duplicate the photo after cutting it into the squares, as this will save you having to repeat the slicing process right from the start each time.
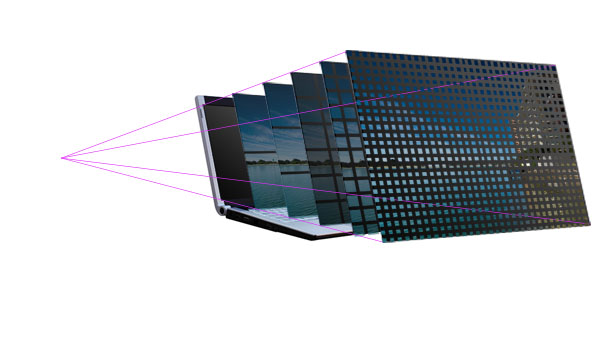
Here is the same image but with all duplicate laptop screen image layers hidden and all photo layer’s with 100% opacity.
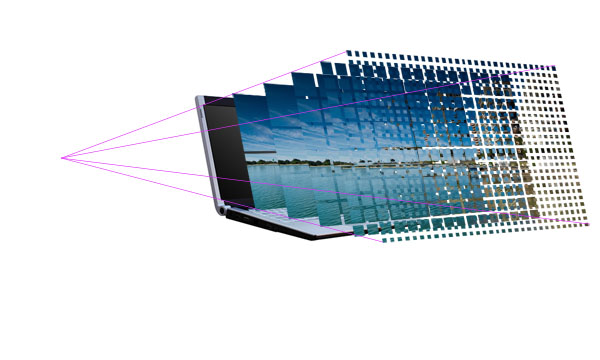
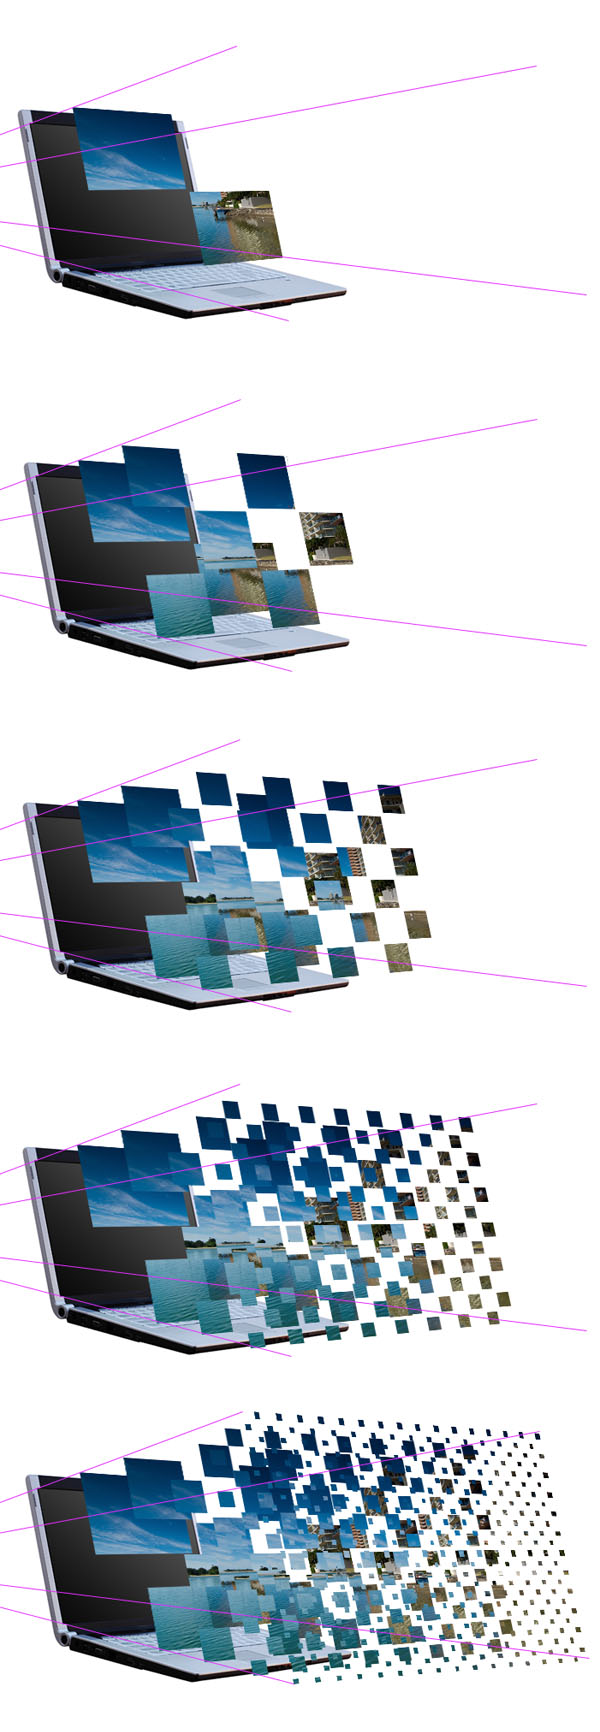
Now is the time-consuming part. Hide all of your photo layers except for your smallest photo layer. Use your magic wand tool set at 255 tolerance to select entire squares and delete them to leave a checkerboard effect. To do this simply go down each column deleting squares, being sure to leave a square remaining between each two that you delete. Then move onto the next column and repeat, but make sure that no squares you delete are next to an already deleted square, deleted squares should be diagonal to each other. The image below shows the various stages of doing this with each photo layer:
You should still have your original photo layer, as it was duplicated for safe keeping near the start of the tutorial. Duplicate the layer again, and move it so that it is the first layer above your laptop image layer. Then go to edit>transform>distort and fit the photo nicely over the laptop screen. Then hide all of your vanishing point guidelines and make sure that all of your checkerboard photo layers are visible. Seeing as all these layers are within the same layer set select the layer set and drag it to make the graphic more central in your document.
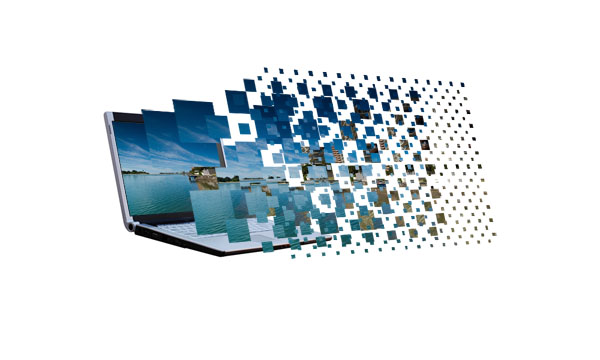
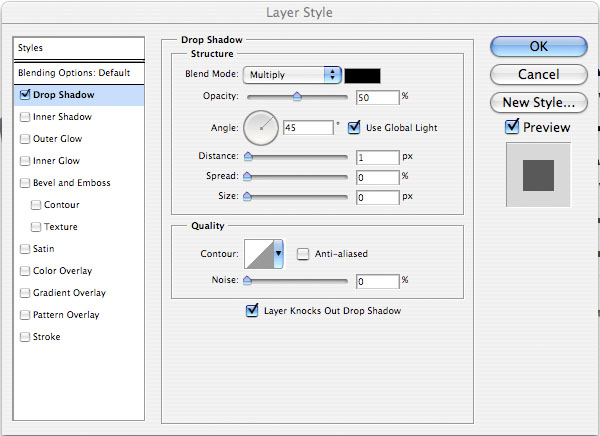
Right click on one of your photo squares layers and click blending options. Apply the drop shadow settings shown below. Then once this has been applied right click on the drop shadow shown in your layers palette, select ‘copy layer style’ and paste the layer style to all of your other photo squares layers. The outcome is shown below:
Now create a new layer set below your laptop/photos layer set called ‘background’. Hide your laptop/photos layer set. Create a new layer and fill it with a white to light gray radial blur.

Paste a metal texture onto a new layer above your radial gradient layer and reduce it’s opacity to 20% for a subtle textured effect.
Now create some bendy lines across your background using the pen tool. Be sure to have a white 1px brush selected and then once you have created your bendy pen line right click on it and select ‘stroke path’. Then simply duplicate your line layer until you have multiple white lines across your background. I merged all of my line layers together and reduced the merged layer opacity to 30% for a more subtle effect.
To finish things off I added some cool text. Click the image below if you want the full sized version.
Tom is the founder of PSDFAN. He loves writing tutorials, learning more about design and interacting with the community. On a more interesting note he can also play guitar hero drunk with his teeth.
Do you know the basic tools in Photoshop but feel that your work is still looking average? Join our creative community at FanExtra and get the direction you need to take your work to the next level.
And then reused in the photo. The photo surprised me in so many ways. Now some of you probably know this but I’ll give you this resized image about a grid.
Sorry Donavan I’m not sure I understand you?
this site rocks . Thanks a bunch i will be trying this in a few minutes
Thanks a lot twopo! I’m going to working as hard as I possible can to bring you guys the best tutorials!
Nice tutorial Tom also shared this tut on my website
Oh btw, please feel free to post any outcomes in the comments, I would love to see how people are using my tutorials.
Nice one! Keep it up!
Thanks man. I’m glad you enjoyed it
This looks awesome, I’m going to be giving it a try tomorrow
Look forward to future tuts
Any chance you can explain part 6 in more detail, I don’t quite get it?
Thanks Glen, I’m glad that you enjoyed it . For part 6 what you’re doing is basically cutting a 1px line down the middle of your image, and then a 1px line across the middle of your image. To do this just use the grid as a guide and use the single row/column marquee tool to make your selections for the 1px lines. Then because I wanted a larger gap between the 4 resulting sections of my image I just clicked somewhere on the background and expanded me selection by 3px. Because the 1px lines cutting through my image were selected these were also expanded by 3px, so when I hit delete it cut away a few more pixels of my photo. Let me know if this helps
Looks very professional
wow…
Thanks guys
Nice and practical, I liked this one!
Thanks Alvaro!
This is truely amazing! Creativity at its strongest!
Thanks Shane, I’m glad to see you checking the site out
that was awsome! thumbs up to u =] i think i did something stupid i was just rubbering out the squares instead ><
Thanks David. You can erase the squares, that’s fine. I would love to see your outcome by the way!
Do you have a good resolution of the laptop to download, to work on the tutorial?
Thanks
Simply Awesome
Buzlink: I’ve tracked the image down for you, and will be sure to post all image urls in the future! http://www.sxc.hu/photo/964755
Imsraaia: Thanks!
gr8 tutorial Tom Thanx 4 sharing!
No problem Raj!
that is sick man off the hook. thanks so much man. keep up the good work mate!
Thanks Wildcard! I’m glad you enjoyed it
excellent, I try it tonight.
Awesome! I really hope that you’ll post the outcome here
didn’t understand
hi Sumit. Sorry to hear that you didn’t understand the tutorial. I’d be happy to explain anything further, and I’m always keen to know how to improve my tutorials/writing.
[IMG]http://i337.photobucket.com/albums/n383/rysmasness/RCD.jpg[/IMG]
Thanks!
<img src=”http://i337.photobucket.com/albums/n383/rysmasness/RCD.jpg”
third time’s the charm, right?
Hey there. I don’t understand the grid part. Where do I get the grid from?
Please reply ASAP, really want to get this done
Thanks.
Dyl.
Ok I figured out the grid problem.
When I set the Magic Wand tolerance to 255 and select a square, sometimes it selects a few…
What can I do?
Rys: Great work man! I always love to see how people use my tutorials.
Dylan: Sorry for the delayed response, my internets been completely down. I got the grid initially from view>show grid and then used these guidlines to cut my grid out on the photo. For the magic wand technique I would lower your tolerance, this will select less data. I would try using around 50. Let me know if this works out for you.
its nice.. thank you.
No problem I’m glad that you enjoyed it.
Very, Very Goog…
its bit odd to ask, but i really would love to get this effect, so if you have some time could you please please make a action script out of this tutorial. it would really really help me…
I tried but did not succeed.
Thanks Leandro
Sumit: Sorry but I’m not actually familiar with Action Script. Good luck with your project though.
thanks though..
No problem
Good Tutorial,learned something, Nice outcome …..
Thanks. I’m glad you found it helpful
damn its soooooo kooollll, rock and roll,bro
Thanks Karlo!
Awesome work Tom,grats!
The only part i didnt understand is 6-7. From where i should choose this GRID option?
P.S. – i`m with PC2
Thank you!
Ops,i just got what u mean Ctrl + ‘
thanks again ,great job
Nice tut, just finished version. Will be using it as a mailshot promotion. I think this is a technique you won’t forget in a hurry. Thank you
@ Zero
Your Grid option is in your Preferences
Thanks n_faiths and Zero. N_faiths: would you mind showing off your end result? Thanks for helping out Zero.
Hey Tom, hope you like?
I followed up to Step13, I never added the background (reason stated in my comment). Hope I have done you proud.
It’s my first upload on my Flickr page so I’m happy with it. Lemme know what you think.
http://www.flickr.com/photos/23795288@N07/2821722617/
Keep them coming mate.
I also have to say how nice it is that you make a point of replying to everyone who posts, and even apologize when you give a late response. A true gent, and a professional. Thanks again
Damn, looks like I need to set up a Flickr account to be able to view it. I should be doing this for the PSDFAN Flickr group tomorrow or Thursday latest though, so I’ll def have a look then. Thanks for the kind words and support, it’s great to hear
Great result ! It seems creativity play about 80% of this project, while 10% is patience+skill and 10% is software due to not many fancy filters and tools used ..
awesome !
here’s a link to the actual photo used.
http://www.sxc.hu/browse.phtml?f=download&id=964755
I’m glad that you enjoyed it Andinobita!
Youneeq: Thanks a lot for finding the original photo
I think your tutorial was soo amazing but soo dificult too for me.
Keep working hard tom…

Thanks amrina. Let me know if I can explain anything further to you – otherwise my last couple of tutorials may be at a more basic level for you
i cant even close this site anymore…. thanks alot. rili rocks
Hi Ive tried this tutorial and got stuck at the magic wand 255 tolerance part and like how do I select indivudual box? If I rpess delete the whole image is deleted remailing the selection dotted lines I am confused and hope u can help cause this is really an awesome work and I want to master it. I know another way i can use the polygon and select one by one but it will take forever so would really appreaciate if u can reply tom thanks
Classy! Very well done.
hi!
TOM! you are the greatest!
man am i trilled about this tut u posted
will try it out ASAP and the post the result (hoping that it comes out fine!
keep up the good work brother you’ll go places. ciao
Thanks everyone!
[...] Design a Professional Laptop Advert: [...]
Gonna definitely try this one. Great idea and kickass tutorial.
Thanks Sneha, feel free to share your final result here when you’re done.
nice any techy work
nice but too tough
Thanks lmran, I’d be happy to help if you have any specific problems.
Great Practice! Sorry, my english writing is too bad! But I very like this lesson. Thank you! I respect your technique!
I haven’t seen this problem from anyone else, however, I AM using CS3 and I’m a new user so step by step is important to me.
I managed to recreate the layers using vantage point by your method but the “lines” don’t go away. When you get to the part about pasting the photo in, it re-selects the vantage point lines to transform instead of the photo.
I saw Cs3 has the vantage filter but don’t know how to use it for this tutorial.
Is it possible for you to download a trial version of CS3 or 4 to better explain this step?
ok, figured that part out, but like Tony asked, step 11 doesn’t work. Using the magic wand and clicking on the squares, selects ALL the layer. How do you select just 1?
Cool tutorial…. Nice concept and great work
Hi tom…,this is really brilliant work,I tried it out and came out with a good work..thanx dude
Sorry my english. Pretty good tutorial with unique techniques! What more can i say, simply professional. Wonderful taste of art. Please check out what i came out with: [http://img444.imageshack.us/img444/7465/suredesignyn5.jpg] Keep up the good work!
Keep it out dude?..really great tutorial,i hope that u can give more tips in the future’s…Thanks a lot
Great tutorial…very cool
nice tutorial.
It’s very nice lesson. I like it so much. Can u help me, how can I get the high-rest metal texture on this tutorials? Thank you so much ..
* I’m sorry for my bad english ^^
There are many sites that offer free textures. I usually grab on from sxc.hu
Thanks
this is wicked but very time consuming
Hey, Thanks for the inspiration! Erasing the grid was a bitch though..
This is what I came up with after following this tut: http://mark.poppen.ca/247/professional-laptop-ad/
Really awesome end design! I love it. I like the idea of you doing a daily tutorial also, I hope some of my others here can help you with that.
A really stunning 3d result. these tutorials are invaluable for me in keeping up with what is out there!
Thanks, I’m glad you liked it.
You have a great blog here and it is Nice to read some well written posts that have some relevancy…keep up the good work
can any one provide us with
psd file???
plz
Abdul: You can find the psd file in the members area. It’s just $4.95 for access to files for every tutorial at PSDFAN.
good
Hi – great tutorial
I’m using CS4 on vista and found the magic wand selection a night mare! But I found that using the rectangle selection tool to remove the squares whilst the image bigger! Anyway, here is my attempt – not as perfect as yours, just an interpretation!
http://tinypic.com/r/244eagy/5
Really nice Linda! I love how you’ve adapted it to your own personal style, but kept all the energy of the exploding laptop screen.
[...] Design a Professional Laptop Advert [...]
how can i select my line tool (STEP 3)
i really happy to implement my skill after go through these tutorials, i really thanks to you admin…
Vidiya
very good!!!!
can anyone help me i duplicated the big screen but when i try to allign them against the lines the 90% screen appears on top of the 100% screen can anyone help me about that part
Wow! that’s great tutorial!! very nice!!
step 11 method really does not work well. setting the tolerance of magic wand tool to maxium only selects the entire image, not the divided sections
hi I saw this stuff with my sis and loved it I’ll like to join your forum aw do I go about it
It’s amazing took time looking for a tutorial like this, thanks
THanks Yar..I am fully enjoy it…
Hello this is very nice tutorial! I’ll bookmarked your blog! thank you very much!
this, very thank you..
Your site full professional and very beautiful…
i don;t understand what it is “Select the screen part of your laptop using the lasso tool. Then copy your selection, create a new photoshop document, and paste in the selection. Go to image>image size and double whatever your image size is. In this case the original screen was 204px wide, so I simply doubled this to 408px.” i had tried it but nothing happening. can you make a video for us to make little easier?
thanks
Hi- I like your site much. This is useful website for me
regards
great job !
wow, i’d love this style, learning it can to do an excellent plane advertisement
Hi, Tom ,you really made great work here and all over tuts , but I can see no piont to use vanishing point however it’s fake or true , it give me same results (as I see) with selection and transformation
wow awesome final image!
This looks awesome, I’m going to be giving it a try tomorrow. Really great. Thanks
Hi, Tom.
Let you know I’m deaf but had still problem with my english but I can understand of your explaining. I hope you understand my English because I had many missing words to add up in scene.
However, I’m not sure how to using on “step 5″. Can you please explain some really easy for me to following of your step 5. Step 1 to 4 is an excellent explaining as I followed your tutorial.
you should record it or make a video of this tutorial.
email me, Dr.Hitman@hotmail.co.uk with your explaining by Step 5.
thanks
Great tutorial!
just toooo gooood. You are a genious man.
You mention you did this without vanishing point, how would you do it with vanashing point filter?
amazing, great tutorial…i cant find it in other
it’s awesome tutorial bro… thanks to publish it
This is awesome work i love it….
i normally use to search tutorials only in http://www.tutoreffic.com (Ma friends website)
by
Jayaram
Thanks for share it. Nice work,
awesome!
Great tutor. Thanks.
i’m sorry apple, i’m happy for you and imma let you finish, but tom has the best laptop ad of all time!
hey dis s really nice…vry creative concept
Great tutorial!
hi tom i find this tutorial so simple and amazing it incredible…i love it…i will try it out and tell you how it went for me …thanks!!!
..AWESOME ..!!
great tutorial.. thanks for sharing
this is AAAAAMMMAZING! fabulous tutorial and outstanding effect!!
it’s awesome tutorial bro… thanks to publish it
nice tutorial..amazing!!
thanks..
i guess u cant get more detailed explanations anywhere.. Wonderful tutorial for everyone Ty!
In the last photo I love the way you restore the texture to the background, it is excellent!
Awesome tutorial thank you
When you look at the final image, you think it would be very difficult to reproduce. But when you take the time to read the steps, you realize it is not that hard.
Very nice!
hello, you okay?
I’m with a doubt, in step 5
“Step 5:
Now create a new layer set called “picture 1″. Paste the image you want to handle. View a grid over the image and use the Free Transform tool to resize your picture to fit perfectly into small squares. Make sure the photo fits into the same number of boxes for your height and width. In this example, the picture is resized to be 8 squares wide and six high. ”
I can not find in my photoshop cs, this tool make the photo checkered, you would like me to explain how I do it?
stuck in step six..can you please tell me that or mail me please!!!btw wonderful work!!
this is really n time consuming too ,but who cares when the result is so good n you learn something as well,thnx a lot.
wow some great stuff thanks for the share
Some great work here, thank you for this tutorial, I’ve only recently started my own photo restoration service and am always on the look out for best practice, hints, tips, tutorials & techniques.
oh, i love it, and i applied in my pub projet to amazing the others
really nice tutorial. thank you very much..
Hi, superb technique. Thanks for the real in-depth tutorial.
My heart goes to does who loves to teach!
hey man that’s a great job and i am really proud of your passion towards creation you have top skill, Keep it up, And thank you a lot for your tutorial, coz i have learnt a lot by surfing in your site, il recommended all of friend who have interest in photoshop to visit your site once but the got more than then their expectation, thank you a lot,
Fantastic tutorial, Thanks for sharing your techniques and tips, great result, Thanks!
simply fantastic
Such a brilliant tutorial on how to produce a laptop advert, and really love the final outcome, Thank you for sharing this tutorial!
It could look better in flash with some animation on it when someone is with the mouse over, but it looks cool even like this.
I love your tuts I really do, but I find them hard to follow this one was hard to follow being new to InDesign, and well photo shop(though I can understand photo shop a lot better. )I find it hard to follow, example, when you said put your photo in a grid, well I don’t know how to do that, exactly, and then you really do not let us know if we are suppose to be in indesign or photoshop. So I find it confusing a little, I had to give up this tut, because I could not find exactly how to put the picture into a grid and to resize or whatever to it. I hope your future tuts will give exact instructions so that we who are still trying to learn even the basic of indesign can do this as well.
Like I said love the tuts just wish there was more detail where how to do the steps to get where we need to go so we can finish a project your showing. Thanks for doing these none the less.
Thanks a lot, excellete creativity, I would like to learn lot more about your techniques
This tutorial is pretty interesting yet helpful. I find it very professionally written and well explained. The step by step guide is none the less. Thanks for these instructions.
Nice job..
excelente tutorial………..
Hey Tom it was really nice work,
keep posting.
Thanks
whoa! this simply creativity……. it is nice…..
awes0me tutz.. nice imaginati0n.. thankz..
very helpful and informative.. thankz
So cool!! But I’m not sure understand language ( I’m not good in English
  (
(
Very nice tutorial work knowing.
Fine tutorials…Mr.Tom
I am having problems with step 6 it wont let me delete. HELP!
Interesting article, very impressed with website, easy to follow tutorial.
What a great concept. What inspired you to come up with this idea?
Thanks Trisha! It’s been so long since I wrote this original post that it’s hard to remember, but I think the idea literally just popped into my head one day .
.
Great tutorial, while I was scrolling the page and reading the tutorial it became more and more awesome for me.
great resource shared thanks
Thanks for the tip, I normally have to rely on I-stock photo for these sorts of images, but with these tips I can now have a stab at doing it myself. Many thanks Tom
Thanks a lot. I learned few things from this tutorial and also made to make my own work
http://imageshack.us/f/6/intentio.jpg/
I’m beginner at photoshop

Thank you
Really great outcome Zlaja! Nice job .
.
HI.
the step 11, i can’t select entire squares by magic wand tool..help me
Good morning to you. Many thanks for sharing this excellent posting. There is no doubt that your site is a valuable resource for many. Keep up the great work.
Brilliant!
Million thanks to you, it’s so awesome i like it so much.
I don’t have photoshop but was able to do it with gimp
nice tutorial
Great post. Thanks for the nice read
wooo good tutorial
You could certainly see your enthusiasm in the work you write. The arena hopes for even more passionate writers like you who aren’t afraid to say how they believe. Always follow your heart.
this is really cool.
Thanks for tutorial, it is very useful for beginners like us.
It´s great!! Thank you fot that!!
hey this is a cool effect! thank you for sharing, I will definitely follow your tutorial
Hey buddy cool na…. xpect more frm U n will follow U, Tnx.
very nice
hey tom i would like you to make some video tutorials instead. because the written tutorials are more time consuming so everyone cant read them easily who really wanna learn something special !!! so if you don’t mind i guess you can take my suggestions. it would also help you to increase your reputation in the world of art. !!! Thumbs up
Hi Ismail. Thanks for the suggestion. It’s a really good idea and something we’re looking closely at. However, they take quite a bit of time to get organized, so it’s something I want to spend enough time planning.
The only part i didnt understand is 6-7,can you explain how to do that? sorry my english very bad
Hi yan the step 6-7 are easy just have to use grid and then select centre point and by using single column marquee tool select and single row marquee tool and then expand the selection direct by go through select<modify<expand by 3px and hit delete.
it is easy way rather to use magic wand tool….
hope u understand.. thanks
hey it is great tutorial. Tom thanks for tuts and I have done this tutorial and I get exact result as yours.
I have learn new tips from this tuts soo thank you for this………..
Nice, I am trying follow this tutorial. Thanks for share it.
Very professional. clean and simple design and very easy steps.
Crazy Tutorial Tom. i like it. thnx for share us. i learn some technique frm this tutorial. so all the best n god bless all of us.
Nice Tutorial for designing
nice tutorial…
can u provide me tutorial video ??
so nice plz tut for user interface (UI)!