
 Create a Geometric Maze Design in Photoshop
 Design a Modern Portfolio Layout
 Design a Print Ready, Graph Inspired Brochure in Photoshop
Have every post delivered to your inbox and get access to hundreds of useful design freebies.
As part of our FanExtra Network launch, we will be publishing one tutorial every day for our launch week. We hope that you enjoy them.
You can also sign up for your FanExtra membership for just $1 for the first month (offer ends Friday 22nd, October). This will give you access to our hundreds of tutorial source files, members only tutorials, hundreds of textures/vectors/icons, and great design discounts! Sign Up Today.
FanExtra Launch Week:
DAY 1:
FanExtra Network Launch
Create a Google Docs Icon
DAY 2:
30 Minute Redesign – GymDJ
Master a Professional Photo-Retouching Workflow
DAY 3:
Design a Textured Portfolio Website
DAY 4:
Members Area Tutorial: Digital Painting Lesson: Scarecrow’s Joyride
DAY 5:
Create a Stylized Photo Montage From Scratch
DAY 6:
Design a Grungy Rock & Roll Gig Poster
DAY 7
Design an Awesome Paint Splattered Dancer
As always, this is the final image that we’ll be creating:

Create a new document (600X700px).
Paste in this photo of a stone wall. Call this layer ‘stone texture’.

Now apply a gradient map adjustment layer, (gradient ranging from 000000 to 0e0e0e). Change this layer’s blend mode to ‘multiply’.

Create a new layer called ‘highlights’.
Select your radial gradient tool, (ranging from white to transparent). Create a series of radial gradients over your brick wall. Then change this layer’s blend mode to ‘overlay’.


Paste in this image of a dancer. Call this layer ‘dancer’.
Resize/position it to be central in your canvas:

Now with your ‘dancer’ layer selected go to layer>layer mask>reveal all.
Select the background elements of your dancer photo, and then fill them with black. This area filled with black will mask off your background, revealing the stone texture underneath it.
Go in with a soft black paintbrush in order to touch up the edges of your dancer where necessary.

Now with your layer mask selected, use a soft, black paintbrush (30% opacity) to paint over areas that you want to make less prominent. I used this technique to fade out the hands of your dancer, as well as her bottom foot and the sides of her legs.
Also reduce this layer’s opacity to 80%.

Now apply some adjustment layers, being sure to apply clipping mask to each adjustment layer, so that it only effects the dancer layer beneath it.
Here are the settings for each adjustment layer:
Hue/Saturation Adjustment Layer
Hue: 0
Saturation: -80
Lightness: 0
Levels Adjustment Layer
46 / 0.65 / 255.


Create a new layer called ‘dodge/burn’. Go to edit>fill and fill your canvas with 50% gray. Then change your layer’s blend mode to ‘overlay’. Use a black paintbrush (15% opacity) to paint in the shadows of your image. Use a white paintbrush (15% opacity) to paint in the highlights. The 50% gray element of your layer means that your brush strokes will act as a dodge/burn effect.
The images below show your 50% gray layer at ‘normal’ blending mode, and then ‘overlay’ blending mode.


Download this 3D Paint Splatter Set.
Paste your first paint splatter into your image. You will see that the splatter image has a black background. To make this background see through, just change your layer blend mode to ‘screen’.


Now resize and rotate your splatter image using your edit>transform tools, and make sure that it fits the contours of your dancers body:

Now apply a couple of adjustment layers (remember to apply a clipping mask, so it only effects your paint splatter object).
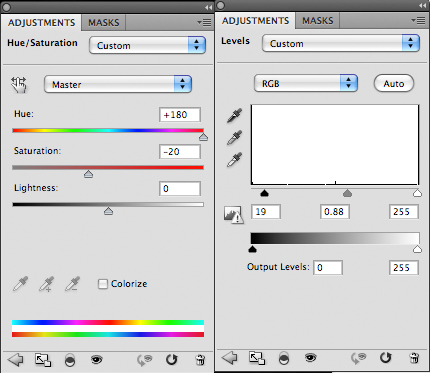
Hue/Saturation Adjustment Layer
Hue: +180
Saturation: -20
Lightness: 0
Levels Adjustment Layer
19 / 0.88 / 255

Now apply adjustment layers and clipping masks to each paint splatter until they have a cohesive color-scheme:

Apply another dodge/burn layer, this time blending your paint splatters with your main image:


Now apply a final adjustment layer (gradient overlay), ranging from 290a59 to ff7c00.
Reduce this layer’s opacity to 20%.

You can view the final outcome below. I hope that you enjoyed this tutorial and would love to hear your feedback on the techniques and outcome:

Tom is the founder of PSDFAN. He loves writing tutorials, learning more about design and interacting with the community. On a more interesting note he can also play guitar hero drunk with his teeth.


Do you know the basic tools in Photoshop but feel that your work is still looking average? Join our creative community at FanExtra and get the direction you need to take your work to the next level.


thank u very much >>>>>>>> very nice
Very nice tutorail of photoshop,looking forward for more edits!
Awesome! I couldn’t get the paint to look quite as crisp across the white dress, but it still looks great. Thanks so much!
Nice tutorial
Brilliant tutorial of photoshop! Keep up the good work.