 Members Area Tutorial: Design a Vector Thermometer Using Photoshop’s Non Destructive Tools
 How to Create a Stopwatch Illustration in Photoshop
 Construct a Novel Victorian Theatre Setting
Have every post delivered to your inbox and get access to hundreds of useful design freebies.
Today we’re going to learn how to create a super creative collage effect, using a range of photo manipulation, blending and compositional techniques. You’ll learn how to correctly extract your images, layer up various effects to create a sense of depth and detail, and create a cool sketchy hand-drawn effect for your photos.
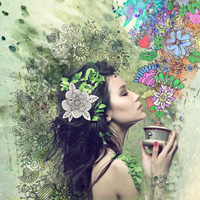
As always, this is the final image we’ll be creating:

Create a new file with a width of 1500px and a height of 2000 px at 100 dpi (Dots per Inch). Background Contents should be White.

To start off we’ll use various textures to create a subtle distress background. First, add a group folder called “Texture”, then open “1.jpg” from these colored grunge textures . Place this within the folder, then hit Command/Ctrl + T and resize to cover the canvas. Name the layer “Texture 1″.

Reduce opacity to “30%”

Now add “8.jpg” as a new layer within the same folder, then hit Command/Ctrl + T and resize to cover the canvas and name it “Texture 2″.

Change the Blend Mode to Overlay and lower its Opacity to 65%.

Place “2.jpg” from the “source” folder as a new layer within the same folder. Resize and label it “Texture 3″.

Change the layer mode to “hard light” and reduce opacity to “45%”.:

First off, let’s open the girl stock iii-Dxlogic in Photoshop. We will be using the girl from this stock image so we will need to transfer it to our main canvas.

Switch to your Channels tab and cycle through each channel in turn to determine which holds the most contrast – in this case it’s the Green. Drag its thumbnail over the Create new channel icon at the foot of the palette to duplicate it:

Now hit Command/Ctrl + L to access the Levels dialogue box and set the Input sliders as shown. Don’t sweat over the remaining background detail :

Now again hit Command/Ctrl + L to access the Levels dialogue box and set the Input sliders as shown.

Now activate Brush tool (B) choose black as foreground color and paint oner the remaning area :
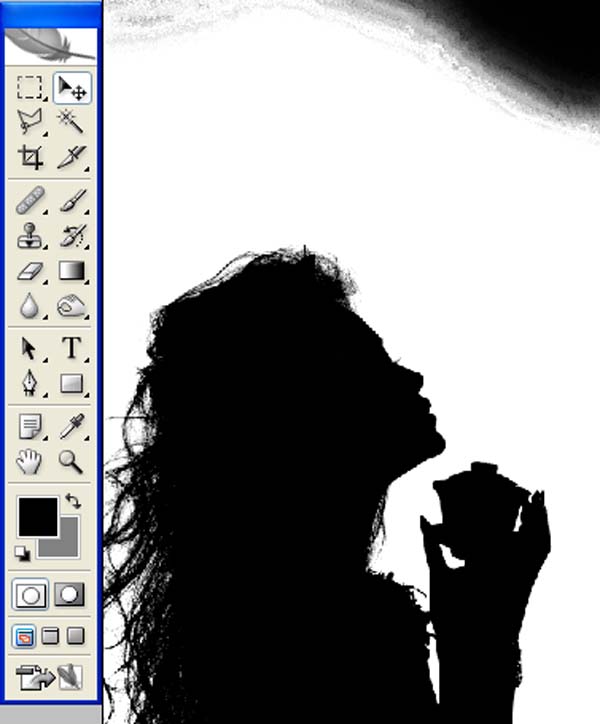
Now load channel as selection:

Now first invert selection(shift+ctrl+i) now then activate vector mask .

Activate any selection tool, then hit the Refine Edge button in the options bar.
In the next window choose On Layers (L) from the View drop-down menu, then check the Smart Radius button and set the Radius field to 2.5 px. Now activate the Decontaminate Colors option and set the Amount value to 68% and hit OK.

When the Refine Edge command has finished you’ll notice an additional masked layer has appeared and the visibility of the original layer switched off. You can now drag the mask into the trash icon at the foot of the palette and click the Apply button on the following dialogue box:

Drag the girl onto your working file and the result should be similar to this:

Now activate the rectungular marquee tool (m) and make a selction around the bottom of the girl.

Now hit Ctrl+t to activate transform tool and drag the encircled square in the red arrow’s direction.

Add a vector mask to girl layer.

Now, activate the Brush tool (B) and open the brush set “15 grunge ps brushes” by Sarytah. To load them, simply, right click on our canvas through any layer and then click on the drop-down button as shown below:

This will prompt the contextual menu to pop up and once you see that, just click on Load Brushes.

You will now be prompted to this directory: Adobe Photoshop > Presets > Brushes so make sure that you have put the brushes within this folder. Now locate the brush set and click OK. Right click on the canvas again using your Brush tool (B) and now you’ll notice that you have lightning brushes. Now, let’s choose a brush and start painting over the girl’s bottom part. See as below:

The result should be similar to this:

Now,let’s open the WaterColor 33 in Photoshop. We will be using the texture from this stock image so we will need to transfer it to our main canvas.

Click the WaterColor 33 and press V to activate the Move Tool. Left-click the image and drag the image to the main canvas and change layer name to “Texture 1″.

Now change the layer mode to “Multiply” :

Now Again choose a brush and activate vector mask and start painting around the texture. See as below:

The result should be similar to this:

Now create new Color balance adjustment layer from the bottom of layers palette. Press Alt+left click in between 2 layer’s (Texture 1 layer and Color balance) to make a mask.
When the Color Balance box opens, input the following:

The result should be similar to this:

Now,let’s open the Blue diamond 2 in Photoshop. We will be using the Dimond from this stock image so we will need to transfer it to our main canvas.

Activate magic wend tool click on the white part of canvas then invert the selection (ctrl+shift+i) then move dimond to the main canvas.

Next, activate the Transform tool (Ctrl/Cmd +T), then while the “Dimond” layer is selected and then resize it as shown below:

Now let’s work on it’s shadow so activate a new layer and name it “Shadow”.Then make a selection below dimond and fill it with black color.

Then goto Filter > Blur > Gaussian blur.When the Gaussian blur box opens, input the following:

Reduce opacity to 85%.

The result should be similar to this:

Now let’s Draw some abstract shapes so activate a new layer and name it “Blue shapes” then activate pen tool and draw some random shapes then activate gradient tool and fill gradient colors in our shapes.

activate a new layer and name it “Pink shapes” then activate pen tool and draw some random shapes then activate gradient tool and fill gradient colors in our shapes.

activate a new layer and name it “Yellow shapes” then activate pen tool and draw some random shapes then activate gradient tool and fill gradient colors in our shapes.Reduce the opacity to 65%.

activate a new layer and name it “Orange shapes” then activate pen tool and draw some random shapes then activate gradient tool and fill gradient colors in our shapes.

The result should be similar to this:

Now get back to girl layer and create new Curves adjustment layer from the bottom of layers palette .
When the Curves box opens, input the following:

Press Alt+left click in between 2 layer’s (Girl layer and Curves) to make a mask.

The result should be similar to this:

Now again create new Curves adjustment layer from the bottom of layers palette.Press Alt+left click in between 2 layer’s (Girl layer and Curves) to make a mask.
When the Curves box opens, input the following:

The result should be similar to this:

Now create a new Hue/saturation adjustment layer from the bottom of layers palette.Press Alt+left click in between 2 layer’s (Girl layer and Hue/saturation) to make a mask.
When the Hue/saturation box opens, input the following:

The result should be similar to this:

Now Let’s do some color adjustment with the Diamond. Now create new Curves adjustment layer from the bottom of layers palette. Press Alt+left click in between 2 layer’s (Girl layer and Curves) to make a mask.
When the Curves box opens, input the following:

The result should be similar to this:

Now,let’s open the Vector Line Drawing Flower Pattern in Photoshop. We will be using the vectors from this stock image so we will need to transfer it to our main canvas.
Click the Vector Line Drawing Flower Pattern then activate marquee tool and make a selection around a vector image then press V to activate the Move Tool. Left-click the image and drag the image to the main canvas and change layer name to “vector back 1″.

Change the layer mode to “Darken” :

Now create new Levels adjustment layer from the bottom of layers palette. Press Alt+left click in between 2 layer’s (Vector back 1 layer and Levels) to make a mask.
When the Levels adjustment box opens, input the following:

The result should be similar to this:

Follow the same steps and add some more vectors. See as below:

Select all vector back layers and make them a group (Ctrl+G) then reduce the opacity to 80% .

Now, let’s open the Vector Line Drawing Flower Pattern in Photoshop. We will be using the vectors from this stock image so we will need to transfer it to our main canvas.

Now go to Select > color range.When the color range box opens, input the following:

Invert the selection (Ctrl+shift+i) and make a duplicate copy .

The result should be similar to this:

Now add a new layer below duplicate layer and fill it with white color (#ffffff) then select both layers and merge them together :

Now activate marquee tool and make a selection around a vector and drag the image to the main canvas and change layer name to “White flower”.

Add vector mask to the image.
Now activate Brush tool (B) with these settings Now let’s erase :
Brush size: 200px
Hardness: 0%
Opacity: 40%
Flow: 100%
Color: #000000
Now paint over the highlighted area.

Next, activate the Transform tool (Ctrl/Cmd +T), then while the “White flower” layer is selected and then resize it as shown below:

Again follow the previous steps which we have used to make “White flower” and drag a vector to our main canvas and name it “Color vector”.

Now activate Magic wend tool and select all white areas of flower see as below :

Then Fill different colors in them see as below :

Drag more vectors to the main canvas fill different colors in them .

Now,let’s open the Watercolors Pack | Volume 2 in Photoshop. We will be using the watercolor texture from this stock image so we will need to transfer it to our main canvas.

Click the Watercolors Pack | Volume 2 and press V to activate the Move Tool. Left-click the image and drag the image to the main canvas and change layer name to “water color Texture 1″.

Change the layer mode to “Multiply” :

Now,let’s open the Watercolors Pack | Volume 2 in Photoshop. We will be using the watercolor texture from this stock image so we will need to transfer it to our main canvas.

Click the Watercolors Pack | Volume 2 and press V to activate the Move Tool. Left-click the image and drag the image to the main canvas and change layer name to “water color Texture 2″.

Change the layer mode to “Multiply” :

The result should be similar to this:

I love vector drawings so i decided to do one for me so I’m going to draw a Humming bird. First we need a reference image so I’m using this one. Then activate pen tool and start drawing around the bird.

When you have done with your drawing select a hard brush of size 3 then reselect pen tool and make a right click and choose “Stroke path” .

When the Stroke path box opens, input the following:

Again make a right click with pen tool and choose “Delete path”.

Now Add a new layer under that stroke layer and fill it with white color and merge both layer then drag the bird to main canvas.

Now,let’s open the Watercolors Pack | Volume 2 in Photoshop. We will be using the watercolor texture from this stock image so we will need to transfer it to our main canvas.

Click the Watercolors Pack | Volume 2 and press V to activate the Move Tool. Left-click the image and drag the image to the main canvas and change layer name to “water color Texture 3″.

Change the layer mode to “Multiply” and activate brush tool and add vector mask the erase the unwanted area.

Get back to bird layer and change it’s layer mode to “multiply” .

The result should be similar to this:

Now activate Pen tool and make a right click near face and choose Stroke path : .

When the Stroke path box opens, input the following:.

Now again make a right click and choose Delete path :.

The result should be similar to this..

Add some more stroke to the body .

In this step, we will learn how to create a vignette which will help enhance the focus on our subject.
First make a new layer and name it “Vignette”.
Now goto Filter > Distrot > Lens Correction.
then set the following settings:
Amount: -100
Midpoint: 50%

Now Just change the layer mode to “Multiply” and change opecity to 50%.

The result should be similar to this:.

Now Create a new Solid color adjustment layer from the bottom of the layers palette .
When the Solid color adjustment layer box opens, input the following:

Change the layer mode to “exclusion” and reduce opacity to “25% :

Now Create a new Color Balance adjustment layer from the bottom of the layers palette .
When the Color Balance adjustment layer box opens, input the following:

The result should be similar to this:.

Now Create a new Color Balance adjustment layer from the bottom of the layers palette .
When the Color Balance adjustment layer box opens, input the following:

The result should be similar to this:.

Now Create a new Color Balance adjustment layer from the bottom of the layers palette .
When the Color Balance adjustment layer box opens, input the following:

The result should be similar to this:.

Now Create a new Gradient map adjustment layer from the bottom of the layers palette .
When the Gradient map adjustment layer box opens, input the following:

The result should be similar to this:.

The source files for this tutorial are available to our FanExtra members community. If you want to access the source files for this tutorial (and all of our tutorials + thousands of other resources) then sign up here.
If you’re already a FanExtra member then you can login here to access the source files.

Vikas Singh Adhikari (Vik aadi) is a 20 years old self-taught digital mixed media artist and a photographer from New Delhi India. The themes that are mostly seen on his work revolve around surrealism, pseudo-realism, nostalgic sentiments, and human emotion.You can contact him on his deviant art account: http://vikaadi.deviantart.com/ and his facebook page: https://www.facebook.com/vikas.theanimater


Do you know the basic tools in Photoshop but feel that your work is still looking average? Join our creative community at FanExtra and get the direction you need to take your work to the next level.


wow, speechless its look’s so beautiful to watch i really want this kind of tutorial coz i luv mixed media style so thanks for the lovely tut…
Thanks vijay! I’m really glad that you enjoyed this tutorial. Did you have any favorite parts in particular?
The best part is how he remove girls image from the background and the why he used all colors and different techniques i am following him from Photoshoptutorials.ws and usually he do surreal work but a mixed media from his side amazed me he is to good in this too.Hope near in future i got more tutorial related to mixed media.
what the best part of your website is we always got something new and advance tuts you have most talented authors among the world.
Thank you vary much for all these tutorials .
Very nice tutorial! There are some great techniques here for all levels and the outcome looks fantastic. I think I may have seen this image in a digital art magazine somewhere? Well done.
Thanks a lot Eric, good to see you back in the community! Which digital art mag are you thinking of?
Thanks Tom! It may have just been another design inspiration blog but I thought it might have been Advanced Photoshop or Computer Arts Magazine a little while back.
Nice work..thanks..
Good! I like it
Nice work. I like it..
This is a very nice combination and comparison with Chinese taste the wind! Nice work!
i must say this is something very special for me to know about mixedmedia and catchy collage. thanks
WOW!! very very cool tutorial… thanks tom.
this ‘tutorial’ was really really rubbish. the idea of a tutorial is to explain things and this pile of poo skips important information.
Charlotte, we always appreciate constructive feedback but your comment is pretty vague. What information in particular are you referring to?
Extra ordinary tutorial. Liked it most. will be waiting for your next post.
Thanks
Excellent tutorial, congratulations for such a work! Many of us will learn a lot from it, and it is a great inspiration. A million thanks for this tutorial, it is really something to appreciate a lot.
Will this work with Photoshop Elements 10?
Being new to photoshop this tutorial is great, learning a lot. however I am having trouble with creating shapes with smooth curves like shown in Step 7.
Thanks!
I loved this tutorial, I’m gonna try it. But the sad part is that the links for the resources are not working anymore..
Thank you!!
I don’t see how this qualifies a tutorial.
It really goes wrong at step 3. If I follow instructions it just wont work. So.. author seems miss some steps there or they are poorly explained.
Founds out the problem. It says to change color levels on both green and green copy, but if do that color info is lost.
What you are supposed to do, is change level on green copy twice.
Hi,
I have a problem with the last step, when I choose luminosity for the gradient map, and lower the opacity and the fill, it leaves the image hardly visible?
Very nice