 Members Area Tutorial: Create A Fantasy Photo Manipulation “Summoning The Power”
 Premium Brush Set: Wall
 Premium Patterns Pack: Twirls
Have every post delivered to your inbox and get access to hundreds of useful design freebies.
Today you can learn about professional packaging design techniques from a true expert in the field – Nacho Riesco.
This tutorial uses the example of a real-life project for a popular DJ’s promotional packaging.
You’ll learn how to layer up multiple textures and surfaces in a non-destructive way. You’ll also apply complex masks, patterns and create custom lighting.
Let’s get started!
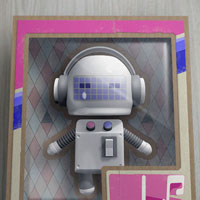
As always, this is the final image that we’ll be creating:
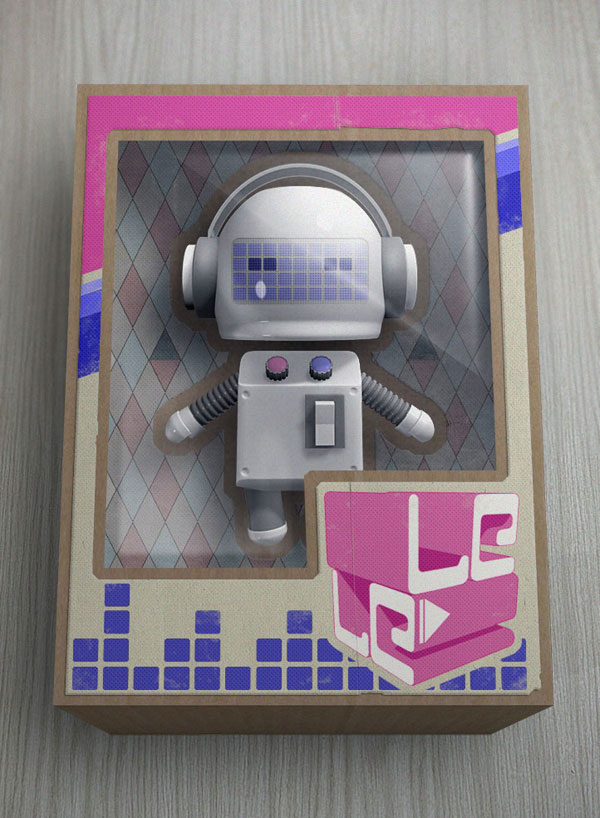
This Tutorial will teach you how to render a retro toy box of a robo-mascot for a DJ producer.
Start by creating a 722 width x 984 high pixels (100dpi) document.
Download the ‘assets’ folder in the resources section for this tutorial. This will contain necessary elements you’ll need to create this piece.
Open the “Cardboard” image you will find on the assets, using the Rectangular Marquee Tool make a selection of the image, then Copy and Paste it on the new document, rename the layer “Box Front”. Go to Edit > Transform > Perspective and transform it as shown.
Next, using the Rectangular Marquee Tool again, make a selection of the lower part, Copy and Paste it on a new Layer “Box Profile” and transform it as shown, as we did before.

Create a new layer “Lower Box Shadow”, set its Blending Mode to Multiply and 40% Opacity, make Ctrl + left Click on the “Box Profile” layer, to select its content, next, select black color and fill it on the new Layer.

Now, open the “Robot” image from the asstes, and import it on a new Layer “Robot”, use the Guides to place it on the middle of the box.

Using the Pen Tool, draw a Work Path for the window as shown, once finished create its selection.
With the selection active, Copy and Paste the piece of window from the “Box Front” Layer, to a new Layer, “Front Cover”.


Now, make Ctrl + Left Click on the “Front Cover” Layer to select its content, then go to Selection > Transform Selection > Contract, and apply a 13 pixels transformation.
Create a new layer “Sticker 1″, select the #f5f3db code color on the Color Picker, and with the Paint Bucket Tool, fill the active selection.


Apply the Bevel and Emboss Layer Style settings as shown, to get the following result.


Grab the Erase Tool, and with a Hard Round Brush, erase some parts of the sticker to get an irregular contour as shown.


I'm a autodidact artist who loves creating art. I started as a traditional artist. The airbrush was one of my most important tools during many years but now I'm fully immersed into the digital world. My favorite themes are Fantasy and Science Fiction, but in my career as an illustrator I've had to do many different things, but always knowing that I was doing what I wanted.


Do you know the basic tools in Photoshop but feel that your work is still looking average? Join our creative community at FanExtra and get the direction you need to take your work to the next level.


Leave a comment
0 Comments:
No comments have been posted yet. Be the first!