
 Create A Beautiful Samurai Photo Manipulation
 Create an Awesome Paint Explosion Image
 Master Photoshops Selection Tools in Under 30 Minutes
Have every post delivered to your inbox and get access to hundreds of useful design freebies.
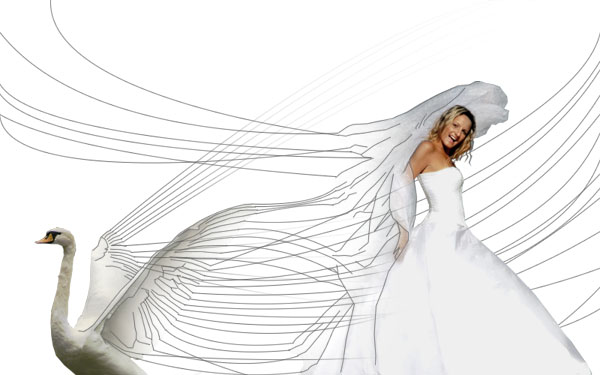
This is the final image that we’ll be creating:

Open up a new document, 80X600px and paste in an image of a swan.

Cut the swan out from it’s background using the lasso tool, or whichever tool you might prefer. Position the cutout so that the bottom part of the swan is cut off, and the image is positioned in the bottom-left of your document.

Now do the same with an image of a bride. After cutting out the bride I went to edit>transform>flip horizontal so that she was facing away from the swan. Don’t worry about the photo’s original background showing through the semi-transparent veil, we’ll fix that later. Be sure to duplicate both your swan/bride layers and hide the originals just in case we need them later.

Now grab your pen tool, and make sure that ‘paths’ not ‘shape layers’ is selected (see image below).

Then create a path along the top line of the swan’s wing, as shown below.

Then with a dark gray, 1px brush selected right click on your path and select ‘stroke path’ with simulate pressure unchecked. Then delete your path, to leave a 1px line following the top contour of the swan’s wing.

Now repeat this technique of drawing and stroking paths, and be sure to leave the right edges of the wings open, don’t close them off. The images below show the paths with the photo layer visible and invisible.


The skin of the bride was looking a little orange so I select my ‘bride’ layer and go to adjustments>hue/saturation and reduce the saturation of my image by 30.

Now with your bride layer still selected click on the area surrounding her and also the space between her arm/body. Then go to select>inverse to invert the selection, leaving only the bride selected. Then select a medium sized soft brush and set the brush mode to ‘saturation’, set it’s opacity to around 70%. Then carefully brush over her veil. This technique will get rid of the blueness that was previously showing through due to the sky background in the original photo. Then with your selection in place change your brush to ‘color dodge’ and reduce it’s opacity to around 30-40%. Then brush over your veil. The veil will now have less saturation and will blend nicely with the rest of your image.

Now create a new top layer called ‘bride pen lines’. Repeat the path/line technique on the left side of the bride, paying particular attention to her veil and the edges of her dress. Remember to make sure that you have a 1px dark gray brush selected again for stroking your paths. The images below show the paths in place with the photo layer visible and invisible.


Now the tricky part. We need to join the lines between the swan and the bride. Create a new top layer called ‘joining lines’. Then drag your pen line from one point to the other as shown before. But this time, don’t let go of your mouse button after clicking your second anchor point, instead move your cursor about to bend the line you’ve created, and do this until it creates a nice arch between your two photos. Repeat this until you’ve joining up most of your lines between the swan/bride. If you remember, I said it was important now to close off the lines for either image, and this step shows you why. We want the lines of each photo not to end where the photos end, but to continue to the other photo.


Now, as you can see there are many lines on the swan’s wing and bride’s veil that haven’t been linked up, their positions just don’t fit. What we want to do here is continue their lines, but not make them join with the other image, simply make them continue to the edge of our document. Firstly, create a new layer called ‘swan lines behind bride’, making sure that this layer is positioned below your bride photo layer. Then you guessed it, create some large arching lines that bottom behind your bride right to the edge of your main image.

Now create a new layer above your bride photo layer called ‘bride veil lines’. Repeat the same technique, but this time drag lines from the veil of your bride right to the edge of your main image.

Now repeat this technique once again for the second wing of the swan, on a new layer called ‘swan wing 2′. Make sure that this layer is below the swan photo layer. What you should have now is one hell of a lotta lines!

Now select your swan photo layer and select a large, soft eraser brush with a low opacity (around 10%). Begin erasing away the edges of your wings, creating a subtle transition between photo and path lines. Repeat the same technique for the bride, erasing away the left edge of her to create a smooth transition between photo and path lines. The end result should look something like this:

Now select your ‘swan wing 2′ layer, and go to layer > create layer mask > reveal all. Create a gradient ranging from black to white and drag it across your image. This will fade away the lines coming out of your second swan wing, and reduce some of the busyness of the image.
Now repeat the same process for the ‘bride veil lines’ and ‘swan lines behind bride’ layers, fading them out using layer masks. The result should be something like the image below:

Now paste in your original swan photo layer (it should be very large) and move this below all other layers so that it makes up your background layer. Make it so that the swans wings comprise most of your background.

Now go to image>adjustments>brightness/contrast and reduce the brightness to -100 and contrast to -65.

Now reduce all pen line layers opacities to 60%.

Now go to the following pen line layers
> swan wing 2
> bride veil lines
> swan lines behind bride
and duplicate them. Move the duplicate layer below the original and then apply the outer glow effects shown below. The outcome of doing this is also shown below. It’s very important to remember to duplicate each layer AND move it below the original though. Remember also to only apply this layer effect to the 3 layers listed above, and not the other 3 layers.


Now select the 3 layers that weren’t given an outer glow, they should be above all of your other layers:
> pen lines swan
> pen lines bride
> joining lines
up their layer opacities to 90%

Now I select a small smudge brush at 50% strength and select each outer glow line layer. I then smudge each glowing line into the line it joins, to create a smoother barrier between the two. Then I select a large, soft eraser brush and erase parts of my outer glow layers that are looking too bright until the image looks right.

To finish things off I reduce the original photo layers opacities to around 65% and add some simply text.

Tom is the founder of PSDFAN. He loves writing tutorials, learning more about design and interacting with the community. On a more interesting note he can also play guitar hero drunk with his teeth.


Do you know the basic tools in Photoshop but feel that your work is still looking average? Join our creative community at FanExtra and get the direction you need to take your work to the next level.


wow! Awesome…I just read through the tutorial . Its wonderful.Thanks.This is really a great site in the making. kudos Tom
Thanks twopo, I really appreciate your support
yeah, great stuff. i really like this one.
saw a similar idea somewhere else where the guy used a small brush and clicked around while tapping shift. (shift makes a straight line between your last click and the current one)… yours is much more controlled though – his ended up making an almost schematic-type effect, which wouldn’t work well for this image/theme.
this image would also look really good mixed with some of those abstract 3d elements that look like origami. (as often seen on desktop wallpaper designs)
even though i’m pretty familiar with photoshop (been using almost a decade), i really enjoy reading your tutorials. thanks for taking the time to make them – we appreciate it.
[...] Creating a ‘Swan Bride’ – Fun With Paths! [...]
Thanks so much Beets. It’s comments like that, that make me want to keep on writing! That is quite a useful technique tapping shift, but like you said paths are probably more appropriate for this type of image. I’m afraid I can’t picture the origami elements you mentioned, could you possibly post an example? Who knows maybe I could do a tut on them
i know you’ve seen them, haha… i can’t find any at the moment tho
here’s a really simple example, showing a typical 3d shape:
http://img478.imageshack.us/img478/1502/abstractgevalkleiner3kr.jpg
and a much more extravagant example:
http://www.shinybinary.com/images/art/strange.jpg
good example, and also a free render to use:
http://synxernal.deviantart.com/art/onitek-7390564
http://synxernal.deviantart.com/art/3D-Abstract-Render-7264699
(just gotta give him credit)
Whoa those were awesome! I don’t know if I could create something like that using just Photoshop, but I am tempted to borrow that 3d render and attempt some cool effects (of course giving him credit ).
).
Thank you so much for sharing this awesome tutorial with us
Thanks for the kind words escanive I’m glad that you enjoyed the tut.
are we aloud to copy the bird?
awesome tut
what a great job you have done using photoshop path.