 Photo Manipulate a Kick Ass Flaming Skull Scene
 Create a Colorful Out of Frame Animal Composition
 Members Area Tutorial: Photo Manipulate a Beautiful, Bejeweled Ancient Princess
Have every post delivered to your inbox and get access to hundreds of useful design freebies.
In this tutorial you’ll learn how to create an illustration using techniques such as creating a stylized background, applying patterns effectively and adding ink outlines.
The template for today’s subject, an airship, was created in the Blender 3D suite. If you’re interested in including 3D in your workflow, I highly recommend this Open Source 3D software. You can download it for free at www.blender.org.
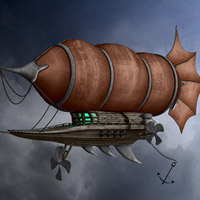
As always, this is the final image that we’ll be creating:

Start Photoshop if you haven’t already done so and open “Starter.psd” from the Assets.zip file. Inside this psd you’ll find 4 layers: BG, which is a plain white layer, and 3 layers each representing the airship. The first layer, Shaded, we’ll use as the foundation for the art work. The second one, Perspective guide, we’ll use as a guide for placing textures and the third, Selection guide, is rather garish but very handy for making quick and accurate selections of the various parts of the airship.

Before going any further, let’s set up the brushes and patterns we need. The brushes are first. Activate the Brush tool (B) and right+click somewhere in the image. The brush presets dialog appears. Click on the small arrow at the top right and choose Replace Brushes from the menu. Locate the “Airship.abr” file and click the Load button.

Next, click on the arrow again and, this time, choose Load Brushes from the menu. Find the lightning brushes you downloaded (firestorm_lightning4.abr) and click Load to append these brushes to the brush presets.

To conclude the preparations, we’ll load the patterns. Press Shift+F5 to bring up the Fill dialog. Set Use to Pattern and click on the arrow next to the Custom Pattern swatch. The pattern presets dialog will be displayed. Click the small arrow at the top right of the dialog box and choose Replace patterns from the menu. Locate the “Airship.pat” file and click Load to load the patterns into Photoshop.

Alright, let’s get going! First off, save the Starter.psd file to another name (Ctrl+Shift+S/Cmd+Shift+S) to keep the original safe. I called my version “Airship.psd” but you can call yours anything you like.
We’ll start with the background. Turn off all airship layers (Shaded, Perspective guide and Selection guide) by clicking on the eye icons in front of the layers. Click on the BG layer to make it active. Create a new layer by clicking on the New Layer icon at the bottom of the Layers palette and rename this layer to “Sky Gradient”. Activate the Gradient tool (G) and click on the Gradient swatch in the Options bar. When the Gradient Editor appears, set the first color to a bright sky blue (#0277ec) and the second color to pure white (#ffffff).

Click Ok to set the gradient to the colors you just specified. Click at the top of the image, Shift+drag all the way down to the bottom and release the mouse button to create the gradient.

Open the Sky 1 image (1077522_97541131.jpg). Press Ctrl+A/Cmd+A to select the whole image. Next copy it to the clipboard (Ctrl+C/Cmd+C) and close the Sky 1 image by pressing Ctrl+W/Cmd+W. Back in the Airship image, paste the sky above the Sky Gradient layer (Ctrl+V/Cmd+V). Rename the new layer to “Sky 1″.
As you can see the sky image is a little too small. Use Free Transform (Ctrl+T/Cmd+T) to scale it up so that it fits.

Next, set the Sky 1 layer’s Blend Mode to Multiply and its Opacity to 70%.

Open the Sky 2 image (1263723_42231450.jpg) and copy and paste it into the Airship image as you did with Sky 1. The new layer should sit above the Sky 1 layer. If not, drag it into place in the Layer’s palette. Rename this new layer to “Sky 2″.
As with the previous sky image, it’s too small. Again, use Free Transform to scale it until it fits.

Next, in the Layer’s palette right+click in an empty space next to the Sky 2 layer’s name and choose Convert to Smart Object from the popup menu.

Why we’re doing this will become clear in a minute. For now, set the Sky 2 layer’s Opacity to 70%.
To start building the effect we’re after we need to apply a filter from the Filter Gallery to the Sky 2 layer. However, as you’ve probably noticed, the image is in Lab Color mode. Although this is a great color mode, many filters, including all Filter Gallery filters, are not available in Lab Color, which means we have to perform some special ops to work around this limitation. Fortunately for us, since Smart Objects are available to us from Photoshop CS3, this is not a problem.
Double-click on the Sky 2 layer’s thumbnail. This will cause the Smart Object to open in a separate window as Sky 2.psb.

In order to apply a Filter Gallery filter, the image needs to be in RGB color mode. To make it so, choose Image>Mode>RGB Color from the menu.
Next, choose Filter>Filter Gallery from the menu and locate the Dry Brush filter, which lives under the Artistic heading. Set Brush Size to 4, Brush Detail to 6 and Texture to 1. Click Ok to apply the filter.

Save the Smart Object (Ctrl+S/Cmd+S) and close it (Ctrl+W/Cmd+W). The main Airship image will now be automatically updated to reflect the changes we made. Note that, although we converted the Sky 2 Smart Object to RGB color, the main file is still in Lab Color mode, which is exactly as it should be.
Now it’s time to give the sky the right atmosphere. For this we’ll need a number of adjustment layers. The first one will lighten the upper right corner of the sky. Click on the Create New Fill or Adjustment Layer icon at the bottom of the layers palette and choose Hue/Saturation from the list. Rename the new adjustment layer to “Lighten”. Set the Lightness to +43.

Press G to activate the Gradient tool. Click on the arrow next to the gradient swatch and set the gradient to Black, White. Click on the Reverse checkbox to turn it on.

Click on the Lighten layer’s layer mask to make it active and draw a gradient from just below the upper right corner of the image to just left of the center as shown below.

Your image should now look like the one below.

Create another Hue/Saturation adjustment layer by clicking on the Create New Fill or Adjustment Layer icon and picking Hue/Saturation from the menu. Rename the layer to “Desat”and set the Saturation slider to -64.

Click on the Desat layer’s layer mask to make it active and, using the Gradient tool (G), draw a mask as indicated below.

To make the clouds on the left hand side of the image look like storm clouds, we need to darken them quite a bit. To do this, create a new Curves adjustment layer, rename it to “Darken” and set the Lightness channel like so:

The Darken layer needs the same layer mask as the Desat layer. To make that happen, click on the Desat layer’s layer mask and Alt+drag/Opt+drag it onto the Darken layer. When Photoshop asks if you want to replace the layer mask, click Yes.

We need one more adjustment layer. This time we’ll bump up the contrast in the sky to make it look even more dramatic. Create a Levels adjustment layer and rename it to “Contrast”. Adjust the Lightness channel by setting the black point to 6 and the white point to 224.

Next, we’ll make the sky look as if it was painted with water colours over pencil lines. Make sure that the three airship layers are still turned off and that all the sky layers are turned on. Press Ctrl+A/Cmd+A to select the whole image, followed by Ctrl+Shift+C/Cmd+Shift+C to send a merged copy of the sky to the clipboard. Make sure that the Contrast layer is selected and press Ctrl+V/Cmd+V to paste the merged copy of the sky as a new layer above the Contrast layer. Rename the new layer to “Pencil lines”.
Press Ctrl+Shift+U/Cmd+Shift+U to desaturate the Pencil lines layer and set its Blend Mode to Multiply. To complete the effect, choose Filter>Stylize>Find Edges from the menu.
Below you see a before and after shot of the sky.

Click on the Sky gradient layer and Shift+click on the Pencil lines layer to select all sky layers. Press Ctrl+G/Cmd+G to group them and rename the new group to “Clouds”.
As a finishing touch, let’s put in some lightning. Create a new layer above the Clouds group and activate the Brush tool. Right+click and choose one of the lightning brushes from the presets. I picked lightning brush 7 but you can pick any you like. Set the brush’s Size to 1100 pixels and your foreground color to pure white (#ffffff).

Click once somewhere inside the image to create a lightning bolt. Use the Move tool to position it over the dark clouds on the left.


My name is Caroline, I currently live in the Netherlands and I am a computer programmer turned graphic designer. I have been drawing and painting since I was allowed to hold a brush. Very recently I decided to make a life-long dream come true and to start up as an independent artist and designer. I hope you enjoy this tutorial. If you have any questions, please leave a comment below.


Do you know the basic tools in Photoshop but feel that your work is still looking average? Join our creative community at FanExtra and get the direction you need to take your work to the next level.


Leave a comment
0 Comments:
No comments have been posted yet. Be the first!