 Create a Daft Punk Inspired Text Effect
 Members Area Tutorial: Create an Incredible Typographic Illustration
 How To Create an Ultra-Realistic Cracked Head Effect
Have every post delivered to your inbox and get access to hundreds of useful design freebies.
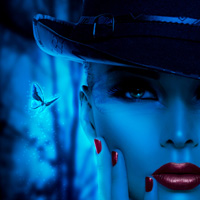
In this tutorial we will combine several stock images, adjust color, use retouching techiniques as well as make and control custom brushes to create a dark and mysterious blue portrait.
As always, this is the final image that we’ll be creating:

Open the background image from the resources section for this tutorial and crop it. I only use this part to get close-up look and it involves the bright part that fits model pose ( we will see in next steps):

Our aim is to make it darker, more contrasted and also blurred to make model the focus. Duplicate background and apply Gassian Blur with 8 px:

Duplicate background copy ( that is applied Gassian Blur) and set the mode to Multipy 100%:

We will use Curves to make more contrast and reduce the light, especially the right part. Choose Layer-New adjustment layer-Curves and drag RGB curve down:

Open model stock. You can take the same image i use here or your own. I cropped this picture to get her face into main focus also resized it a bit. I use Polygonal Lasso Tool to isolate model from background and place into our canvas:

You should do basic retouch for model skin before adding next steps. Use retouching tools ( Clone, Healing brush, soften, sharpen…) in the way you are familiar with or follow many good tutorials over the web. Remember that you should not overdone with skin. Leave skin texture and pores to get rid of plastic look. My model has a pretty perfect skin for this tutorial purpose ( you can take it as a reference)

I just need to fix a dark skin part on her forehead and nose top as you can see in screenshot below:

Create a new layer, grab Eyedropper Tool ( I ) and pick color on bright part skin on her face:

Now foreground color is set to #f4cdbc and use soft brush, flow and opacity about 20-25 % to paint on dark skin part to make it brighter. Don’t paint many times on each part you want to work with as you can lose face details.

Open butterfly 1 stock. Extract butterfly and drag onto our main layers . Resize and situate it as shown below:

Rename this layer as “butterfly mask”. Use transform tools (i usually use combination key Cmd/Ctrl+T) to stretch it and warp ( if needed) to fit the shape of your model.
Add layer mask and with soft black brush, eraser some parts on nose, inside the eyes, cheeks to make the result as shown:

Change the mode to Overlay 30% and we have butterfly mask for model

In this step we will add more “taste” to model’s eye. Create a new document with transparent background ( about 100×100 px, we don’t need it too big). Use Pen Tool to make a curves like eyelash shape ( it depends on the shape of your model eyelash) , stroke with hard black brush, 2 px and checked Simulate Pressure:

Go to Edit-Define Brush Preset then name it whatever you want:


Come back to our main document. Create a new layer above butterfly mask layer. Choose brush and find eyelash brush we’ve just created:

Set foreground color to #00a9eb and press F5 to make settings for this brush:


You can easily vary the curve of eyelash from changing the brush angle and roundness parameters or dragging arrow up or down.

Hold the left mouse, drag it along the end of model eye which is visible ( not hidden from hat):

Use eraser or brush on layer mask to clear the top and bottom of eyelash which is just added.

Tip: Don’t let eyelash go inside the eye, especially if your model eyes small or narrow as it will make the eyes smaller.
In two next step we will create main color of picture. The method is to fill picture with dark blue color first then add some highlights to get out of underexposed look.
Curves:
Click to choose Options in Curves window then pick dark blue color for highlights:


By this way you can easily pick the color for picture as you like.
You can see the curves of Red, Green and Blue changed as shown below:


Move the RGB curve up a bit to increase the light:

Hit “No” when you are asked to set this blur color as default color.
We have:

Use Channel Mixer layer to add some cyan tone for picture:


This is what we have so far:

After step 5, the picture looks so underexposed. To fix it, we will draw some highlights on mode face. Create a new layer under Curves and Channel Mixer in step 5, fill it with 50% gray:


Take Dodge and Burn tool with Midtones range, Exposure about 25-40% to determine facial features. Generally, keep in mind that you must retouch T-shaped face with highlights (forehead, under eyes, nose bridge, under nose, lips highlight, chin) and some another face parts( scleras, light blobs on the eyes, eyelash) and make shadows for cheeks sides, nose side, pupil…But remember that highlights and shadow on model depend on the direction of light source and her look. So do it carefully and subtly until you get sastified. You can see my result as a reference.
Normal mode:

Overlay mode:

Create a new layer above Curves and Channel Mixer layer in step 5. Make selection for lips and nails, fill these with color #422231, then set the mode to Color 100%:


In this step we add some adjustment layers to reduce cyan tone and make picture more contrasted.
Brightness/Contrast:


To get the look that light source comes from behind, I use a new layer, grab soft white brush to paint on background part that meets model, then put it as Overlay 70%:

New layer again and we continue to make highlights on cheek side and model part that meet bright part of background with same technique above:

To make highlights on lips more visible , add a new layer which is set on top, take soft white brush, opacity about 50-60% to paint on lips and nail highlights as shown below.
This layer is set to Overlay 70%. You can see difference before and after this step:


This step is added with the same purpose in step 11, but for chin and nose part. Create a new layer with Overlay mode 70%, grab soft white brush with opacity about 40%, spot on highlights of nose and chin as the screenshot below shows:

In this step we will add blur effect for under part of model (neck, hand) to make this part blend better with background. Hit Cmd/Ctrl+Shift+Alt+E to merge all layers. Use any tool to make selection for this part with feather = 40:

Apply Gassian blur with 3 px then lower opacity to 50%:

Open butterfly 2 stock. Because this stock has transparent background so make selection for any butterfly you want and use Move Tool to drag it into our document, resize and transform it as shown below:

You should transform butterfly to make its motion suitable for your model look.
To continue, we will make the color of butterfly fit background. I use two new adjustment layers, Selective color and Channel Mixer which are above butterfly layer with Clipping Mask option applied:

Selective color:

Channel Mixer:

We have:

The butterfly still seems to look slightly out of place. To fix it, and also make a fantasy look, I add glow effect by applying Layer style.
Outer glow seems not enough as it only creates glow from behind the subject. So I pick both Inner Shadow and Outer glow with color that is slightly brighter than background color and change the mode to Linear Light and Screen. Also lower opacity of butterfly layer to 80% ( the right opacity to make butterfly intergrate better with background but not be hidden from it):

 \
\

In this step we will add sparkling effect for butterfly and background. Create a new layer on the top, choose hard white brush, diameter 2 px with settings:


Paint on butterfly and the part below it:

Then apply Outer glow for this layer:


Now press Cmd/Ctrl+G to make group for this layer (only this sparkle layer) then change the mode to Color Dodge 100%.
Remember that if you don’t make group for this layer but change directly the mode to Color Dodge, the result will be totally different. Take a look at this image below and you can easily notice it:

Right click this group and choose Duplicate Group, lower opacity to 50%, apply Flip Horizontal (Edit-Transform-Flip Horizontal) and set position till sparkles look natural.
My Result:

In this final step we will use Dodge and Burn tool again.
Merge all layers, then we create a new layer with Overlay mode and fill with 50% gray , set similar settings to step 6, take Dodge and Burn to create more visible contrast on model face and make sparkle effect brighter.
Normal mode:

You can view the final outcome below. I hope that you enjoyed this tutorial and would love to hear your feedback on the techniques and outcome.

Thank you for reading this tutorial, I hope that you enjoyed it. If you want to view my other arts and tutorials you can look at my Deviantart page or follow me on Facebook.


Do you know the basic tools in Photoshop but feel that your work is still looking average? Join our creative community at FanExtra and get the direction you need to take your work to the next level.


I love it!
Wow, very nice tutorial and great results! I love the colors.
Thanks for sharing..
Amazing..!!
Easy to follow and great outcome – nice job!
show de bola, very good
Great first tutorial Jenny! Welcome to the site. It seems that you’re a hit with our readers anyway . Really enjoyable tutorial though, I especially loved your creation of the eyelash brush and some of your more advanced coloring techniques.
@all: guys,i’d like to thank you for pleasing comments .
.
@Tom: Thank you for giving my tutorial to be published on your site. I’m glad you enjoyed it and again thanks for your nice support .
.
You’re amazing dear …
you saved me from a great psychological trouble that could have happened as a result of ” not knowing how ti get these effects”
special regards from noorl3yoon (Zainab Almarzooqy )

Great tutorial. Love the blue overlay. It’s makes the composition!
Amazing thing!
Thanks for this detailed tutorial !
Fantastic!
Omg, it is amazing, but it’s too hard to follow, I could never crop anything like you did with her face, it’s too much I would love it if you added more tutorials for newbies around here, you might think the web is full of them but they’re all too pro. Maybe if you actually got someone who has no clue about photoshop and tried to teach him, you would get the problems
  )) Amazing work, it is simply mesmerizing!
A very admirable result Jenny. The portrait really creates and shows a dark and mysterious effect, what took my attention is the emphasis on the lips and nails that brought more life and ace to it. Good job.
Thanks a lot Rnel . I appreciate you took time to view my tutorial and leave a thoughtful feedback. It’s a pleasure for me when you enjoyed my post. Thanks again
  .
.
i like the butterfly most
a very good job jenny, you got talent and i am fighting to become as skilled as you are. thanks for giving me faith
My pleasure . Thanks so much for your kind comment
I just loved this tutorial, the outcome was beautiful. Thanks for taking the time to create and share.
Excellent tutorial,I love this!
Thanx for the tutorial! It was my first attempt at one– might have been out of my league- but this is what it looks like with a shot of a model I had take.
https://www.dropbox.com/s/19nimu5f6acr9at/Premade_Background_Stock_by_Shinobinaku-2.JPG
Cheers!
Very cool outcome! It reminds me of avatar. Nice job
Hi I’m doing this for a school project, and I was just wondering in step 5, do you make a new curves adjustment layer? if so, i can’t change the options and it’s really stressing me out :L
My attempt with a random photo of Angelina Jolie.
Very awesome tutorial!
https://www.dropbox.com/s/mgcopobcnbw12b0/photomanip_angie1.jpg
Wow, amazing outcome Susan! It almost doesn’t look like her, but very nicely done .
.
great tutorial, thank you.
Thanks for the kind words Klara, glad you enjoyed this lesson.