
 Photo Manipulate a Scenic Natural Spa Scene
 Create an Awesome Illustration Using Custom Brushes
 How to Turn Yourself Invisible
Have every post delivered to your inbox and get access to hundreds of useful design freebies.
In this tutorial I am going to show you how to create a nature inspired design that is both organic and visually arresting. We will be covering some useful tips as we work through the process of creating a striking image that will show a helpless being pulled into the powerful grasp of nature.
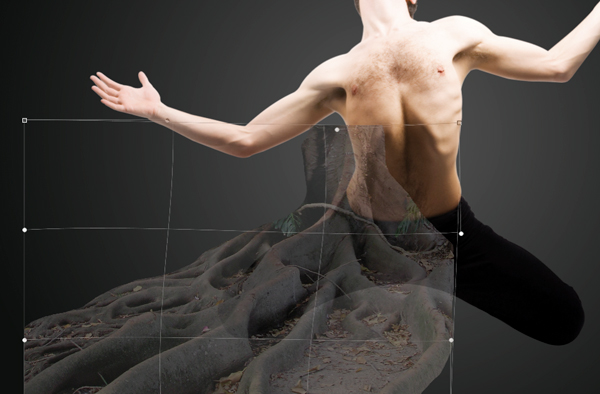
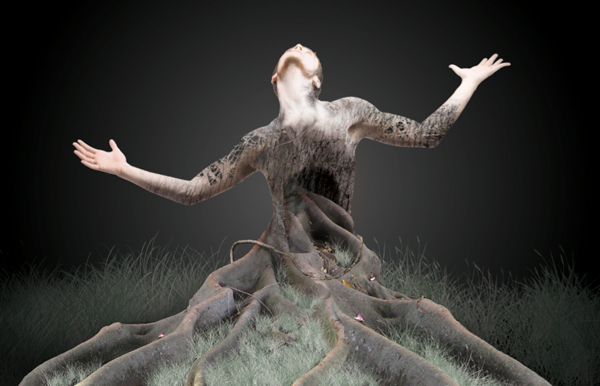
Here is a preview of the image that we are going to be creating:

We will be starting things off by finding a solid image of a model that we can use for our composition. I tend to use iStock for things like this. At times it can be difficult to find the right images, and you always have to keep in mind the general concept of the piece you will be creating because you want to find just the right picture for the job. I will be using an image of a man down on his knees, looking upwards towards the light with both of his arms out to his sides. A good dramatic image like this will really lend itself well for this type of moody surreal design.
Before we get into the actual designing of the image we need to isolate the man from the background. While there are several options on how to approach this such as the Eraser, Magic Wand, or Layer Masking, I still tend to favor the trusty old Pen Tool. Often times new digital artists can have a bit of trouble coming to grips with the Pen Tool but the only way to get better is to practice.

Follow the contours of the body and continue to trace around the figure until you have made your way around where you will want to close your path.

Once you have closed the path, hold the Control Key and click along the path to initiate the dropdown menu where you want to choose ‘Make Selection’ and press OK.
Next, you should see the marching ants that indicate your selection. Go to the Select Menu and choose ‘Inverse’ before hitting the delete key to erase the background from the image. Here I have placed a layer filled with black underneath our model to show you what has been removed.

Create a new Photoshop document that is 17 inches wide by 11 inches tall, 300 dpi. The reason I am starting off with such a large size is because I know that I will be printing this piece when it’s complete and we can always reduce the size later if we need to.
Once you have your document set up, double click the Background layer and press OK to unlock it, then double click the layer again to bring up the Layer Styles Dialog Box. Check off Color Overlay and for the fill we will be starting off with #525252, which is a medium gray color.

Drag the isolated image of the model into your new document and close the original. You may choose to save the isolated image of the model for a later time, but for now we will just close it after we bring it into our new document. Press Command+T to initiate a Free Transform and then click and drag one of the four corners outwards while holding down the Shift Key to constrain the proportions of the image. We want to scale it up so that it’s large enough to fill out most of the center area of our composition as shown below:

Switch over to your Gradient Tool (G) and select the color #313131 as shown below:

Check the settings for your Gradient at the top of the toolbar. We want a Radial Gradient that fades from solid to transparent. Be sure to also check off the ‘Reverse’ option.

Click in the center of your image and drag outwards towards any one of the four corners to create the gradient. Once you have done that and the gradient is centered, change the Blending Mode to Multiply. Below is an image of our layers thus far:

We are trying to create a sort of dramatic and moody background early on so that we can focus on other parts of the image, but it’s good to establish some type of lighting early on so as not to leave it as an afterthought. We will be coming back to this to add more to it, but so far this is what we’ve got:

Be sure to also save your work before moving on, and continue to do so throughout the remainder of the tutorial just in case!
Next, we are going to open up the image of the tree roots and what we want to do is crop it so we are only left with the bottom half of the image. The top half is extraneous at this point and what we really need are the roots that will be taking the place of the legs, giving the illusion that the man is morphing and changing into the tree or being pulled into the Earth. Press C to get your Crop Tool and select the area shown below:

Once you have cropped the image, bring it into your Photoshop document. From here, place the image on top of the other layers and add a mask by clicking on the icon at the bottom of the Layers Palette, indicated by the red circle in the image shown here:

Now that we have applied a mask to the image, we can use a hard black brush to paint out the areas we don’t want. The nice thing about this is that if we mess up or need to add part of the image back in, all we have to do is paint with white. Conversely, if we use the Eraser Tool to simply remove parts of the image we don’t want, we can’t really get that back unless we keep hitting undo.
We can now begin to mask out certain parts of the tree roots that we don’t want to be seen. It will make it easier if you lower the opacity of the layer while you are brushing so that you can also see the figure underneath.
Press Command+T to do a Free Transform and then hold the Control Key and click on the image and you will see a menu where you want to select Warp. What this will do is let us manipulate various points of the image so we have more control over the shape. We want to slide and pull different spots in order to make it blend in with the direction of the leg.
Once you are happy with the direction of the roots press the Enter Key to apply the changes. Before getting too far into the masking of the roots layer I am going to duplicate the layer by pressing Command+J. Now we can work off of the duplicated layer and turn off the visibility of the original layer below.
As you continue to paint, mask out the areas where there are leaves, and use a soft brush at a low opacity (20-30%) to blend the bark texture into the mid section of our model

Zoom in and continue masking while thinking about certain parts of the roots that we may not need. Remember that we also have the original layer underneath which we can keep making copies of if we wish to use different sections of the image that we may not need right now.

Next, select your Lasso Tool (L) and create a selection around the smaller branch that overlaps the leg as shown here:

With the layer selected, press Command+J to duplicate the selection onto a new layer. Once you have done that, press Command+T and then click on the image while holding the Control Key. When the menu appears, choose ‘Flip Horizontally’ and press the Enter Key to apply. You will also have to rotate the image upwards a bit so that it begins to follow the curve of the body. To do that it’s another transform and then rotate the image so it looks like this:

We will then apply another Warp like we did earlier and once again manipulate the shape and direction of the branch.

Notice where the branch overlaps the side of the body? All we have to do here is apply another mask by clicking the icon at the bottom of the Layers Palette and then trim it down a bit with a solid black brush in order to remove it. Try to make it appear natural so that it curves a bit at the side.

We want to now repeat this process for the smaller branch on the opposite leg. Make another selection around part of the branch using the Lasso Tool (L).

With the layer selected, press Command+J again to paste the selection into it’s own layer. After doing that you will notice that we are losing our mask and part of the image that we don’t want visible is showing. To fix this we are going to hold the Command Key and click on just the mask thumbnail icon of the layer below. This should activate the selection.

Make sure that you are on the duplicated layer now and click on the Layer Mask icon at the bottom of the Layers Palette.

Now we will have our selection back and it will definitely save us a bit of time. From here we will once again flip and rotate the image so that it seems to follow the direction of the original piece. Paint with a soft black brush at 20-30% opacity to fade out parts of the branch that overlap the original. Use the hard edged brushes at 100% opacity to get the more precise areas.

Notice how the bottom piece of the branch appears to go behind the leg. Once you are satisfied with the positioning and appearance of the branch. Merge these layers with the main root image by holding the Shift Key, selecting them, and then pressing Command+E to merge.
If you are still with me at this point, you know the basic technique of taking certain areas of an image, selecting them, and then transforming and masking them. Let’s take a look at what we’ve got so far:

Next, we are going to make a copy of the original tree root image, as in, not the one we have been working from but the one we started with (highlighted below):

Drag this layer down to the New Layer icon at the bottom of the Layers Palette or press Command+J to duplicate the layer. After that, turn the visibility of the original layer off. You should now have the original root image plus two more copies.
Hold the Control Key and click on the Layer Mask icon of the layer we just created and select ‘Delete Layer Mask’ from the layer. You should now see this:

This is good because we can make a different selection to use another part of the image or section of branches for the image.
From here, lower the layer’s opacity to about 58-60% so you can see the image below. After that you will need to click on the Layer Mask icon at the bottom of the Layers Palette. Slide the image over a bit so that the hollowed part of the roots is right around the midsection of the model.

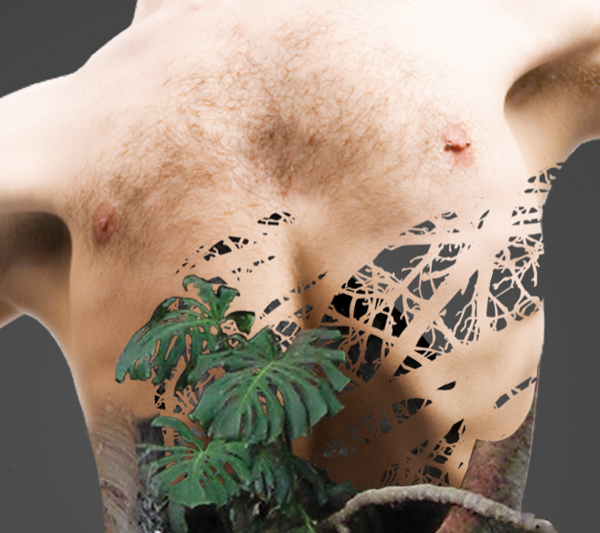
We can now begin to paint into the mask with a solid black brush and remove parts of the image we don’t want. Remove all of the image except for the area inside of the ribcage.

This part can be a bit tedious but we need to get rid of the spaces between the leaves. To do this you can simply zoom in and use a small black brush at 100% opacity. We are going to be creating a hollowed out sort of effect so we need an area where we can reveal the layer below.

Make a selection using the Pen Tool that goes around the inner part of the midsection. Fill this layer with solid black using the Paint Bucket Tool (G) after closing your Path and activating the selection.

Open the next tree root image from the resources folder and import it into your Photoshop file. Do a quick Free Transform (Command+T), hold the Control Key and click on the image, and then choose Flip Vertically. Press the Enter Key to apply the changes and then lower the opacity of the layer. Move the image around a bit and try to find a part of the image that you think would look good for the inside of the body.

Make sure that you place this layer just above the selection that we made previously that is filled with black.

Next, hold the Control Key and click on the layer containing the new tree image we have just imported. From here you want to select ‘Create Clipping Mask’ from the menu.
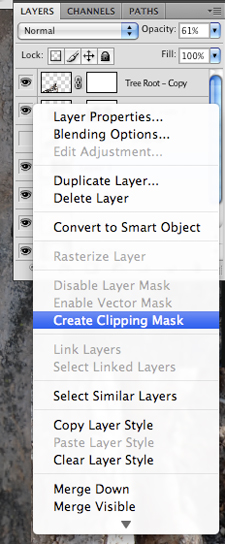
Once you do this you will notice that you have an arrow on this layer indicating the Clipping Mask.

And this is what the result looks like:

The other benefit of doing this is that we can still move the tree image around and we will still only be seeing what is inside of the shape area. Before moving on we will want to also reduce the opacity of this layer to around 60%.
Choose the color #4c3c39 and create a new layer above the previous layer setting it’s Blending Mode to Multiply. Next, hold the Command Key and click on the black shape layer thumbnail icon to activate the selection. On your new layer begin to paint with a soft round brush set to about 20% opacity. Brush around the edges so that it appears to fade in gradually as shown here:

This will add a gradual shadow that helps to give the illusion of depth.
Import the tree vector from the resources folder and rotate it to get the branches pointing at a diagonal across the body as shown here:

Next, select your model layer, and while holding the Command Key, click on the tree vector to activate the selection.

While the selection is still active, and you are on your model layer (make sure that the layer is highlighted) and press Command+J. You will not notice anything right away, but we must now turn off the visibility of the vector tree layer. Also, the layer that we just created by pasting the selection into a new layer has to be moved up in the Layers Palette so place it above the shadow layer. Here I have turned down the opacity of the model layer so you can see what is happening:

I’m going to now repeat this step once more after moving the tree vector around a bit more. The idea here is build up a cluster of branches near the ribs so that we can mask out some of the original model layer in this area. Doing so will reveal the cluster of branches above.

Next, we are going to add a Layer Mask to the model layer and using a solid black brush we will remove the area of the model that is showing on the side:
Open the tree-bark texture from the resources folder and bring it into your document. Change the Blending Mode to Multiply and rotate it slightly so it’s at a diagonal as shown here:

Hold the Command Key and click on the layer thumbnail icon of the model layer to activate the selection around the body. Then, with your tree-bark layer highlighted, click the Layer Mask icon at the bottom of the Layers Palette.

Continue to paint into the mask on this layer with a soft round brush set to around 20%. Use a solid black and fade out the edges of the texture so that it blends into the skin.
Add a Layer Mask to the layer beneath the bark texture, which should be the branches that are showing through the model layer. Use the same brush with a solid black color and low opacity to remove some of this area inside of the midsection to make it look more hollowed out. This will also add more depth to the image.

Now we are going to repeat some of the earlier steps by making a copy of the tree root image, flipping it horizontally, and masking out certain areas that we don’t need. After playing with the positioning of the image I have found a nice spot where the roots appear to be going into the midsection area, replacing the plant from earlier – This seemed to give it a more hollow effect rather than covering it up completely.

Next, duplicate the tree-bark texture and lower the opacity to about 65%.

We will now use the vector tree once again and this time, position it over the arm. Duplicate this layer and rotate it slightly so it creates a more intricate bundle of branches. Select both of these once you are happy with the positioning and press Command+E to merge them together.

Hold the Command Key and click on the merged vector tree layer. Once the selection is activated, highlight the model layer and press Command+J to paste the model into your selection on a new layer. Turn off the visibility of the vector tree layer and move the copy up in the Layers Palette so it’s above the other layers. Once you have done that you can then mask out the model’s arm to show the branches underneath.

Duplicate the tree-bark texture and delete the layer mask by holding the Control Key, clicking the mask icon and selecting ‘Delete Layer Mask’ from the dropdown menu. The Blending Mode should still be set to Multiply.

Hold the Command Key again and click on the model layer’s thumbnail icon to activate the selection and then press the Layer Mask icon at the bottom of the Layers Palette while your model selection is active and you are on the tree-bark layer. This will mask out all of the texture that falls outside of the body. Continue to paint into the layer mask with a soft round black brush at a low opacity like we did earlier on. Try to blend the texture in with the skin as shown below:

When you are happy with the result, duplicate the layer to intensify the effect. You may also wish to lower the opacity a bit so it’s not quite as strong but still stronger than it would be with only the first layer.
Repeat the same process for the opposite arm. Use the vector tree to get a cluster of branches going, then, copy the model selection into the tree area and mask out the model to reveal the branches. After that we apply the bark texture again and mask it out with a light opacity brush to blend it in.

Next we are going to select the model layer and paint with a black brush into the Layer Mask where the lower body is (underneath the tree roots). This will remove the legs and make it appear as though the tree has replaced the lower half of the man.

Make another copy of the hidden tree root layer and flip it vertically and horizontal so it looks like this:

Mask out the area outside of the model’s body so the tree root is only visible inside. From here we want to concentrate on blending the root with the body and you will come up with some interesting results.

Select the top layer in your Layers Palette and then go down to the Adjustment Layer icon at the bottom. When the menu pops up, choose ‘Hue/Saturation’ to bring up the interface.
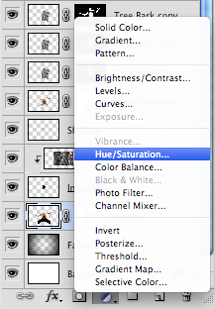
Move the Saturation slider all the way to the left to desaturate the entire image. From here, hold the Command Key and click on the model layer thumbnail icon to activate the selection around the man. Go to the Select Menu and then choose ‘Inverse’ to inverse the selection.
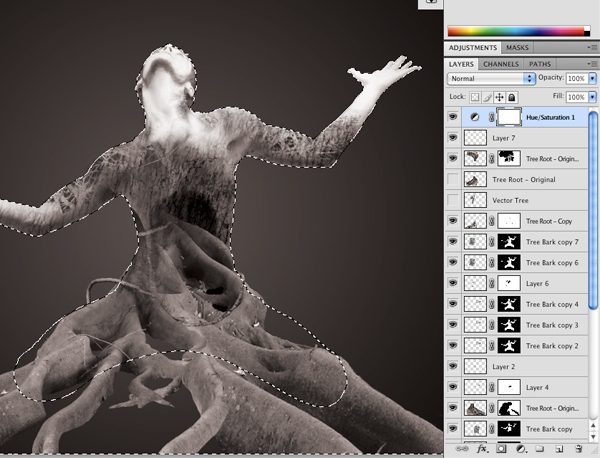
Next, switch to your Paint Bucket Tool (G) and with solid black, paint into the mask of the Hue/Saturation Adjustment Layer and it should mask everything else out so that the effect is only visible inside of the model selection.

Now we can switch back to our Brush Tool (B) and use a soft round black brush at a low opacity setting to paint some color back into the image. We only want to have the effect covering certain parts of the body. Concentrate on mostly bringing color back into the face, hands, and some parts of the arms and chest. The image below shows both the before and after effects of the Hue/Saturation Adjustment.

Switch to your Gradient Tool (G) and select the color #231B1C.

Create a new layer and move it just above the background layer before switching to your Marquee Tool (M) and making a rectangular selection to represent the ground. Once you have the selection active, fill it using the Paint Bucket.

Load up the Grass Brushes from the resources folder and select the brush from the set that is highlighted below:

Create another new layer above the ground layer. Select the color #4D6852 and begin to paint in some of the taller grass behind the tree.

Create another new layer just below the top Hue/Saturation Adjustment Layer and begin to paint in some more grass. Remember to vary the size of the brush using the left and right bracket keys and focus on filling in the dark spaces between the tree roots in the foreground.

Add a Layer Mask to the grass brushes layer by clicking on the Layer Mask icon at the bottom of the Layers Palette. Begin to brush over parts of the tree roots where the grass brushes have overlapped. The idea here is that we want certain parts of the grass to appear as though they are behind the tree roots as shown below:

Duplicate the ‘Faded Edges’ layer that we created earlier on in the tutorial. We want to place one copy above and one copy below the background grass layer as shown here:

Next, on the grass brushes that are behind the tree (not the ones in the foreground), we want to add a Layer Mask and paint around the edges with a soft round black brush at a low opacity setting. This will gradually fade the background grass out into the background.
Continue the process of adding grass behind the tree with the grass brushes and masking certain parts out to build up a solid base. This will also help to distinguish the foreground, middle ground, and background.

Create a new layer just below the Hue/Saturation Adjustment Layer and named it ‘Airbrushing’ as shown here:

Next, while you are on this new layer, hold the Command Key and click on the layer thumbnail icon for the body, and each of the tree roots separately so that you have a selection around them.
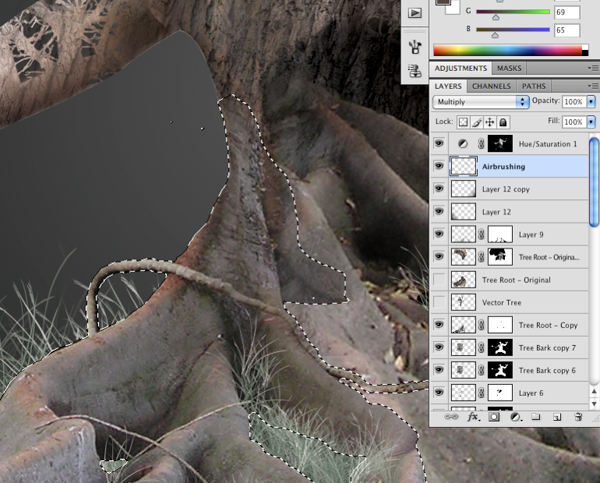
Change the Airbrushing layer’s Blending Mode to Multiply and with a soft round brush at a low opacity (10-20%) begin to sample colors from the darker areas and paint into the Airbrushing layer while the selection is active for each part. This will ensure that no paint goes outside of the lines!

This is a similar effect to using the Burn Tool (O) and will help to achieve a higher contrast image.
Next, open the smoky texture from the resources folder and import it into your document. You will need to scale this up using a Free Transform (Command+T) and remember to hold the Shift Key as you drag one of the four corners of the image outwards.
Notice where ‘Layer 13’ is in the Layers Palette – between both of the faded edge layers. Change the Blending Mode of the texture to Overlay and reduce to the opacity to about 70% as shown below:

Create a new layer above the texture layer and with your Gradient Tool (G) apply a solid black-to-transparent Linear Gradient that fades into the texture as shown here:

This will give a more gradual fade, as we want our texture to be pretty subtle and appear as a fog in the background. We will now do the same to both the upper left and right corners by creating a new layer for each and dragging from outside the corner into the image. Reduce the opacity of these layers a bit so the black isn’t quite as stark.

Switch over to your Gradient Tool and pick the following colors for your settings:

For the muted purple-gray color I am using #707073 and for the muted pink color #A0777A. Create a new layer above the black gradients that fade into the image and click somewhere in the center of your image and drag upwards. Once you have created your Linear Gradient, change the Blending Mode of the layer to ‘Color’ and you should have something like this:

Next, create a Layer Mask for the Linear Gradient and change the colors to black and white in your Gradient Settings Dialog Box. From here we just want to click and drag downwards to mask out the muted pink color so that the only color that remains on this layer is the grayish-purple. This color seems to blend better with the gray from the smoky texture.

Next, create another new layer, just below the model layer. What we want to do here is make it darker behind the model – Because we have a lighter area in the center of the image, we can’t tell that there are certain parts of the body that are wearing away and turning into branches. On the new layer you can paint with s hard 100% solid black brush to fill in some of these gaps. The image below shows the design with this layer first turned on, and then the second image shows the layer disabled.
With the black layer on:
With the black layer off:
You can see that this helps to bring some of the nice detail back into the image where we started to lose it.
Select the top layer in your Layers Palette so that it is highlighted. After that, click on the small black and white icon at the bottom of the palette to bring up the Adjustment Layer Menu. Select ‘Levels’ and it should add a Levels Adjustment to the top of your Layers Palette.
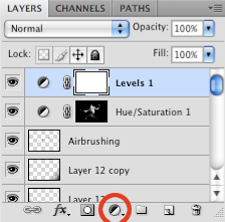
Move the black slider to the right a bit so that it is set to 6 as shown here:

Next, go to the Image Menu and select ‘Canvas Size’ to bring up the dialog box. Click the down arrow so that the height adjustment we make will only affect the top of the image. Essentially by doing this we are adding a bit of extra room on the top of the image, rather than on the top and bottom evenly.

Add three inches to the height making the canvas 14 inches tall and press the Enter Key. You will notice a few of the layers getting cut off initially, but we can fix this quickly.

Go to the Background layer and press Command+T before dragging the top middle handle upwards to extend it so that it goes to the top of the canvas. If there are any spots where it doesn’t connect or the image isn’t solid, simply fill it in with a color sampled from the background.

We have added a bit too much room to the top so with our Marquee Tool (M) drag a selection around the image, roughly about the same size as the image below:

Go to the Image Menu once again and choose ‘Crop’ from the menu.
As a finishing touch for our design I want to add a bit more atmosphere and detail to the background. The scene is supposed to be a forest, but a foggy forest. So what we want to do now is create a new layer above the smoky texture layer and just make a tall rectangular selection using your Marquee Tool (M). Fill the selection with a dark color from the background using the Paint Bucket Tool (G) and then lower the opacity to around 30%.

Duplicate this layer a few times and spread out the selections in the background. Also use a Free Transform (Command+T) on each of the rectangles to make them different widths. This will give the illusion of depth and show some distant trees, helping to make the scene feel more dramatic and dark.
Once you have done that and are happy with the results, be sure to save your work. I hope that you have picked up some useful tips in this tutorial now that we have created a dramatic scene in Photoshop with just a few images and some useful techniques. Thanks for following along, and happy Photoshopping!
You can view the final outcome below. I hope that you enjoyed this tutorial and would love to hear your feedback on the techniques and outcome.

Eric is a Graphic Designer, specializing in Print and Web Design. He's a graduate of the New England Institute of Art in Boston and has over 4 years of professional and freelance work experience. He lives in Brooklyn, New York working as a Graphic Designer and he has been featured in Advanced Photoshop Magazine, The Art of Fashion Art Exhibit and Artists In The Station Art Exhibit. Visit Eric's portfolio at ericvasquez.net.


Do you know the basic tools in Photoshop but feel that your work is still looking average? Join our creative community at FanExtra and get the direction you need to take your work to the next level.


thank for tutorial.
LOVING the techniques used in this tutorial Eric! I’ve always struggled a bit when masking gets this complex, but you explained it really well.
No problem at all – hope you enjoyed it!
Hello There Eric. First of all I must say this is a super tutorial. I’m a cs5 noob but found it relatively easy to understand and follow. I just wanted to know where i can find the tree vector because i can’t seem to find it in the resources links. A nudge in the right direction would be much appreciated. thank you
Hey Ricky -
Thank you very much for your comments! I am glad that you enjoyed this tutorial. I was wondering what vector you were referring to as I have only used a combination of images and textures here.
I cannot find it either. The one used in step 12?
Great tutorial Eric.
where can i find the mystic photo from somewhere else either than istock?
I’m afraid there is no free version of this image, but of course you can use a similar free image and the techniques will still work.
its a awesome tutorial
Thanks Nandini, I’m glad you liked it .
.
Nice work! Really cool ideas! Loved the tutorial. But I was wondering. The texture on the chest and arms of the man seems a little monotonous. As in, the direction of the texture there seems a little to uniform. What about rotating the tree branches vector here and there (u did rotate it, but i meant cutting the shape into smalled pieces and rotating them individually) Amazing tutorial otherwise!
Good point Sid. I think as well as rotating possibly the textures could be warped to fit the body of the man more.
wow this is fantastic !
Nice tutorial… i ? it!
I am a beginner. And my jaw dropped…in AWE!
Thank you guys for your comments and feedback on the tutorial. I really wanted to create something with mystique that was both dark and eye catching.
I do think that perhaps I could have spent some more time warping and rotating some of the textures, and it’s a great suggestion! You can really take it as far as you want to go, and an understanding of the techniques shown is all you need to get there.
This is the real deal. I love the final outcome. This is the first design I’ve seen that manipulates both objects. Great tutorial.
As great as I think the image is, I find it not believable as the tree meets the man. Is there some way to make this more realistic? It just seems that there are so many steps and so much work (nothing wrong with that) that the end effect should be stunningly realistic where the tree meets the man.
Thank you guys once again for the feedback! This remains one of my more popular tutorials with PSDFan and I am very thankful to have been given the opportunity to show some of my techniques.
@ Kev – I sometimes look back at some of my work and see how I could have done things differently or perhaps improved on certain aspects of a design. In this case, I worked on it until I got it to a place that I was happy with, but of course with the techniques used in the tutorial you could spend as little or as much time tweaking it to get the image to a place that you are happy with.
To me, the part where the tree meets the man is pretty realistic, and to further enhance this I suppose there would be a couple of options. You could perhaps add some more branches wrapping around the torso or layering more textures into this area.
The manupulation is on point, The tree does infact meet the man for me, Notice how everything ends up in place. Really Good Work Eric.
What a great tutorial, it looks a bit difficult for me but i’ll try…Thanks!
Thanks guys! I’m very happy that you guys enjoyed this one – I probably could have spent some more time on the background, but this is still one of my favorite manipulation works!
Hello friend it for your comment and make me have to know more style
Really nice thinking and very creative artwork
I did the following photo manip in 2004: http://lanezumoff.com/home/wp-content/uploads/2011/07/lastleaf.jpg
It was published in this book (also in 2004): http://www.amazon.com/ArtWanted-com-Creative-Minds-Artwanted-com/dp/0976330415
Well I really liked studying it. This tip provided by you is very helpful for accurate planning.
Great tut!
However I have gotten to the point of the vector tree brush. It wasn’t in the resources section you provided, but I found another and downloaded it.
I clicked on the model layer, clicked in the tree, did command J and saw that nothing happened…and you mentioned moving it above the shadow layer. Do you mean the background layer?? When I turn down the opacity of the model layer, I still see black tree. Please help.
great manipulation, good job guys..
I can’t believe my eye ! It’s like a 3d work ! But it’s made photoshop ! Good job thanks for share it!