 Members Area Tutorial: Create a Sinister Little Red Riding Hood Photo Manipulation
 Design a Creative RSS Icon in 15 Simple Steps
 Design a Cool Music Wallpaper
Have every post delivered to your inbox and get access to hundreds of useful design freebies.
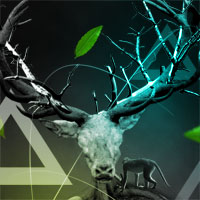
This is the final image that we’ll be creating in this tutorial.

The following images were used in making this tutorial:
http://www.sxc.hu/photo/810583
http://www.sxc.hu/photo/810584
http://www.sxc.hu/photo/1078543
http://www.sxc.hu/photo/1147268
http://www.sxc.hu/photo/1083889
http://www.sxc.hu/photo/1048200
http://www.sxc.hu/photo/1048199
http://www.sxc.hu/photo/908414
http://www.sxc.hu/photo/1158745
Open up a new document (600X700px) and create a new layer called ‘background’. Draw a radial gradient ranging from dark gray to very dark gray.

Next, create a new layer called ‘clouds’ and go to filter>render>clouds.

Now set your cloud layer’s blend mode to ‘soft light’ and reduce it’s opacity to 40%.

Now paste in the body of a mannequin that you have cut out (using the pen tool or lasso tool). This should be automatically pasted into a new layer. Call this layer ‘mannequin body’. Move the mannequin to be in the bottom center of your canvas.

Now grab your pen tool. In the options bar set it to ‘paths’ not ‘shape layer’ and then draw a curved path line along the top of your mannequin’s body. If you need help using the pen tool then you can refer to our recent article ‘Master the Pen Tool in Under 30 Minutes’. Once you have drawn your pen line, right click on it and click ‘make selection’. Then hit delete to delete the top part of your mannequin.


Now paste in the head of a stag, positioning it where the head of the mannequin would have been. Do not worry about blending for now, as we’re just setting up our main composition.

Now cutout and paste in two mannequin hands. Resize and rotate them to fit nicely with your overall composition.

Ok, so granted, your image will be looking pretty damn weird right about now. But now it’s time to start bringing the current elements together a little.
Select your mannequin body layer and go to image>adjustments>levels. Apply the levels settings shown below. This will make your body a lot more intense.


Apply the same levels settings to your hand layers.

Now apply the level settings below to your stag head layer.


Now use your clone stamp tool to copy part of your deers face and clone over each eye, thus hiding it’s eyes entirely.


Now open up a photo of a tree. Luckily for us this photo is on a reasonably plain background, so instead of cutting out the tree using the lasso tool or pen tool, we can use the magic wand. Because the blue background is not all the exact same color, set your magic wand tool’s tolerance to around 30. Then simply click on large areas of the background to select it. You want to select all parts of your background, and so to keep adding more areas of selection, simply hold ‘shift’ and then click on a new area of blue. Then once you’ve selected all areas of your background, go to select>inverse to invert your selection and you are able to copy your tree image into your main composition.
If you need further tips on using the magic wand tool and other selection tools check out our recent article: ‘Master Photoshop’s Selection Tools in Under 30 Minutes’.


Now go to edit>distort>scale and scale your tree branch to fit over one of the stag’s antlers. Then select the bottom half of the branch and go to edit>transform>rotate to fit it over the lower part of the antler.

Now select some parts of the tree branches and delete them. You want to give the impression of the branches winding between the antlers.

Start adding a few more branches into your piece.

Position another picture of a tree over your mannequin’s body. Then try fitting in other branches and details into your composition. For the main tree over your mannequin’s body use a medium sized soft eraser brush to allow parts of the body to show through.


Now go through each of your layers going to image>adjustments>desaturate in order to grayscale each photo.

Now select the main tree image (with the leafs) covering your mannequin’s body. Go to image>adjustments>brightness/contrast and increase your contrast to +50.

I want to blend the branches at the bottom of my composition a little better. To do this I reduce the opacity of my bottom branches to about 80%, and then use a soft eraser at a low opacity to gently erase the branches as they move towards the center of the mannequin’s figure.

Now select your pen tool. Draw out large curved lines going across your figure. Then, with a 1px white paintbrush selected, right click on your pen line and click ‘stroke path’. This should give you a big curved 1px white line.
Then use a soft eraser brush at a low opacity to gently erase parts of your white lines, particularly where they overlap your figure.

Now I want to add triangle outlines. To do this, I create my triangles using the lasso tool. To make a perfect triangle hold shift, to draw your selection at 45 degree angles. Then fill your triangular selection with white using your paintbucket tool. Then, with your selection active, go to select>modify>contract and contrast by 30px. Then hit delete, leave delete the middle part of your triangle.
Then reduce the opacity of this layer to around 50%. Duplicate it, and shrink your triangle, moving it into the right part of your canvas. Be sure to reduce the opacity on your smaller triangles, making it lower the smaller they are.

Now cut out and paste in an image of a leaf. Duplicate this layer, and make your duplicates progressively smaller and at different rotations.

Now use filter>blur>gaussian blur to blur the leaves various amounts. My the larger leaves more blurred, to give the impression of them being closer to you.

Now use a very large, soft paintbrush to paint in spots of color over your composition. Be sure to do this on a new top layer.
Then change your layer’s blend mode to ‘overlay’.

I hope that you enjoyed this tutorial, and as always would appreciate your comments.

Tom is the founder of PSDFAN. He loves writing tutorials, learning more about design and interacting with the community. On a more interesting note he can also play guitar hero drunk with his teeth.


Do you know the basic tools in Photoshop but feel that your work is still looking average? Join our creative community at FanExtra and get the direction you need to take your work to the next level.


This techniques are really cool, even if it looks a bit like it’s not complete. It’s a great tutorial and I love those wicked horns! The monkey and forrest effect don’t fit the image that well though, somehow they don’t feel “right”, at least yet. Otherwise: Keep up the good work!
Thanks Smashill! Yeah, to be honest I struggled a bit with the result in this piece, but felt that the techniques discussed warranted me publishing the tutorial. If you have any tutorial ideas I’d be happy to come up with something to cover them.
I really love the end results and techniques used. Though I reckon that once an composition like this is done for print you would have to use the pen tool rather than magic wand to extract everything from the background. Overall you did a great job!
Thanks Franz! Yeah that’s a good point about the magic wand tool. I just felt for this quick web demonstration it was the quickest way to go. I’m glad you liked the end result
That thing’s gonna give me nightmares – I don’t know where you get you’re inspiration from but it’s well put together.
I’d say the only bit that bothers me is the tree bit in the middle which fades out – I’d prefer it to not fade.
The outcome is kinda meh but the techniques are great! Appreciate the effort Tom!
Featured here: http://www.presidiacreative.com/web-picks-18/
Thanks a lot Eric, I appreciate the feature and kind words
Adam: Ha, yeah it’s a pretty freaky piece. I agree that I struggled with that middle section, but I’m glad you like it overall!
sorry to say(i’m not harsh or rude) from past few tut….i don’t like these designs, I think these are missing the wow! factor.
Thank you.
I tried this tutorial last night my outcome here.
http://i286.photobucket.com/albums/ll112/Alekis_d/PSDFANTUTO.png
Thanks;
A very interesting composition thanks
Thanks a lot, it’s very good tutorials
Thank you
I tried it and my out put was very Nice. All my friend loved it.
A very interesting photography, thanks a lot, This blog well and good. have a nice day.