 How to Design a Beautiful Google Calendar Icon
 Photoshop Case-study: Metropolis
 Members Area Tutorial: Creating a Zombie Video Game Cover
Have every post delivered to your inbox and get access to hundreds of useful design freebies.
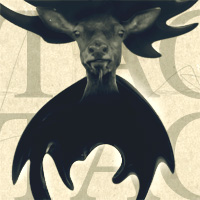
As always, this is the final image that we’ll be creating:

Download this great paper texture.
Create a new document (600X650px) and paste in the texture.
Call this layer ‘old paper texture’. Then reduce this layer’s opacity to 60%.


Now apply a hue/saturation adjustment layer. Decrease your saturation to -60 and increase your lightness to +25.

Download this great image of paint splatters.

Paste in one of the paint splatters that you like the look of.
Then cut it out from it’s background. Because the background is pure white you can do this quickly and easily using the magic wand tool.


Now go to filter>distort>polar coordinates. Select ‘rectangular to polar’ and hit OK.
This should warp your paint splatter into an awesome abstract shape.


Name this layer ‘paint splatter 1′.
Now go to edit>transform>flip vertical.
Then use your transform tools to resize your paint splatter.

We want to reduce the saturation and darken our paint splatter. A great non-destructive way to achieve this is using adjustment layers.
Apply a hue/saturation adjustment layer just above your paint splatter 1 layer, reducing the saturation to -100 and the lightness to -60.
However, notice that this effects your entire canvas, whereas you only want it to effect your paint splatter. Go to layer>apply clipping mask, and the hue/saturation adjustments will only effect the layer directly beneath the adjustment layer (in this case our paint splatter 1 layer).

Download this image of a stag:
Copy and paste it into your document, and then cut out the stags head, making sure to only include the head, ears and neck, not the body, background or antlers.
Call this layer ‘stag head’.
I also slightly rotated my paint splatter 1 layer to fit better with my stag’s head.


With your stag head layer selected, click the quick mask icon at the bottom of your layer palette.
Use a medium sized, soft black paintbrush (20% opacity) and begin painting over the bottom of your stag’s neck, until it fades into the paint splatter beneath it.
Note how this is a non-destructive alternative to the eraser brush.

Now apply a hue/saturation adjustment layer just above your stag head layer (remember to apply a clipping mask!). Reduce saturation to -100 and lightness to -10.

Select another paint splatter and copy/paste it into your main document.
Again, cut it out using your magic wand tool:


Repeat the techniques used previously on your first paint splatter layer.
Apply a polar coordinates filter, and then a hue/saturation adjustment layer.
To make things easier you can duplicate your previous adjustment layer, move it above your new paint splatter layer and reapply a clipping mask. I actually reduce the lightness of this new adjustment layer to -80, as the new paint splatter was lighter than the original one.

Duplicate your paint splatter 2 layer, and move the duplicate above your latest adjustment layer. Call this layer ‘paint splatter 3′, and for now hide it’s visibility.
If needed reapply a clipping mask to your adjustment layer (it can turn off the mask when you duplicate your paint splatter layer).
Now apply a quick mask to your stag head layer.
Option+click on your ‘stag head’ layer in your layer’s palette, whilst remaining on your ‘paint splatter 2′ layer. This will form a selection around your stag head layer. Then, with your mask in place, use a medium, soft black paintbrush to paint away areas of your paint splatter overlapping your stag’s head. If you want to undo any of your masking efforts, simply paint over an area using a white paintbrush.

Now repeat the same technique on your ‘paint splatter 3′ layer. Also feel free to mask away areas where your two top paint splatter images overlap (although not completely masked off, they should blend together subtly).


I want to bring out some of the highlights and shadows of my piece, so I choose to dodge/burn it.
A great non-destructive way of doing this is to create a new top layer, go to edit>fill and fill your canvas with 50% gray. Then change this layer’s blend mode to ‘overlay’.
Use a medium sized paintbrush (20%) and use black for your burn marks, and white for your dodge. This should allow you to accentuate the highlights and shadows of your piece nicely.
The image is already quite heavily shadowed, so I paid more attention to dodging. It’s also useful to go in with a smaller white paintbrush to really bring out the subtle highlights in your image.

Create a layer called ‘rough lines’, just above your background layer and adjustment layer for your background. Use a 1px black paintbrush to sketch out some rough abstract lines behind your main composition.
Reduce this layer’s opacity to around 25% to make the effect more subtle.

Type out the word ‘STAG’ behind your main composition 3 times to help construct some background detail. I used Times New Roman text, 242pt, regular.

Now apply a new adjustment layer (curves) top layer. You can play around with the settings until you’re happy with the result, but try to bring up the bottom part of your curve, and bring down the top part. This will eliminate 100% blacks and 100% whites. I chose to give my image a nice bluish tint.

Finally, add an exposure adjustment layer (settings below):

You can view the final outcome below. I hope that you enjoyed this tutorial and would love to hear your feedback on the techniques and outcome:
Tom is the founder of PSDFAN. He loves writing tutorials, learning more about design and interacting with the community. On a more interesting note he can also play guitar hero drunk with his teeth.


Do you know the basic tools in Photoshop but feel that your work is still looking average? Join our creative community at FanExtra and get the direction you need to take your work to the next level.


Very easy to do. Thanks a lot Tom
I think this tutorial is too simple and it provides a “creativity” that is personal but not something that people would be completely interested in knowing about, in my opinion. I think you could lose the animal and create a tutorial using the same effect but use it, designing the whole animal not just top and bottom.
Thanks for the great constructive critique Wendell. I agree that more of a ‘drawing’ tutorial could be very useful for people. I’ll look into it over the next few weeks, as it’s been a while since I did a ‘from scratch’ drawing tutorial.
Hi
Nice Tutorial
Tom, congrats !!! you do the best tuts ever! keep up the good work, can’t wait to see your next project
It’s very nice tutorial. Thanks.. ^_^