 Master Photoshops Selection Tools in Under 30 Minutes
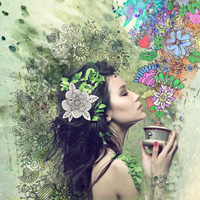 Learn How to Design a Charming Collage Composition
 Members Area Tutorial: How to Create a Detailed Blender Illustration From Scratch
Have every post delivered to your inbox and get access to hundreds of useful design freebies.
This tutorial will guide you on how to turn a plain portrait into a unique, colorful and complex piece of art. You will learn how to modify resources and blend them into the piece, as well as adjustment layers and masking techniques.
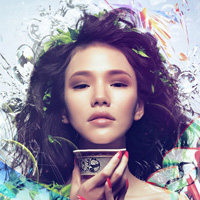
As always, this is the final image that we’ll be creating:

The first step is to determine on your model, since this is a portrait photomanipulation. I’ve chosen this one here, refer to the resources above to download.

As you can see, the space above the girl’s hair gives us very little room for creativity. So we’re going to extend it further. Hit Ctrl+Alt+C to change the canvas size or go to Image > Canvas Size…. Key in these details into the window which will then pop out shortly after. At the anchor section, you’ll see nine arrows stretching out. Remember to click the bottommost arrow. This means that the canvas will fix at the bottom while stretching towards the top.

After that we should have something like this.

It’s best to get acquianted with the major tools we’ll use beforehand. The list below is for your reference.

Next we have to blend the entire canvas. Use Eyedropper Tool and click on a spot closest to the top edge, as shown below. This will give you the color of the background of portrait as your foreground color.

Before we continue, I’d like to introduce the buttons which I’ll mention quite a lot throughout the tutorial. They’re located on the bottom of the layer panel on your right.

After that, create a new layer clicking the No.3 button (“Create a New Layer”) on the bottom of layer panel. Then, shift the layer beneath the stock photo and use Paint Bucket Tool with the previously acquired foreground color to fill in that color.

Still, you’ll realize that it’s not perfect. So select the Stock Photo and click on the No.1 button (“Add Layer Mask”) to create a new layer mask. A layer mask gives you the ability to undo changes (such as erasing) later on anytime you like. So in future, use this instead of the normal Eraser Tool. To use this tool, set the foreground color to black, and take out Brush Tool. Just treat the Brush Tool as though it’s the Eraser Tool, and start erasing the top edge gently with a soft brush. A soft brush (as opposed to hard brush) is a type of default brush of which the edge is faded and not solid. If you want to undo this action, just change the foreground color to white and repeat the same.
You should get something like this.

Next, we want to paint some color to the background since it looks rather plain otherwise. Blue is a good choice. Take out the Gradient Tool (right click on Paint Bucket Tool to switch to Gradient Tool), then click on the gradient bar on top and this window will pop out. Use the colors as shown below.

Set the gradient mode to Radial.
And brush it in the upward direction from the woman’s forehead.


After that, erase the bottom half until the woman’s face can be seen. Again, use layer mask and soft brush as elaborated in Step 2.

Set the layer mode to Color Burn and its opacity to 60%.

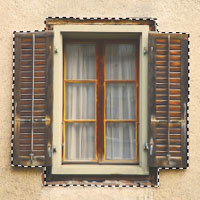
Go to Lost & Taken website and download the Psychadelic Paper pack, or just look for the individual texture that looks like this and download it.

Resize and place it like this so that there’s a nice curve right above the woman’s head.

After that set the layer to Soft Light 25%.

Next, set your foreground color to #464b61 and paint it around the woman using a soft brush.

Then set the layer to Hard Light 12%.

Repeat the step by using black color (#000000) and paint it like this.

This time set the layer to Soft Light 25%.

Now we can consider the background done.
Moving on, we’re going to decorate the piece with something called the C4D renders. Have a look at stinky666‘s gallery to get an idea of what it is.
Download a variety of C4D packs. I recommend this because it has everything you need.
We’ll start with this C4D. It’s okay if you can’t find the exact one, just pick one that is the closest and improvise. What we need is the volume, and a little creativity.
After this we’re going to only extract a small part of it. Since it’s the first C4D, I usually crop out the part that is simple and big.

Paste it on the model, then use Free Transform by hitting Ctrl+T and right click to select Rotate 180 degrees. Manually rotate it slightly so that you get something like this.

Erase the unwanted parts and set the layer to Hard Light 60% (opacity).

If you’re wondering how to determine the position to place the C4D, here’s how I do it. I look for the area that has the greatest volume, which in this case, is the area highlighted below. Then I rotate it so that it fits nicely above the woman’s head.

Using the same C4D, repeat Step 7. But this time place it in this position.

Again, erase the unwanted parts and set the layer to Hard Light 80%.

Next, look for this C4D.

Manually rotate it to get this.

Erase the unwanted parts and set the layer to Hard Light 70%.

Using the same C4D in Step 9, position it like this.

Set the layer to Screen 70%.

Next, we’re going to pick something more colorful, but not so complicated. A good choice would be something like this.

Rotate it manually and place it at the bottom right corner. Position it in such a way that a nice pattern can be formed above the shoulder.

Next, hit Ctrl+U or go to Image > Adjustments > Hue/Saturation… and apply these following settings.

Set the layer to Hard Light, 85% Opacity and 80% Fill. This time, use a hard round brush to erase the unwanted parts because using a soft brush will finally lighten even the area that you want to keep. Erase bit by bit until you get something like this.

Now look for a C4D piece like this one below.

After copying onto the canvas, Free Transform it and Ctrl+T, then right click to select Rotate 90 degrees CW. Then place it here.

Set the layer to Pin Light, 80% Opacity and 80% Fill. Then erase the unwanted parts. This time you can use a soft brush.

This time we’ll choose another colorful C4D.

Resize and rotate manually.

After that, hit Ctrl+T for Free Transform and right click to select Warp. Use your mouse to create a nice curve above the woman’s head, just like this.

Ctrl+U or Image > Adjustments > Hue/Saturation… and apply the following settings.

Erase parts that cover the woman’s face/hair with a soft brush. Lastly, set the layer to Pin Light, 85% Opacity and 80% Fill. And you should get something like this.

For variety we’ll use a wireframe instead of the regular C4D piece.

Since the background is white and not transparent, we’ll have to change the blending mode to something else besides Normal to get a transparent background. But first, Invert it by hitting Ctrl+I or Image > Adjustments > Invert.

Set the blending mode to Screen.

Last C4D piece, pick something similar to a C4D effect. C4D effects usually have black background, so when we set the blending mode to screen, we’ll get something like light rays or sparkles. This time I’ll choose stinky666′s bubble effect.

Position it here.

Set the layer to Screen and erase area that covers the woman’s face.

Since now the area above the woman’s head is a little plain, let’s add one more stock photo. Bubbles are good because they’re not very obtrusive when you lower the opacity. Download the bubble stock here.


Set the layer to Screen, 90% Opacity, 90% Fill.

The next tools we’ll use are pen tool and gradient. We want to create big colorful swirls to make it more interesting. This site has lots of amazing gradient packs. You can manually customize your gradient each time, or have a variety of saved gradients to be more convenient.
To install the gradient packs that you’ve downloaded (which will be in .GRD format), click on ‘Load Gradients…’ as shown below and browse for the gradients in their respective locations.

As for using pen tool, there’re usually two ways to do it – creating paths or shape layers. If you choose to create shape layers, you’ll have to edit the layer style to change the color. But I usually use the first method because I like experimenting with different gradients. Use the following settings.

You might find pen tool challenging at first, so just stick to very simple curves and shapes. For example, click on one point outside the canvas, then another one on the other side of the canvas and drag it towards the right.

After that, just complete the loop outside the canvas whichever way you want. Note that it’s only important to create a nice curve inside the canvas, what’s outside doesn’t matter. Remember that you have to go back to your original point which is ’1′ to complete the loop.

Once you have the path, right click on the canvas and select Make Selection…, then click OK.

Then, choose a bright blue gradient and apply it this way.

Set the layer to Hard Light, 80% Opacity, 60% Fill.

We’ll repeat the previous step for several times, but this time try an S curve. It’s also very easy to create an S curve. To create such a curve, you have to place your second in the middle between left and right, then drag it down to about 55 degrees.

Then click on a point outside the canvas and complete the ‘S’.

Complete the loop.

Again, right click to Make Selection and apply a warm pink-orange gradient.

Set the layer to Hard Light.

Another S curve placed slightly towards the bottom with bright cyan-blue gradient.

Set the layer to Hard Light, 65% Opacity.

Every now and then, you can experiment with slightly more challenging shapes. It’s a double S-curves. Instead of completing the loop outside the canvas, make another S curve and return to the starting point.

Choose a red-brown gradient.

Set the layer to Overlay.

Another blue double-S.

Set the layer to Hard Light, 80% Opacity.

Next, you can try experimenting around with clipping mask. Create a new layer, right click on the layer and select Create Clipping Mask. This means that any pattern on the newly created layer will only appear on the visible areas on the layer below.
For example, the curve we previously created in Step 22 is the blue double-S. Let’s say we now create a yellowish-green random shape.

If we create a clipping mask it’ll become like this.

Finally, set the layer to Hard Light.

Double S-curves.

Set the layer to Overlay.

The last pen tool shape.

Set the layer to Vivid Light this time.

Finally, create several curves using pen tool. Before you delete your pen tool paths, go to Brush and set your brush settings to Hard Brush, 1 px, and set foreground color to white. After that, click Pen Tool again and right click on the canvas to select Stroke Path…
A new window will then pop up, set the Tool to Brush and do not tick Stimulate Pressure. You will have something like this.

Lower the opacity if necessary.

Now we’re just left with some color adjustment. I used a sepia-purple gradient with its orientation set to Radial. Let the brightest part be on the side so that the lighting is not directly on the model.

Set this layer to Screen, 60% Opacity.

This time use a dark pink-red gradient. The reason to use dark colors is to create non-obtrusive lighting. When you’re using Screen as your layer mode, it’s important to note that using bright colors will give a really bright effect, though you can always lower the opacity.

Set the layer to Screen, 80% Opacity.

For final adjustments I almost always use a Curve. You can create a new adjustment layer (Curve) by clicking on the small button below the layer panel. Then apply the following settings. For this composition I mainly use an S curve for all four modes. RGB is mainly to control the contrast.

If you think you’ve overdone it but don’t know which to modify, you can always lower its opacity. An adjustment layer works like any normal layer in this sense. You should have something like this.

Now create another adjustment layer and select Photo Filter. Apply the following settings.

Lower the opacity of the layer to about 50%.

Finally, create the last adjustment layer and select Selective Color. Apply the following settings.


Here’s the final product! Thank you for following this tutorial till the end. I hope you enjoyed working on it and followed it ok. Feel free to leave any constructive comments or questions.
The source files for this tutorial are available to our FanExtra members community. If you want to access the source files for this tutorial (and all of our tutorials + thousands of other resources) then sign up here.
If you’re already a FanExtra member then you can login here to access the source files.

Pauline is a self-developed digital artist from Malaysia. Her specialty is photo manipulation but oddly enough, she's a full-time engineering student. Visit her deviantART and Behance for more.


Do you know the basic tools in Photoshop but feel that your work is still looking average? Join our creative community at FanExtra and get the direction you need to take your work to the next level.


Thanks for this tutorial, that’s great!
Nice !! Thanks a lot !