
 Photo Manipulate a Surreal Space-Age Landscape
 A Beginners Guide to Photo-Manipulation and Ani-Morphing
 Create a Cool Abstract Photo-Manipulation
Have every post delivered to your inbox and get access to hundreds of useful design freebies.
In this tutorial I’ll show you how to create a dark ghostly scene. You’ll learn how to manipulate different images together and blend them correctly, use layer masking, create ghostly lighting, retouching, extract hair, work with advanced layer groups and more.
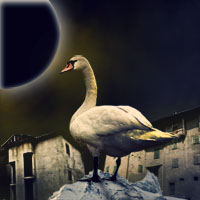
As always, this is the final image that we’ll be creating:

Create a new layer and fill it with black. I start with a medium size but feel free to make your own. Open ground stock. I take the part on the right (use Lasso Tool) and drag it into our black canvas with Move Tool (M). Press Cmd/Ctrl+T to narrow it horizontally as shown below:


I use some adjustment layers to change color of this ground. On ground layer, go to New Layer-New Adjustment Layer-Hue/Saturation:

Color Balance:

Curves:

I use soft black brush to erase the left side of this ground on Curves layer mask as I want it darker than the rest:

Open sky stock. I use Retangular Marquee Tool to make a selection on this part of sky and place it above the ground after resizing it down. You can see that I choose a part with a bright middle section as I want it to be main light source in our destination photo.


Now click the second button on the bottom of Layer Pallete to add layer mask for this layer. Take soft black brush with big size (about 200 px but it depends on your document size) and erase rough edge of this sky part:

There are some noise on sky part and I don’t want it. It might look ok at this stage but it will bother you when you adjust color, change lighting…etc…To fix it, on sky layer, go to Filter-Noise-Dust & Scratches:


The sky now looks smoother:

I use an adjustment layer with Clipping Mask for sky to darken it a bit. On sky layer, go to New Layer-New Adjustment Layer-Curves:

I use soft black brush to remove effect on the middle part of sky where the light source will be set (on Curves layer mask):

Make a new layer and I use soft black with opacity about 30-50% to paint on the sides of sky to darken it. Change the mode to Soft Light 100%:


Create a new layer and take soft white brush painting on the center of sky to brighten it. I put the mode to Soft Light 100%:


In this step we’ll make a big grave. Open hill stock. Extract the hill part, position it on the right of ground and downsize it:


Duplicate this layer and choose Edit-Transform-Flip Horizontal then move it to the left:

I name these layers as “grave part 1″ and “grave part 2″.
Add layer mask for these grave layers and use black brush with hardness about 50% to remove hard edges at the bottom parts:

Change brush to grasses ones. I choose this brush:

Press F5 to change brush direction to fit the grave stroke slope to remove unwanted parts. You can see two screenshots below as an example:


My result:


Thank you for reading this tutorial, I hope that you enjoyed it. If you want to view my other arts and tutorials you can look at my Deviantart page or follow me on Facebook.


Do you know the basic tools in Photoshop but feel that your work is still looking average? Join our creative community at FanExtra and get the direction you need to take your work to the next level.


Leave a comment
0 Comments:
No comments have been posted yet. Be the first!