
 Create an Aquatic Photo Manipulation of a Giant Tortoise
 Design an Abstract Splattered Photo Manipulation
 Create a Dark Landscape Matte Painting with Photoshop
Have every post delivered to your inbox and get access to hundreds of useful design freebies.
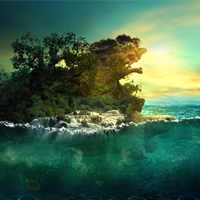
In this tutorial I’ll show you how to create a beautiful emotional sunset scene. We’ll work with manipulating techniques, blending, masking, painting and more.
As always, this is the final image that we’ll be creating:

Create a new document and fill it with white ( or any color you like). I use the size of 1000×1200 px.
Open sky stock. Move it ( press M to active Move Tool) into the white canvas, resize ( use Cmd/Ctrl+T to do it) and place it as shown below:

Flip it by choosing Edit-Transform-Flip Horizontal:

Open meadow image. Use Magic Wand Tool ( or any methods you’re familiar with) to extract the meadow from background). Drag it into our document and downsize to fit . Place it at the bottom of our picture:


Because the meadow is set as background so we will blur it to create some depth. On meadow layer, go to Filter-Blur-Gassian Blur and set radius as 5:

We can see that the contrast and color of meadow don’t match sky. To correct it, I use an adjustment layer with Clipping Mask for meadow. On this layer, go to Layer-New Adjustment Layer-Curves:


This is result we have:

Open the stock with balcony. Cut it out and move it into our main picture and resize. Because it will be positioned at foreground so I only take its upper part:


I add two adjustment layers ( with Clipping Mask) for balcony layer to change its color.
Curves:

Color Balance:


I want to make the main light source come from upper left so the balcony must get some reflected light. Right click balcony layer, choose Blending Options:


This what we have so far:

Open model stock. First use your favorite method to extract her from background. As you see I don’t take all her hair as I will paint a new one later. I make a new fill layer between extracted model and background with a light color (#ecfafc) but you can choose any bright colors you want. Also you can notice that some parts of background is still seen though transparent part of dress bottom, model arm, the back of dress and we need to remove them.


Thank you for reading this tutorial, I hope that you enjoyed it. If you want to view my other arts and tutorials you can look at my Deviantart page or follow me on Facebook.


Do you know the basic tools in Photoshop but feel that your work is still looking average? Join our creative community at FanExtra and get the direction you need to take your work to the next level.


O M G What a Tutorial with lot of effort very easy to follow the instruction i like the way you are presenting your Tutorials. It will help me lot in Designing Ideas.