 Photo Manipulate a Scenic Natural Spa Scene
 Members Area Tutorial: Photo Manipulate a Destructive Giant Gorilla Scene
 Members Area Tutorial: Create A Fantasy Photo Manipulation “Summoning The Power”
Have every post delivered to your inbox and get access to hundreds of useful design freebies.
As creatives we often love to produce works that express our creativity. Whether they’re doodles, collages or in today’s case a color work of art depicting a lazy summer day. Yes, we know it’s winter, but let this advanced tutorial from our expert Jenny Le take you away from the winter climate and explore your creative side.
In this tutorial I’ll show you how to create a colorful photo manipulation called “Simple Life”. We’ll pratice manipulating techniques, retouching, applying texture and working with lighting effects.
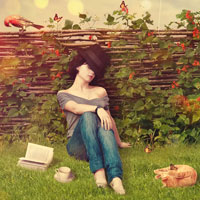
As always, this is the final image that we’ll be creating:

Create a new document with 1000×1200 px (you can use your own size) and fill with any colors (I like white). Open sky stock. Use Retangular Marquee Tool (M) to make a selection for this part of sky part as shown below:

Active Move Tool (V) to drag it into our white canvas, place it on the top and resize it down by pressing Cmd/Ctrl+T (hold the Shift key while resizing to keep original aspect ratio):

We’ll apply Gassian Blur for this sky in order to add depth to our picture. To do it in non-destructive way, on sky layer, go to Filter-Convert for Smart Filters and you’ll be informed that selected layer will be converted into Smart Object. Then choose Filter again, go to Blur-Gassian Blur and choose radius as 6 px:

I add an adjustment layer with Clipping Mask to sky to change color of it. On sky layer, choose New Layer-New Adjustment Layer-Color Balance:


I want to brighten the bottom left of sky so I make a new layer (Clipping Mask) and use brush with color #644811 to paint on indicated part then change the mode to Screen 100%:


Open grass stock. Take any parts you want and move it into our main picture, position it at the bottom:


I want to sharpen it a bit so convert it into Smart Object as done with sky. Go to Filter-Sharpen-Unsharp Mask:

Open fence stock. Move it into middle section of our picture and I take the left part of the fence to be visible as it does not have as plenty of vines top as anothers (we need space to add more elements there):

Click the second button on the bottom of Layer Pallete to add layer mask to fence layer. Change your current brush to cloud ones and remove sky on fence image. The reason I choose cloud brushes to mask is to leave cloud-like edges while masking over the vines top which we can’t do with another brush kinds. Remember to vary brush ones to get the best result. With the bottom of the fence, I use basic brush, black color with hardness about 20-30%:

Call this layer “fence part 1″.
The middle section of the left looks empty so on fence layer, I make a selection of part from the right and paste into the left (Cmd/Ctrl+J to copy):


Add layer mask to this copied layer and use hard black brush to carefully remove unwanted parts (don’t use soft black as it will leave unatural edges). Try to keep details as much as possible:

I name this layer “fence part 2″.
Copy another small part and paste again into the left:

Name this layer “fence part 3″.


Thank you for reading this tutorial, I hope that you enjoyed it. If you want to view my other arts and tutorials you can look at my Deviantart page or follow me on Facebook.


Do you know the basic tools in Photoshop but feel that your work is still looking average? Join our creative community at FanExtra and get the direction you need to take your work to the next level.


Leave a comment
0 Comments:
No comments have been posted yet. Be the first!