
 Create A Nature Inspired Digital Illustration in Photoshop
 Create an Emotional Dreamscape Digital Photo Manipulation
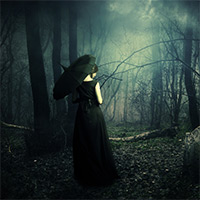 Create a Dark, Mysterious Photo Manipulation
Have every post delivered to your inbox and get access to hundreds of useful design freebies.
In this tutorial I’ll show you how to create a surreal underwater photo manipulation that is perfect for a poster design. You’ll work with various manipulation techniques including blending, masking, creating underwater effects, complex extractions and much more.
This is a comprehensive tutorial that will teach you a range of applicable photo manipulation skills to use across your work.
Let’s get started!
As always, this is the final image that we’ll be creating:

Create a new document and fill it with white (or any colors you want). Open sky stock. Grab Retangular Marquee Tool (M) to make a selection on sky part and use Move Tool (V) to drag it into our white canvas, place it at the top . Go to Edit-Transform-Flip Horizontal:


I use an adjustment layer to change color of sky. Go to Layer-New Adjustment Layer-Color Balance:


Open underwater stock. Drag it to the bottom of our picture then click second button at the bottom of Layer Pallete to add layer mask to it:

Use soft black brush to remove hard edges of the top and blend it with sky:

I add two adjustment layers with Clipping Mask to change color and contrast of this underwater part:


After darkening with Curves I use soft black brush to erase the top of this underwater area as I want it brighter than the rest:

Open sea stock. Take a part from this sea and position it at the center of our image, use Cmd/Ctrl+T to narrow it:


I call this layer “sea surface”.
Add a Color Balance layer (Clipping Mask) to match color of this sea with the scene:


Extract girl and situate her at the middle section of our image and set this layer under sea surface layer:

Add layer mask to sea surface one. Use black brush with hardness about 70-80% to remove a part of model to make a look of this girl sitting between the sea, also remove hard edge of the sea sides:

Create a new layer above girl one with Clipping Mask option. Active Clone Tool (S), ensuring that ‘sample all layers’ is ticked, and remove some hair strands and a part of girl glasses:

I use two adjustment layers (Photo Filter and Curves – Clipping Mask) to reduce saturation and change contrast of the girl:

Then I clear the girl part under the sea with soft black brush on Curves layer mask:

I want to darken the bottom part of the girl and reduce highlights on model body, hair, fingers so I make two layers (Clipping Mask) and use soft black brush to paint on these areas. I change the mode of these layers to Soft Light 100%. On screenshots, you can see that I vary brush opacity for differents parts:


Thank you for reading this tutorial, I hope that you enjoyed it. If you want to view my other arts and tutorials you can look at my Deviantart page or follow me on Facebook.


Do you know the basic tools in Photoshop but feel that your work is still looking average? Join our creative community at FanExtra and get the direction you need to take your work to the next level.


I loved this tutorial! Thank you very much!
My realization:
http://www.chez-mireilled.com/article-design-summer-time-avec-photoshop-116835570.html
Wow, that’s incredible work Mireille! I love how sharp your final outcome is, very impressive .
.
Thank you very much, Tom