
 Create An Underwater Typography Scene
 Create the Emotional Photo Manipulation Firing Heart
 Members Area Tutorial: Create a Detailed Reel to Reel Tape Recorder From Scratch in Photoshop
Have every post delivered to your inbox and get access to hundreds of useful design freebies.
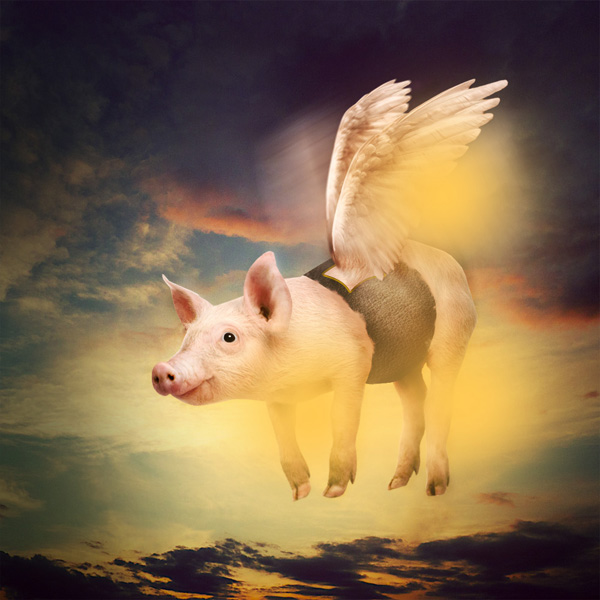
Here is a preview of the image that we are going to be creating:

Create a new document (1000X1000px).
Paste in your sky photo from the resources section for this tutorial, positioning it to fit like the image below:

Apply a color balance adjustment layer to your sky layer. For all adjustment layers in this tutorial be sure to apply a clipping mask so that your adjustments only effect the underlying layer, and not your entire canvas.
Color Balance Adjustment Layer Settings:
Highlights: +2 / -13 / -6
Midtones: +28 / +4 / -11
Shadows: +11 / -4 / -12


We want to create a more central focus for our design.
Start by creating a new layer called ‘vignette’.
Use a large, soft, low opacity (around 10-20%) black paintbrush and brush around the corners and edges of your canvas:

Create a new layer called ‘center highlight’.
Use a very large, soft, white paintbrush (around 20% opacity). Create a large white spot of white light in the middle of your canvas.
Change this layer’s blend mode to ‘overlay’. This should create a subtle lighting in the middle of your composition, drawing the eye:

Open your main pig image (see resources section for this tutorial).
Extract the pig from it’s background using your preferred extraction method.
Paste the pig into your original document, resizing and positioning the pig like the image below:

If you notice, the feet of the pig appear very flat, as in the original photo they were resting on a flat surface. Now that our pig needs to be floating in the air we need to give the impression of the feet dangling naturally.
To achieve this effect, go to edit>puppet warp. Use your puppet warp tool to create multiple anchor points over the body of you pig. This will hold the pig in place while your warp it’s legs.
Use your puppet warp tool to bring the front legs closer together, and adjust the back legs slightly to give the impression of the legs hanging in mid air:

You can see the outcome of warping below:

Apply a levels and color balance adjustment layer to your pig layer to help blend the pig better with it’s background:
Levels Adjustment Layer Settings:
26 / 0.87 / 243
Color Balance Adjustment Layer Settings:
Highlights: +6 / -2 / 0
Midtones: -26 / 0 / +4
Shadows: +16 / 0 / -9


Create a new layer called ‘band’.
Use your pen tool to create a belt type shape wrapping around your pig. Be sure to leave a little opening in the belt, letting a square of the pig’s back show through.
You can fill this area with whatever color you want. I used black:

Download your leather texture from the resources section for this tutorial. Paste the texture into your original document, resizing and positioning it to fit over your ‘band’ area:

We want to give the impression of the leather molding roughly to the shape of the pig’s body. To help achieve this effect, go to edit>transform>warp. Use your warp tool to warp the texture like in the image below:

Ensure that your leather texture is directly above your ‘band’ layer, and then apply a clipping mask to it. This will mean that your texture will clip to the shape of your band, giving the impression of a cool leather band effect wrapping around the pig:

Apply a color balance adjustment layer. This should automatically be given a clipping mask, but if not then apply one.
Color Balance Adjustment Layer Settings:
Highlights: +18 / 0 / -16
Midtones: +32 / 0 / -11
Shadows: +2 / 0 / -12

You can see that this has tinted the leather brown:

We need to give our leather band area some lighting to make it look more natural.
In your layers palette option+click on your ‘band’ layer. This will select all data on this layer.
With your selection still in place, create a new top layer called ‘shadow band’. Use a soft black paintbrush to paint in shadows at the top and bottom of your band. Use a soft white paintbrush to paint in the middle of your band area.

Change this layer’s blend mode to ‘multiply’ and reduce it’s opacity to 50%:

Create a new layer called ‘highlight band’.
Use a soft, mid-opacity white paintbrush to brush over the center area of your band to act as a highlight:

Change this layer’s blend mode to ‘overlay’ and reduce it’s opacity to 50%:

Create a new layer called ‘gold outline’.
Using your pen tool, create a selection around the square opening in the top of the leather band. Fill this area with ffd800.

Apply an inner shadow and inner glow blending option to your ‘gold outline’ layer:
Inner Shadow Blending Option Settings:
Blend Mode: Multiply
Color: 000000
Opacity: 35%
Angle: 120
Distance: 5px
Choke: 0%
Size: 5px
Inner Glow Blending Option Settings:
Blend Mode: Normal
Opacity: 20%
Noise: 0%
Color: 000000
Choke: 0%
Size: 1px


Create a new layer called ‘pink fur’.
Download the FanExtra fur brush set from the resources for this tutorial.
The idea here is to apply subtle furry edges overlapping from the pig over the leather band area.
To do this, sample colors from the pig surface, and use these colors to paint with using your fur brush. Apply several brushes to achieve a nice random edge:

You’ll notice in the last image that the size of your fur brushes means a lot of the brush will be overlapping the pig and background, with only a tiny bit of the edge of the brush actually being useful, overlapping the leather band area.
To fix this, add a layer mask to your ‘pink fur’ layer, and mask off all areas of your brush marks apart from the areas overlapping your leather texture:

You’ll notice in the last image there’s still a bit of a seam line between the edge of the pig’s fur and the fur brush set.
To fix this create a new layer called ‘fur blend’. Use a small, soft pink paintbrush to paint along this seam line, blending the two areas a little more smoothly:

To make the eye of the pig stand out even more, create a new layer called ‘eye glint’.
Create a tiny white spot over the pupil of the eye. (There is already a white spot here, but you want to make it more intense):

Download the wing image from the resources section for this tutorial.
Extract one of the wings, and paste it into your original document. Use a layer mask to gradually blend the wing into the pig’s back, by masking off the bottom of the wing using a soft, black paintbrush:

Paste in the second wing, positioning this on a layer beneath your original wing. Label the front wing layer ‘front wing’ and the back wing layer ‘back wing’.
The back wing won’t be the perfect shape to start with, so go to edit>transform>distort to distort the wing to fit better:

We want to give a tiny bit of movement to our back wing to help simulate the pig flying.
Select your ‘back wing’ layer and go to filter>convert for smart filters. This will convert this layer to a smart object, and let you apply filters non-destructively.
Then go to filter>blur>motion blur.
Motion Blur Filter Settings:
Angle: 30
Distance: 4 pixels

Apply a color balance adjustment layer to both your wing layers. This will tint your wings pink, blending them with your pig:
Color Balance Adjustment Layer Settings:
Highlights: +9 / -8 / -5
Midtones: +53 / -18 / -57
Shadows: +12 / +1 / -13


Duplicate your front wing layer.
Go to edit>transform>distort and distort the wing to fit in the area where it would naturally flap downward to.
Use a layer mask to gradually mask off the top edge of this wing:

Apply a motion blur to this layer to simulate the movement of flapping wings:
Motion Blur Filter Settings:
Angle: -66
Distance: 100 pixels

Repeat this step, creating a second blurred wing for the front wing, distorting this wing to be even further down.
Also create two blurred ‘back wing’ duplicates.
With the second duplicate for each wing (the most downward blurred wing) reduce the opacity of this layer, in order to make it fainter than your first duplicate wing:

To finish our wings, we want to blend their base a little better into the pig’s back.
To do this, select a square area of fur from the surface of the pig, and copy/paste this to be a new top layer. Rename this layer ‘fur to wing’ and position your square of fur over the join between your wings and your pig:

Use a layer mask to mask this area of fur, creating a smooth transition between the base of the wings and the pig’s back:

Apply a levels and color balance adjustment layer to this ‘fur to wing’ layer, in order to make the colors more accurately blended:
Levels Adjustment Layer Settings:
56 / 0.76 / 247
Color Balance Adjustment Layer Settings:
Highlights: -2 / -2 / +4
Midtones: -1 / +6 / +5
Shadows: +32 / +16 / +11


Create a new layer called ‘dodge/burn main pig’.
We’re going to dodge/burn our pig in a non-destructive way.
Start by going to edit>fill>50% gray. Once you’ve filled your canvas with 50% gray, change it’s blend mode to ‘overlay’. This will hide your gray fill, but allow you to dodge/burn your image in a non-destructive way.
Simply use a soft black paintbrush (around 10% opacity) for burning your image, and a soft white paintbrush (around 10% opacity) for dodging.
Below you can see your dodge/burn layer at ‘normal’ blend mode and then ‘overlay’ blend mode:
The idea is to blend the pig better with it’s background. Try to identify light sources coming from the sky, and accentuate shadows where needed:


To further blend the pig with the background, we’re going to add some soft color overlays as additional lighting.
Select a large, soft paintbrush (color: ffca55) and add several spots of orange light over your image. Again, try to work out where this orange light would be coming from in terms of your background:
Reduce this layer’s opacity to 20% and change it’s blend mode to ‘overlay’. This should give a very subtle orange tone to areas of your pig:

Repeat this technique using additional layers and adding purple/darker orange tones:


Repeat the techniques used to create your main pig, and add a second, larger pig to the bottom left corner of your canvas.
You only want part of this pig’s head to be visible, as it’s merely used to create some nice framing and depth for the composition.
The image below shows the pig after adjustment layers, color tint layers and dodge/burning:

Go to filter>convert for smart filters.
Then go to filter>blur>gaussian blur. Apply a 6 pixels strength gaussian blur. This will help give the impression of depth, as the larger pig appears to be closer to us and out of focus:

Create a new layer called ‘lens flare’. Fill your canvas with black, and then go to filter>convert for smart filters.
Go to filter>render>lens flare and apply a 50-300mm Zoom flare (100% brightness).
Try to position the lens flare over your pig’s back:

Change this layer’s blend mode to ‘screen’ which will hide the black background fill, letting only the lens flare show through. Also reduce this layer’s opacity to 50%, making the effect more subtle:

Finally, to finish apply a gradient overlay adjustment layer. We actually only want this adjustment layer to effect mainly our background area, as we don’t want to tint the pig too much.
To solve this problem, simply use the adjustment layers built in layer mask, and mask off the areas over your pig, using a large, soft black paintbrush:
Gradient Overlay Adjustment Layer Settings:
Gradient: default orange to purple gradient
Layer opacity: 10%
Layer blend mode: Normal:

You can view the final outcome below. I hope that you enjoyed this tutorial and would love to hear your feedback on the techniques and outcome.

Tom is the founder of PSDFAN. He loves writing tutorials, learning more about design and interacting with the community. On a more interesting note he can also play guitar hero drunk with his teeth.


Do you know the basic tools in Photoshop but feel that your work is still looking average? Join our creative community at FanExtra and get the direction you need to take your work to the next level.


Honestly….
WTF??
Well yeah, it is a bit of a strange concept, but I was trying to teach some cool blending techniques along the way .
.
Quite lengthy steps…but turns out good. Thanks for the share!
really funny idea!
good source finding…..!