 Create a Google Docs Icon
 Design a Clean Business Layout
 Create a Surreal, Scenic Photo Manipulation
Have every post delivered to your inbox and get access to hundreds of useful design freebies.
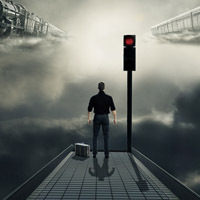
In this tutorial I will show you how to create a surreal photo manipulation called “The Sky Station”. We’ll go through different techniques of manipulating, retouching, masking, using brush, coloring and much more.
As always, this is the final image that we’ll be creating:

Open sky 1 stock, crop the bottom of this picture to get a look below:

On background layer, i use Lasso Tool to make a selection for dark sky part with feather = 20, then right click it, choose Layer via Copy. Move it up to hide a part of light rays. Name it as “cloud 1″:


Duplicate this layer twice, name them as “cloud 2″ and “cloud 3″ , and erase any unecessary parts:

Now we will brighten a cloud part. On background layer, use Lasso Tool to make selection in sky with feather = 30. Copy it into a new layer ( right click, choose Layer via Copy) then set this layer on the top, name it “cloud 4″. Lower opacity to 30%:

I want to achieve more dramatic effect for sky so i use another sky stock. Open it and make selection for only sky ( you can use similar images if you can’t download it from Photoxpress). Drag it into our canvas, resize and place it on the top:


Change the mode to Soft light 100% and use layer mask to hide rough edges of this part. Name this layer as “sky 1″.

To make this sky part color fit the background I use a Hue/Saturation layer with Clipping Mask options. Choose Layer-New adjustment layer-Hue/Saturation:


Drag sky from sky 2 stock into our canvas again. Resize and apply Flip Horizontal for it ( Edit-Transform-Flip Horizontal):

Call this layer as “sky 2″. Put the mode to Soft light 100% and use layer mask to clear any rough edges and a Hue/Saturation layer with Clipping Mask for this sky part. I use different settings for this Hue/Saturation layer:


Now we will make the light for center of sky. On background layer, make a selection of sunlight part with feather = 30. Copy it into a new layer in the method used in previous steps. Place it on the top, name it “cloud 5″:

Move it to the center part of picture and transform a bit, add layer mask to hide some parts:


Duplicate it and transform it’s shape and with layer mask again, make a similar look like this below. Call it “cloud 6″:

Don’t worry if the light does not look good. We’ll do some steps to make it look better later.
On background layer, i copy a dark sky part ( make selection , feather = 30) and paste in into a new layer which is set on the top. Place it to hide the sunlight on the right. Because we copy this part from background layer so when it’s put on the top, the light of sun still there. Use layer mask to clear it. Call it “cloud 7″:


Duplicate it ( call it “cloud 8″) and with same technique, we see the light there is reduced.

Create two new layers with Soft light mode 50% and i use soft brush with color #c1c2c2 . Paint on dark parts of sky ( the top left and bottom right) to brighten them a bit.

There is a part of light in the center that needs to be fixed. Create a new layer and use soft white brush painting on it then change the mode to Soft light 100%:

I want to reduce the intensity of light in the center so i make a new layer and take brush with color #dad2c9. Paint on the light and around it. Lower opacity to 50%:

Open building image. Use any tools you like to make selection for it then copy it into a new layer. Drag it into our document and situate it at the bottom center of picture:


As you see i just use the top of this building, call it “subway”. And you may notice that it’s too bright from background. So i use a Hue/Saturation layer with Clipping Mask to reduce brightness and change a bit of color :


Don’t down lightness too much as you can loose the contrast. We will do another method to make it darker in next step.
Create two new layers with Clipping Mask. Take soft black brush and paint over this subway. Put the mode as Soft light 100% and 50%.

There are some parts of subway that are darker than the rest. Make a new layers ( Clipping Mask) and use soft white brush painting on them. Change the mode to Soft light 100%:


As you see the main light source comes from center so the top part of subway which catch light needs to be a bit brighter than the rest. Make a new layer ( Clipping Mask) and use soft white brush with opacity and flow 50% painting on it. Set the mode to Soft light 50%:


In an additional step to create light for subway, i use Inner Shadow effect. Right click subway layer, choose Blending options:

Notice that i put the settings of Angle as 90 to fit the light direction from background.

Open traffic light stock. First make a selection for this part of it and copy it into our main document. Because it has a big size so we can easily resize and transform it. I stretch it longer and narrower:


Add layer mask for this part and erase the bottom with black brush:

Name it as “iron column”.
Copy the light part and place it at the top of column, always remember to resize to make a suitable size. Call this layer “lights”.


In this step we’ll make shadow for Traffic light. The light from background comes from behind this subject so it must have a shadow in front. Select column and lights layer, right click and choose Duplicate Layers. After that, right click these layers again, choose Merge Layers. Move this layer under column and lights layers, name it “traffic light shadow”. Apply Flip Vertical, transform and move it under the bottom of the column then reduce the lightness of it to -100 by Hue/Saturation ( hit Cmd/Ctrl+U to open this dialog). Lower opacity to 40%:


You should take care of the angle of this subway. The shadow should be on the same angle and shorter than the length of the column.
To change color of “lights” to fit the background i use two adjustment layers with Clipping Mask:
Curves:

Hue/Saturation:

The red light looks pretty dark so i want to enhance it. Make two new layers ( Clipping Mask), use brush with color #d5102e painting on the red part. Change the mode of these layers to Soft light 100%.


I still want to fix this part of lights. Create a new layer above “lights” layer, name it “light 1″. Choose lights layer, make a selection as shown below:

Press Cmd/Ctrl+C to copy it then choose “light 1″ layer, press Cmd/Ctr+V to paste into. Move this part down to hide the part we want to fix. You should have a similar result like mine:


Now we will add more light for traffic light layers by Inner shadow effect. I use different value of light intensity for each of these layers:


We have result:

After adding light we have an unwanted light part at the bottom of column:

To fix it, right click column layer , choose Indicates layer effect then Create Layer. Inner shadow effect now appears as a normal layer with Clipping Mask:


We can add layer mask for this layer and use black brush to clear any unwanted light effect:

Open train stock. Extract it and place it into our canvas, resize and transform it. Apply Flip Horizontal to get a look below:

Call it “train 1″. Now our work is to remove all texts of train and then add the ones we like. Create 3 new layers with Clipping Mask. On each layer i make selection around the texts which need to be removed then fill it with approriate colors ( #141c1e, #1c1417, #888661).


I add Layer Style for the part below after filling to get rid of flat effect:


Now we will add name and number to the train. Make a new layer ( Clipping Mask), hit T to active Type Tool, i use Candara font ( you can find it if you use Window Vista or Win 7) but sure you can use any fonts you feel approriate . Choose color #cccbbb and type “SKY 2 EXPRESS” with 11 pt as shown below:

Hit Warped text mode and choose Arc then put the settings below:


Hit Cmd/Ctrl+T and choose Warp mode to make a suitable curve for these texts:

Create a new layer and i use Impact font ( a default Window font) with 22 pt and same color ( #cccbbb). Type any numbers you want and transform it as the screenshot below shows:

I make a Hue/Saturation layer ( Clipping Mask) to reduce saturation of the train to be fit the background:

As you know some parts of train catch the light from background so they must be brighter. Make two new layers ( Clipping Mask) and use soft white brush painting on these parts. I set one layer to Soft light 100% and another to Overlay 100%:


A new layer with the purpose to brighten train head as it’s pretty dark. Use soft white brush on it and set the mode of Soft light 50%:

In this step we add more light for the train with a method used before. Right click the train, choose Blending options:


I use a new layer ( no Clipping Mask) on the top to reduce light on some parts of train. Choose brush with color #727369 and paint on them and put the mode as Multipy 50%:


Open train stock and move isolated train into our canvas again, place it on the right side, remember to make the size bigger than train 1. Position it to leave only the last carriages visible on the image:

Name it “train 2″.
Add a Hue/Saturation layer with Clipping Mask for train 2:

To brighten it, i use two layers ( Clipping Mask), Soft light mode 100% and paint with white brush:

Add glowing light for train 2 with Inner Shadow effect:


To add some mist effect for trains, make a new layer on the top. Set foreground and background color to #f9f9f5 and #babebd. Make two selections around trains with feather = 30. Choose Filter-Render-Clouds:

Lower opacity to 30% and use layer mask to make some parts of train visible:

Now we will make special railway for the trains. Open cloud stock and use Magic Wand Tool with Tolerance about 30-35 to click the blue part of sky then hit Cmd/Ctrl+Shift+I to invert selection. Set feather for this selection = 30. Copy it into a new layer then drag into our image, resize and place it beside train 1 as shown below:


Add layer mask to leave some some parts of this cloud visible only:

Duplicate this layer twice, transform and use layer mask and black brush to make our clouds get a look like this:

With each cloud layer, i apply a Hue/Saturation layer with Clipping Mask:

Name them as “cloud railway 1″, “cloud railway 2″, “cloud railway 3″ or whatever you like.
Do the same for train 2 . Try to create a different look from train 1. Here is my result:

I notice that the bottom of these clouds which meet light from background a bit dark so i want to brighten it.

Create a new layer on the top ( no Clipping Mask), use soft white brush painting on this part, set this layer to Soft light 100%:

Open man stock. Make selection for man only ( don’t take the can) and copy into a new layer. Move him into our document, resize and position him at the top of subway. The right hand is missed so we’ll add one for it. On man layer, make selection for left hand then copy it into a new layer. Apply Flip Horizontal and transform it to be fit the right hand:
Then merge two these layers, rename it as “man”.


The man should have two shadows: one is under his feet and one on the subways. Create a new layer under man layer. Use black brush with medium hardness ( 40-50) and opacity about 70-80% to paint under his feet.

To make a shadow of the man on subway, we do the same technique done with traffic light.

To change color of the man i use two adjustment layers with Clipping Mask:
Curves:

Hue/Saturation:


In this step i will retouch white hair part to make him look younger. Make a new layer ( Clipping Mask), choose Clone tool and make sure that you’ve checked “Sample All Layers” on property bar. Clone over this part:

A new layer with the purpose to remove some muscles on man’s arms with Clone Tool :

In this step i use many layers with Clipping Mask option to retouch color and brightness on some parts of the man.
Create two new layers and i use brush with color #b59582 painting on the arms. Put the mode of these layers as Multipy 50% and 70%:

Two layers with Soft light mode 100%, i use soft white brush and paint on hands to brighten them. You can see on screenshot below:

Two layers and i use brush with color #414344 . Set the mode of them to Multipy 50% and paint on the jeans:

I use a Hue/Saturation layer with Clipping Mask to reduce saturation of man’s skin:

Add light for the man by using Inner Shadow:

I want to make the light in some parts of the man more visible. So i make a new layer ( Clipping Mask) with Overlay mode and fill it with 50% gray:


Use Dodge Tool to brighten his clothes:

Isolate suitcase, resize and place it beside the man:

With same technique used before we make two shadows for this suitcase:

Use two new adjustment layers (Clipping Mask) to change colors of the suitcase:
Curves:

Hue/Saturation:


I use a layer ( Clipping Mask) and brush with color #c1cad8. Paint on the top of this suitcase and change the mode to Multipy 100% to darken it a bit:

A new layer and i use brush with color #c1cad8 but to brighten outside the suitcase. Set the mode of it to Overlay 100%:

Make a new layer on the top. Use brush with color #a19b8d painting on trains and clouds parts. Change the mode to Color 50%:

I use some adjustment layers to change color of whole picture:
Gradient Map:

Change the mode of this Gradient Map layer to Soft light 70%.
Brightness/Contrast and Hue/Saturation

On Brightness/Contrast layer mask, use black brush to clear the contrast parts:

You can view the final outcome below. I hope that you enjoyed this tutorial and would love to hear your feedback on the techniques and outcome.

Thank you for reading this tutorial, I hope that you enjoyed it. If you want to view my other arts and tutorials you can look at my Deviantart page or follow me on Facebook.


Do you know the basic tools in Photoshop but feel that your work is still looking average? Join our creative community at FanExtra and get the direction you need to take your work to the next level.


Wow! What a great step by step tips!!!! It’s really helpful. A learner can make easier to create this type of images.
Thank you so much for sharing your knowledge. Please keep it up.
Congratulations! i loved your tutorial! its easy to follow you explain very well, i was around internet see some tutorials im kinda fan of design and i stoped here and read all of your article, thanks for that.
Nice and great tutorial… nice jenny! thank U!
what version of photoshop is? 7, 8?
wow……… like…….. i want to try it…
Interesting idea for a tutorial, I like the result very much!
very nice tutorial
Excellent very very good
awesome!!!
I do not even know how I stopped up right here, but I believed this submit was once
great. I do not recognize who you’re however certainly you are going to a famous blogger should you are not already. Cheers!
Wonderful. one of the best and interesting tutorials. loved working on it. it was long but then worth it as it explained each and every step.