 Design a Retro Futurism Space Scene Poster
 Create the Fiery, Dark Photo Manipulation ‘The Last Ride’
 Digital Painting Lesson: Monkey Island 2: LeChuck’s Revenge Special Edition
Have every post delivered to your inbox and get access to hundreds of useful design freebies.
In this tutorial, we will learn how to create a conceptual surreal photo-manipulation. We are going to learn the process of creating depth of field using a few advanced tools. We are going to learn how to blend images so seamlessly that it would look like a single image using the Brush tool, masking and several adjustment layers. We will learn how to create light and darkness to make the background look seamless. We are going to learn how to use textures and give life to our image, and we are going to learn how to create a moody, dreamy tone using a few adjustment layers and lighting effects.

Create a new file with a width of 3500 px and a height of 3500 px at 300 dpi (Dots per Inch). Background Contents should be White.

First off, let’s open the desolate storm in Photoshop. We will be using ground from this stock image so we will need to transfer it to our main canvas.

Click the desert stock and press M to Rectungular marquee tool and then make a selection around the ground and then click V to activate the Move Tool. Left-click the image and drag the image to the main canvas and change layer name to “ground”

The result should be similar to this:

Activate transform tool (Ctrl+t) as see below:

The result should be similar to this:

Again activate transform tool then make a right click and choose “Distort” :


The result should be similar to this:

First off, let’s open the lost horizon in Photoshop. We will be using Sky from this stock image so we will need to transfer it to our main canvas:

Click the lost horizon and press M to Rectungular marquee tool and then make a selection around the sky and then click V to activate the Move Tool. Left-click the image and drag the image to the main canvas and name it “sky” :

The result should be similar to this:

Next, activate the Transform tool (Ctrl/Cmd +T), then while the “Sky” layer is selected and then resize it as shown below:

The result should be similar to this:

Now activate brush tool (B) and choose softround brush :
Brush size: 400px
Hardness: 0%
Opacity: 40%
Flow: 100%
Color: #ffffff

To set foreground/background colors to black/white press “D”

Now create a vector mask from the bottom of layers palette

Now paint see as below:

The result should be similar to this:

Now create new Curves adjustment layer from the bottom of layers palette :

fill these setting:

Press Alt+left click in between 2 layer’s (Sky and Curves ) to make a mask.

The result should be similar to this:

Now create new Curves adjustment layer from the bottom of layers palette.

When the Curve box opens, input the following:

Press Alt+left click in between 2 layer’s (Sky layer and Curves) to make a mask.

The result should be similar to this:

Now create a Solid color adjustment layer which can be found by pressing on the create New Fill/Adjustment layer button shown on the layer window:

When the Solid color box opens, input the following:

The result should be similar to this:

Now change the layer mode to “Exclusion” and reduce opacity to 30% :

The result should be similar to this:

Now create a Photo filter adjustment layer which can be found by pressing on the create New Fill/Adjustment layer button shown on the layer window:

When the Photo filter box opens, input the following:

The result should be similar to this:

Now create a Gradient map adjustment layer which can be found by pressing on the create New Fill/Adjustment layer button shown on the layer window:

When the Gradient map box opens, input the following:

The result should be similar to this:

Change the layer mode to “Luminosity” :

The result should be similar to this:

Now create a Curves adjustment layer which can be found by pressing on the create New Fill/Adjustment layer button shown on the layer window:

When the Curves box opens, input the following:

The result should be similar to this:

Now create a Curves adjustment layer which can be found by pressing on the create New Fill/Adjustment layer button shown on the layer window:

When the Curves box opens, input the following:

The result should be similar to this:

Now create a Curves adjustment layer which can be found by pressing on the create New Fill/Adjustment layer button shown on the layer window:

When the Curves box opens, input the following:

The result should be similar to this:

Now create new layer and name it “Vignette”. Fill it with White color “#ffffff”.

Now goto Filters > Distrot > Lens Correction:

When the Lens Correction box opens, input the following:

Now create new layer and name it “Vignette”.Fill it with White color “#ffffff”.

Now goto Filters > Distrot > Lens Correction:

When the Lens Correction box opens, input the following:

The result should be similar to this:

Now Change the layer mode to “Multiply” .

The result should be similar to this:

Now, let’s open the Stag stock in Photoshop. We will be using the stag from this stock image so we will need to transfer it to our main canvas.

Click the Origami ball and press P to activate pen tool and then make a selection around the stag and then click V to activate the Move Tool. Left-click the image and drag the image to the main canvas and change layer name to ” Stag “:

The result should be similar to this:

Next, activate the Transform tool (Ctrl/Cmd +T), then while the “Stag” layer is selected and then resize it as shown below:

The result should be similar to this:

Now We are going to make it’s shadow activate a new layer and name it “stag shadow” .
Then activate pen tool (P) some shapes bellow stag see as below:

Then goto Filter > Blur > Gaussian Blur :
When the Gaussian Blur box opens, input the following:

Now Reduce the opacity of stag shadow layer to “70%” .

Now create a Curves adjustment layer which can be found by pressing on the create New Fill/Adjustment layer button shown on the layer window:

When the Curves box opens, input the following:

Press Alt+left click in between 2 layer’s (Stag layer and Curves) to make a mask.

The result should be similar to this:

Now we need to clear some curves effect from the stag coz it make him to dark :
So activate the layer mask associated with the curves adjustment layer:
Now activate Brush tool (B) with these settings :
Brush size: 400px
Hardness: 0%
Opacity: 40%
Flow: 100%
Color: #000000
Now paint over the highlighted area.

The result should be similar to this:

Now create a Brightness/Contrast adjustment layer which can be found by pressing on the create New Fill/Adjustment layer button shown on the layer window:

When the Brightness/Contrast box opens, input the following:

The result should be similar to this:

Now create a Hue/saturation adjustment layer which can be found by pressing on the create New Fill/Adjustment layer button shown on the layer window:

When the Hue/saturation box opens, input the following:

The result should be similar to this:

Now,let’s open the Moss in Photoshop. We will be using the moss from this stock image so we will need to transfer it to our main canvas.

Now go to Select > Color range
When the Color range box opens, input the following:

Activate move tool (v) and drag it to the main canvas and rename it to “Grass”
The result should be similar to this:

Activate a vector mask from the button shown on the layer window:
Now activate the brush tool, and use a black paintbrush with these settings. Now let’s mask away areas of moss:
Brush size: 100px
Hardness: 0%
Opacity: 40%
Flow: 100%
Now paint over the highlighted area.

Change the layer mode to “Soft light” :

The result should be similar to this:

Now create a Curves adjustment layer which can be found by pressing on the create New Fill/Adjustment layer button shown on the layer window:

When the Curves box opens, input the following:

Press Alt+left click in between 2 layer’s (Grass layer and Curves) to make a mask.

The result should be similar to this:

Now,let’s open the Vintage Papier 5 in Photoshop. We will be using the Texture from this stock image so we will need to transfer it to our main canvas.
Click the Vintage Papier 5 and press V to activate the Move Tool. Left-click the image and drag the image to the main canvas and change layer name to “Texture”.

Change it’s layer mode to “Soft light” and opacity to “65%” :

The result should be similar to this:

First off, let’s open the A house stock in Photoshop. We will be using the house from this stock image so we will need to transfer it to our main canvas.

Click the A house and press P to activate pen tool and then make a selection around the house and then click V to activate the Move Tool. Left-click the image and drag the image to the main canvas and change layer name to “House 1″.

Next, activate the Transform tool (Ctrl/Cmd +T), then while the “House 1” layer is selected and then resize it as shown below:

The result should be similar to this:

Now activate Mask tool .
Then activate Brush tool (B) with these settings :
Brush size: 20px
Hardness: 0%
Opacity: 70%
Flow: 100%
Color: #000000
Now paint over the highlighted area.

The result should be similar to this:

Now create a Curves adjustment layer which can be found by pressing on the create New Fill/Adjustment layer button shown on the layer window:

When the Curves box opens, input the following.Press Alt+left click in between 2 layer’s (House 1 layer and Curves) to make a mask.

The result should be similar to this:

Now create a Brightness/contrast layer which can be found by pressing on the create New Fill/Adjustment layer button shown on the layer window:

When the Brightness/contrast box opens, input the following.Press Alt+left click in between 2 layer’s (Brightness/contrast layer and Curves) to make a mask.

The result should be similar to this:

Add more houses and towers with same techniques

Now let’s add there shadow :
Activate a new layer and name it as “House shadows”.Then activate pen tool and make shadow and fill it with black color.

Again goto Filter > Blur > Gaussian blur :
When the Gaussian blur box opens, input the following:

Reduce it’s opacity to “78%”. :

The result should be similar to this:

Now let’s activate pen tool (P) and draw a curve.

Now activate Brush tool (B) with these settings:
Brush size: 5px
Hardness: 0%
Opacity: 100%
Flow: 100%
Color: #000000

Then Again activate pen tool (P) and make a right click and choose “Stock Path” :

When the Stock Path box opens, input the following:

Then again make a right click and this time choose “Delete path” :

The result should be similar to this:

Now,let’s open the solitary bulb in Photoshop. We will be using the Bulb from this stock image so we will need to transfer it to our main canvas.

Click the solitary bulb and press P to activate pen tool and then make a selection around the bulb and then click V to activate the Move Tool. Left-click the image and drag the image to the main canvas and change layer name to “Bulb”.

The result should be similar to this:

Next, activate the Transform tool (Ctrl/Cmd +T), then while the “Bulb” layer is selected and then resize it as shown below:

The result should be similar to this:

Now Just make some Duplicates (Cmd/Ctrl+J) of Bulb layer.

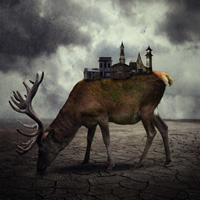
Here is how your final result should look.
The source files for this tutorial are available to our FanExtra members community. If you want to access the source files for this tutorial (and all of our tutorials + thousands of other resources) then sign up here.
If you’re already a FanExtra member then you can login here to access the source files.

Vikas Singh Adhikari (Vik aadi) is a 20 years old self-taught digital mixed media artist and a photographer from New Delhi India. The themes that are mostly seen on his work revolve around surrealism, pseudo-realism, nostalgic sentiments, and human emotion.You can contact him on his deviant art account: http://vikaadi.deviantart.com/ and his facebook page: https://www.facebook.com/vikas.theanimater


Do you know the basic tools in Photoshop but feel that your work is still looking average? Join our creative community at FanExtra and get the direction you need to take your work to the next level.


Nice tutorisl!
Can i please ask a question? Would it be correct to say thst the light source is coming from the front of the stag, directly on the side of him we see?
Thanks in advance.
D
Thank you very much!!
My realisation:
http://www.chez-mireilled.com/article-montage-ville-et-faune-avec-photoshop-109460041.html