
 Design a Surreal Retro Futurism Scene
 Members Area Tutorial: Create Beautiful Sunrise Landscape Matte Painting in Photoshop
 How to Create a Fan Illustration From Scratching Using Photoshop
Have every post delivered to your inbox and get access to hundreds of useful design freebies.
In this tutorial, we will learn how to create an conceptual surreal photo-manipulation. We are going to learn the process of creating depth of field using a few advance tools. We are going to learn how to blend images so seamlessly that it would look like a single image using the Brush tool, the Eraser tool and several adjustment layers. We will learn how to create light and darkness to make the background look seamless. We are going to learn how to use textures and give life to our image, and we are going to learn how to create a moody, dreamy tone using a few adjustment layers and lighting effects.we also learn how to draw a realistic candle and how to make a smokey ship by using some advance technique.
Create a new file with a width of 3500 px and a height of 3500 px at 300 dpi (Dots per Inch). Background Contents should be White.

Let’s start our background with a wall.
Now, let’s open the Brick Wall Texture in Photoshop. We will be using the brick from this stock image so we will need to transfer it to our main canvas.
Click the Brick Wall Texture and press V to activate the Move Tool. Left-click the image and drag the image to the main canvas and change layer name to “wall”.

The result should be similar to this:

Next, activate the Transform tool (Ctrl/Cmd +T), then while the “Wall” layer is selected and then resize it as shown below:

The result should be similar to this:

Dupilcate the wall layer (Ctrl/cmd+J) and move it to the left side .
The result should be similar to this:

Now lets make a top part of our wall so activate Rectungular marquee tool (M) and make a selection above top of wall and fill the color with #74362b and name it “Top part”.

The result should be similar to this:

Open the stormy clouds image in Photoshop. We will be using the sky from this stock image so we will need to transfer it to our main canvas.
Click the stormy clouds ninth and press V to activate the Move Tool. Left-click the image and drag the image to the main canvas and change layer name to “Sky”.

The result should be similar to this:

Next, activate the Transform tool (Ctrl/Cmd +T), then while the “sky” layer is selected and then resize it as shown below:

The result should be similar to this:

Now let’s create a candle so first we are going to create his body
Activate ractungular marquee tool

Now activate a new layer and name it “candle body” and make a rectungular selection see as below.

Fill it with white color (#ffffff).
The result should be similar to this:

Now Activate gradient tool (G) and make candle body selected (left Click + ctrl on candle layed).


When the Gradient editor box opens, input the following:

Now drag the courser from top to bottom.See as bellow

Activate pen tool and make a selection around the top part of candle to erase it
Now activate Erase tool (E) with these settings Now let’s erase :
Brush size: 100px
Hardness: 0%
Opacity: 40%
Flow: 100%
Color: #000000
Now paint over the highlighted area.

The result should be similar to this:

Now we are going to make it’s flame.
Now activate Brush Tool (B) with these settings :
Brush size: 300px
Hardness: 0%
Opacity: 100%
Flow: 100%
Color: #000000
See as below :

Now we are going to add some glow to our flame.So activate

Now add some Outer glow:

go back to flame layer and make it selected (ctrl+left click):
Now goto select > modify >expand and put these settings below :

now fill these setting:

activate a new layer and name it inner glow .now fill the selection with #f4b156:

Now goto Filter >blur >gaussian blur and put these settings below :

now fill these setting:

now reduce the opacity of this to 55% :

Now activate dodge and brun tool (o):

Put these settings:

Now paint over the highlighted area:

select all layers candle body,glow,inner glow and press ctrl+g to make there group and name the group candle:
The result should be similar to this:

make a duplicate of candle group and move it to left and name it candle1:
Next, activate the Transform tool (Ctrl/Cmd +T), then while the “candle1” layer is selected and then resize it as shown below:

The result should be similar to this:

Activate brush tool (B).
With these settings
Brush size: 30px
Hardness: 100%
Opacity: 75%
Flow: 100%
:

Now activate a new layer (ctrl+shift+n) and name it “wicks” paint over the highlighted area and paint the two wicks:

Now go back to sky layer and create a curve adjustment layer which can be found by pressing on the New Fill/Adjustment layer button shown on the layer window: :

When the curve box opens, input the following:

The result should be similar to this:

Now Crate new level adjustment layer from the bottom of layers palette :

input the following:

The result should be similar to this:

once again create a Solid color adjustment layer which can be found by pressing on the Create New Fill/Adjustment layer button shown on the layer window:

When the Solid color adjustment layer box opens, input the following:

Reduce the opacity to 35% and The result should be similar to this:

Now let’s work on wall lets mearge it with rest of our image:
Now activate Brun tool (O) with these settings :
Brush size: 300px
Hardness: 0%
Range: Midtones
Exposure: 75%


Now paint over the highlighted area.

The result should be similar to this:

Now go back to Wall top layer:
Again activate Brun tool (O) with these settings :
Brush size: 100px
Hardness: 0%
Range: Midtones
Exposure: 75%
Now paint over the highlighted area.

The result should be similar to this:

Now,let’s open the Tall Ship PNG Pack in Photoshop. We will be using the sgip from this stock image so we will need to transfer it to our main canvas.
Click the Tall Ship PNG Pack and press V to activate the Move Tool. Left-click the image and drag the image to the main canvas and change layer name to “Ship”.

The result should be similar to this:

Next, activate the Transform tool (Ctrl/Cmd +T), then while the “Ship” layer is selected and then resize it as shown below:

The result should be similar to this:

Now we are going to change our ship to black and white mode:
So let’s goto Image > Adjustments > Hue/Saturation

When the Hue/Saturation box opens, input the following:

The result should be similar to this:

So again let’s goto Image > Adjustments > Hue/Saturation
When the Hue/Saturation box opens, input the following:

The result should be similar to this:

Now change the ship layer mode to “Screen” :

The result should be similar to this:

Make a duplicate of Ship layer (Ctrl+j) then select both layers and mearge them (ctrl+E) see as below :

The result should be similar to this:

Now activate Smudge tool and work on edges of ship layer make them flexible see as below :

Work on different part of ship layer and make them a look of smoke.See as below :
The result should be similar to this:

The result should be similar to this:

Now,let’s open the smoking and moving cigarette in Photoshop. We will be using the smoke from this stock image so we will need to transfer it to our main canvas.
Click the smoking and moving cigarette and press V to activate the Move Tool. Left-click the image and drag the image to the main canvas and change layer name to “smoke 1″.

Activate erase toll (e) and erase the waste highlighted area. :

Change the layer mode of Smoke 1 to screen .
Next, activate the Transform tool (Ctrl/Cmd +T), then while the “Smoke 1” layer is selected and then resize it as shown below:

Reduce the opacity to 65%
The result should be similar to this:

Now,let’s open the smoking and moving cigarette in Photoshop. We will be using the smoke from this stock image so we will need to transfer it to our main canvas.
Click the smoking and moving cigarette and press V to activate the Move Tool. Left-click the image and drag the image to the main canvas and change layer name to “smoke 2″.
Then Next, activate the Transform tool (Ctrl/Cmd +T), then while the “Smoke 2” layer is selected and then resize it as shown below:

Warp your smoke as shown below:

Reduce the opacity to 65%
The result should be similar to this:

Now,let’s open the smoking and moving cigarette in Photoshop. We will be using the smoke from this stock image so we will need to transfer it to our main canvas.
Click the smoking and moving cigarette and press V to activate the Move Tool. Left-click the image and drag the image to the main canvas and change layer name to “smoke 3″.
Then Next, activate the Transform tool (Ctrl/Cmd +T), then while the “Smoke 3” layer is selected and then resize it as shown below:

Adjust and set the controler of curves.See as below :

Reduce the opacity to 65%
The result should be similar to this:

Now,let’s open the smoke in Photoshop. We will be using the smoke from this stock image so we will need to transfer it to our main canvas.
Click the smoke and press V to activate the Move Tool. Left-click the image and drag the image to the main canvas and change layer name to “Big smoke”.

The result should be similar to this:

Now activate Erase tool (E) with these settings Now let’s erase :
Brush size: 400px
Hardness: 0%
Opacity: 40%
Flow: 100%
Color: #000000
Now paint over the highlighted area.

Reduce opacity to 85% :

The result should be similar to this:

In this step, we will learn how to create a vignette which will help enhance the focus on our subject.Create a new layer name it “vignette”. Fill it with white. Now go to Filer > Distort > lens correction and fill it with white color (#ffffff) :

Now go to Filer > Distort > lens correction:

Now use these settings:
Vignette amount: -100
Midpoint: +30

The result should be similar to this:

Now change the layer mode to “multiply” :

The result should be similar to this:

Make a duplicate of Vignette layer (Ctrl+j) and reduce it’s opacity to 65% :

Now,let’s open the textures 92 in Photoshop. We will be using the texture no 4 from this stock image so we will need to transfer it to our main canvas.
Click the textures 92 and press V to activate the Move Tool. Left-click the image and drag the image to the main canvas and change layer name to “Texture”.

Next, activate the Transform tool (Ctrl/Cmd +T), then while the “texture” layer is selected and then resize it as shown below:

The result should be similar to this:

Change the layer mode to “Multiply”

Now activate Erase tool (E) with these settings Now let’s erase :
Brush size: 400px
Hardness: 0%
Opacity: 40%
Flow: 100%
Color: #000000
Now paint over the highlighted area.

Now,let’s open the star in Photoshop. We will be using the star from this stock image so we will need to transfer it to our main canvas.

Click the star and press V to activate the Move Tool. Now activate magic wend tool and click the white background then inverse the selection (ctrl_shift+i) and move it to main canvas and change layer name to “star 1″.

The result should be similar to this:

Now activate a new layer and name it “Thread”.
Now activate pen tool (P) and draw a line see as below

Now activate Brush tool (E) with these settings :
Brush size: 400px
Hardness: 0%
Opacity: 100%
Flow: 100%
Color: #4c4c4c


Now again activate Pen tool and make a right click nere our thred and chose Stock path :

When the Stock path box opens, input the following:

Now again make a right click and chose Delete path :

The result should be similar to this:

Now creat a Color Balance adjustment layer which can be found by pressing on the Create New Fill/Adjustment layer button shown on the layer window:

When the Color Balance box opens, input the following:

Press Alt+left click in between 2 layer’s (Star layer and Color balance) to make a mask.

The result should be similar to this:

Follow the same steps and make some more stars:
The result should be similar to this:
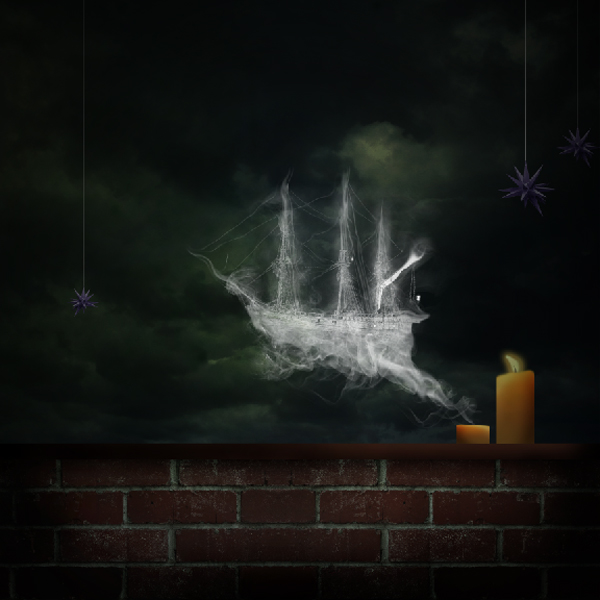
You can view the final outcome below. I hope that you enjoyed this tutorial and would love to hear your feedback on the techniques and outcome.
Click on the image below to view the full-sized outcome:


Vikas Singh Adhikari (Vik aadi) is a 20 years old self-taught digital mixed media artist and a photographer from New Delhi India. The themes that are mostly seen on his work revolve around surrealism, pseudo-realism, nostalgic sentiments, and human emotion.You can contact him on his deviant art account: http://vikaadi.deviantart.com/ and his facebook page: https://www.facebook.com/vikas.theanimater


Do you know the basic tools in Photoshop but feel that your work is still looking average? Join our creative community at FanExtra and get the direction you need to take your work to the next level.


No wonder you got the best output because all the details in the process of editing is noted for a very professional graphic designer. Keep posting more.
i don’t think i ever had more fun doing a tut before till now. well put together. the end result is awesome. i did a little twist to mine though. the stars i placed at the front i gave them a little blur for a depth of field feeling. you’re a great graphic designer, i learnt alot from this one.
Thanks XtreMedia! It is a really fun tutorial to follow for sure . I like your idea of adding DOF using the stars. Do you have a link to your final outcome, I’d love to see it!
I like the ghost boat!
excellent work and even getting more details in this tutorial.
vik aadi again an exellnt creation frm your side its fantastic no one can ask betr thn that nice detailing actually i have followed your some tutorial in Photoshop Tutorials aswell they are also grt
  so thanks for sharing such an amazing tutorial thanks