
 How to Design a Beautiful Google Calendar Icon
 Design a Trendy Yet Professional Website Layout
 Create a Stylish Two-Tone Photo Montage
Have every post delivered to your inbox and get access to hundreds of useful design freebies.
Welcome to the first in a series of tutorials on professional retouching. Ever wondered how commercial and fashion photographs have that beautifully flawless look?
This two part tutorial will work towards creating this professionally retouched result:

It takes a while to master, but here are a few things to consider;
• Keep as much texture as possible, this means keeping your brushes small and avoid any tutorial that tells you to blur huge sections of skin!
• Develop an eye for what is and is not a blemish. Beauty spots should in most cases be left well alone, keep the character of the model as well as the texture.
• Know when to be subtle, know when to stop. It’s disturbingly common to find beginner retouchers who absolutely will not stop until their 40 year old subject looks like Megan Fox.
• If you’re hoping to retouch photos professionally for other photographers, respect their work. This means not making changes for the sake of it, always remember that the model was chosen for a reason, as were the clothes, backgrounds, lighting, only make major changes on request. Be invisible.
For examples, feel free to visit my own beauty retouching portfolio.
With those points in mind, here is part one, and the easiest in the series; healing with minimal evidence ![]()
And here’s the starting image I’m using for demonstration;
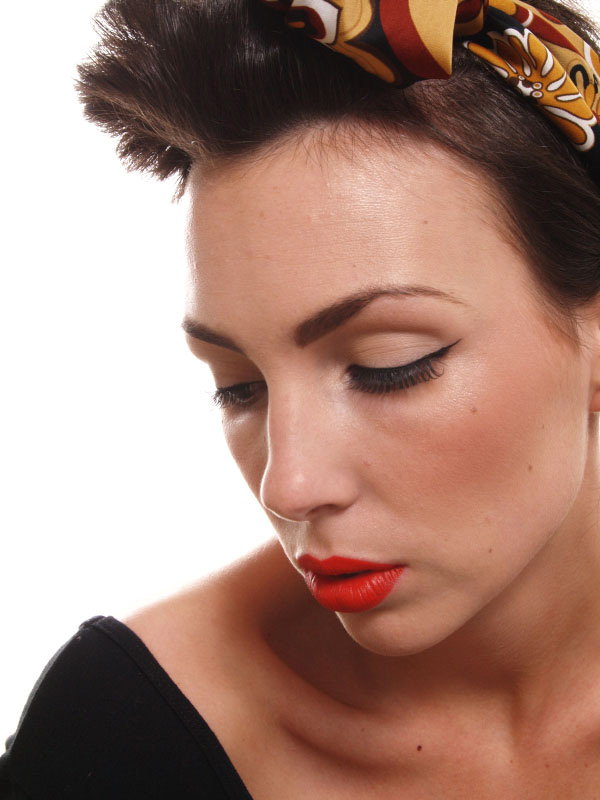
Always start with a high resolution image. Politely ask a photographer if you need starting images, large JPEGS are fine for now (if they’re less than 1Mb in size they’re probably too small). Photography forums are a great place to find portfolio work when you’re starting out, try not to use the same photographs as a thousand other people on the web. Develop an entirely individual portfolio ![]()
When you’re retouching professionally, remember that your client might be using their images for large print, imagine every eyelash out of place or stray hair on a bus shelter poster. It may not be noticeable in a web-sized image, but just imagine dozens of people idling at that bus stop every hour. Your perfect work might go unnoticed, but any flaws will certainly be picked up on!

One of the fundamental parts of the retouching process is the healing stage, and we’re going to look into that with this first tutorial. Open your image in Photoshop, and drag your Background Layer to the New Layer icon to create a copy of your image. This new layer will be our working copy, saving the original so we can always pull parts of it back if we need to.

Here I’ve decided to retain these beauty marks, but it’s always up to you to decide which to keep or remove, or even move slightly to improve composition;

Select your clone stamp (C) and zoom in to 100%. Use the Lighten blend mode to remove darker blemishes and Darken blend mode to remove lighter distractions. This way your clone tool will ignore the ‘good’ texture and only alter the problem pixels. Keep your brush as small as the blemish and use a hard brush (around 90%) to avoid blurry edges, Alt-click to select a local sample of good texture of a similar tone and carefully paint out any major blotches.

Zoom to 200% and deal with any smaller imperfections, including stray eyebrow hairs;

Once you’ve imperceptibly removed all major distractions and stray hairs you’ll start to notice the next problem to tackle; shadows and highlights that betray wrinkles and deep pores, skin depressions and bumps, and even tonal variations caused by digital compression.

This is where we’ll start off in the next PSDFAN professional retouching tutorial, using Dodge and Burn to achieve flawless, magazine cover results. And absolutely no blur filters!
In the meantime, keep practicing, I want you to come back for Part Two as clone stamp ninjas ![]() Pride yourself on every seamlessly perfect removal and every pixel rescued from the fate of large-brush slap-dash cloning. Remember the bus stop and make sure Mr. Eagle-Eyed waiting traveller never even knows you were there…
Pride yourself on every seamlessly perfect removal and every pixel rescued from the fate of large-brush slap-dash cloning. Remember the bus stop and make sure Mr. Eagle-Eyed waiting traveller never even knows you were there…
Daniel is a professional retoucher with eight years of experience in digital photo-manipulation and retouching. You can follow him on twitter at http://twitter.com/dmeadowsretouch


Do you know the basic tools in Photoshop but feel that your work is still looking average? Join our creative community at FanExtra and get the direction you need to take your work to the next level.


Daniel, this is starting off to be a good tutorial, i wanted to know how to use the Dodge and Burn, the next tutorial should be a good one.
Thanks Vim, keep an eye out, I hope you’ll find it interesting.
There’s a method of using Curves Adjustment layers to give more control than the standard tools that I’ll be demonstrating in Part 2
It’s nice to learn from professional. Especially you have contradicted a blur as a tool which as far as I remember is recommended by Adobe in their educational stuff.
I’m eagerly awaiting part two.
Regards.
Great first part, I’ve always wondered how to retouch photos professionally and now I can easily learn how to retouch photos of people. Can’t wait to see part two of this tutorial.
I really love this tutorial Daniel! ‘Professional’ is definitely the right word, as a lot of tutorials do look at incorrect methods such as surface blurring, and simply pushing things too far. I love how you delve into the theory behind your work flow.
Fantastic tutorial. I am eager to do to Part 2! Thanks for that.
Claudio
Part 2 is live now
Awesome tutorial dude,need to read the part two .
It’s nice to learn from professional.
Nice little tutorial Dan. Keep them coming. Another neat tip for this occasion:
1) Create a new layer above your image
2) Select the Clone stamp tool or Spot healing brush
3) Make sure ‘sample all layers’ is ticked at the very top
4) Now when your using these tools you will be cleaning up the image onto a blank layer and not touching the original image.
I hope this helps someone
That’s actually a really useful tip Shaw! Thanks so much for sharing, I hadn’t even thought of that before .
.
It definitely comes in handy Shaw, you make a good point. But don’t forget that blend modes don’t work using this method
You can work on a background copy and turn it into an easily editable layer using Apply Image, leaving you free to use the clone blend modes, patch tool, dodge/burn ranges etc. that you can’t use on a blank layer. I’ll cover it soon
Hi, I’m learning new photoshop program would be very helpful for me thanks
FINALLY… A proper professional re-touching tutorial which doesn’t create plastic-looking images. I already know how to surface-blur a whole face, as most tutorials suggest, and it’s not pretty! Good little tip with the different blend modes for light/dark blemishes.
Looking forward to part-2 onwards.
Thanks for the tip on blemish removal. I usually use the spot healing or patch tool but I’ll give this a try!
No problem Lloyd! There are a few problems with healing and patch on a regular flat image, although they are fantastic tools when used on high frequency texture detail, and even then it’s better to stick to the regular healing brush instead of spot healing, it’s better to trust your own judgement than Photoshop’s spot healing algorithm.
I’ll discuss splitting frequencies in a later tutorial
Thanks for the tips Dan, I have a question if you mind: “Would you be going to make another tutorial discussing the subtle way you changed the tone of the girls skin color without damaging the highlights coming from the light source of the image?” I was trying to go ahead on the tutorial and the only way I can go near your method is to use the selective color option to change the skin tone color. Looking forward to your succeeding tutorials on this topic! Thanks a lot!
Hi Willie, there will be a tutorial on local colour adjustments, so keep an eye out
thank you….thank you…
No problem
wow! this is awesome.. and easy to follow.
great TUT! keep it coming sir! *salute*
Thank you so much for this post. I want to let you know that I posted a link to your blog in CBH Digital Scrapbooking Freebies, under the Page 6 post on Aug. 30, 2011. Thanks again.
Thank you so much for this post. I want to let you know that I posted a link to your blog in CBB Digital Scrapbooking Freebies, under the Page 1 post on Oct. 02, 2012. Thanks again.
Thank you so much for this post
You’re very welcome Jagdish!