 Design a Retro, Rock T-Shirt Design
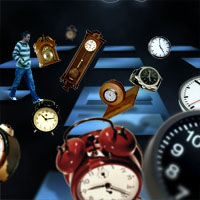 Create an Elaborate Photo Manipulation Around the Theme of Time
 Create an Abstract Playing Card Photo Manipulation
Have every post delivered to your inbox and get access to hundreds of useful design freebies.
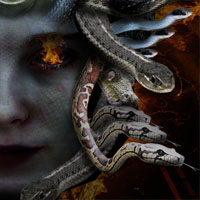
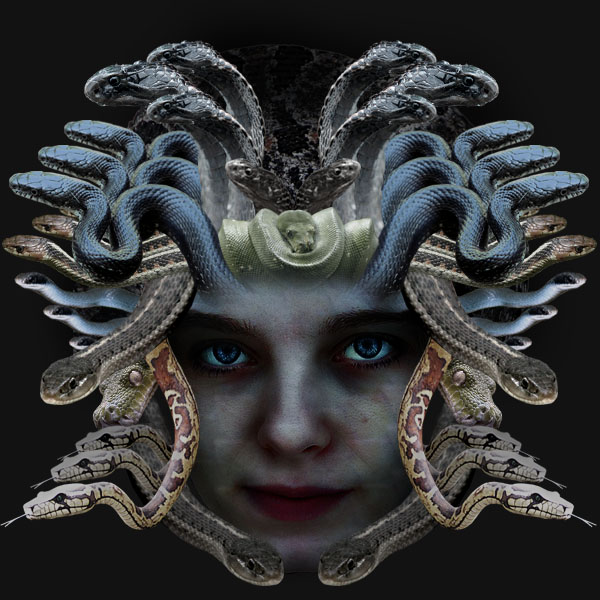
Here is the final image that we’ll be creating:

Here is a list of the various images used to create this piece:
http://www.sxc.hu/photo/797762
http://www.sxc.hu/photo/1063321
http://www.sxc.hu/photo/1068537
http://www.sxc.hu/photo/1056935
http://www.sxc.hu/photo/1061420
http://www.sxc.hu/photo/1060564
http://www.sxc.hu/photo/1053704
http://www.sxc.hu/photo/999039
http://www.sxc.hu/photo/995347
http://www.sxc.hu/photo/792891
http://www.sxc.hu/photo/704414
http://www.sxc.hu/photo/586141
http://www.sxc.hu/photo/1066166
Open up a new document and paste in an image of a woman’s face. Move it so that the face is in the bottom section of the document.
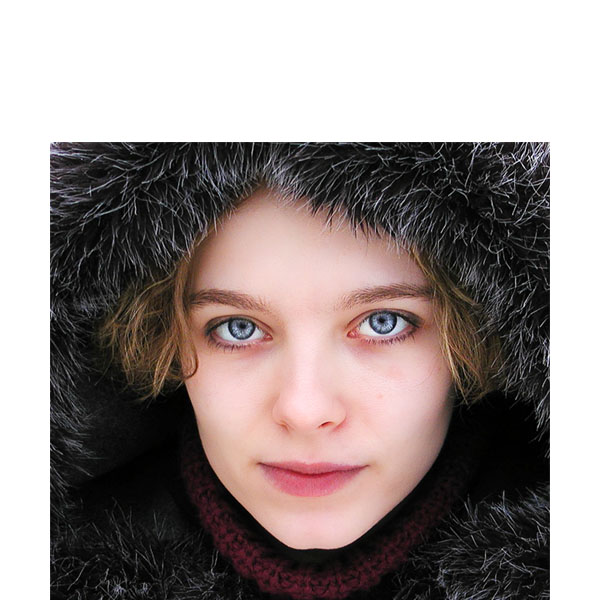
Now cut out the woman’s face using the lasso tool. Select your whole canvas and then paste her in to paste her into the center of your canvas. Then shift her down towards the bottom of your document. I also created a dark gray background layer beneath my face layer.

Now duplicate your ‘face’ layer and hide the original. This is because we’ll be applying destructive techniques to it. Then go to image>adjustments>shadows/highlights and apply the settings shown below:

Now go to image>adjustments>hue/saturation and apply the settings shown below:

Now go to image>adjustments>color balance. The trick with these steps is to be fairly subtle, as if you apply anything too heavily it will cause the image to look fake.

Now duplicate your ‘face’ layer and set the duplicate’s blend mode to ‘hard light’. This should give your face a lot more intense shadows. To heighten the shadows again duplicate this new ‘hard light’ layer.

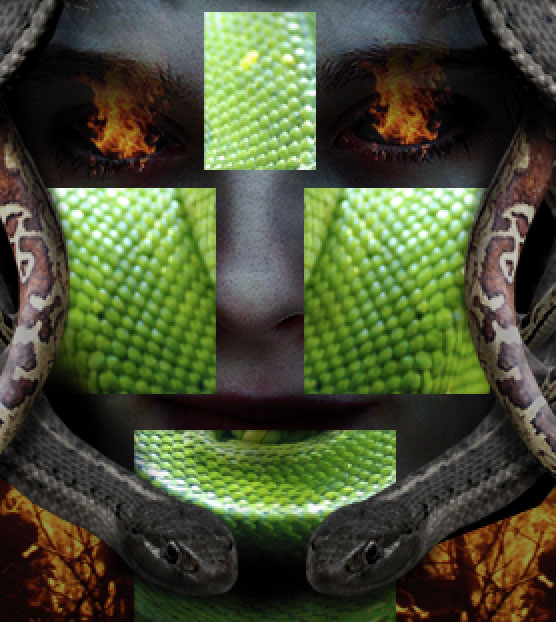
Now paste an image of some snake scales into a new layer above your face layers. Go back to your face layer and click somewhere around it using the magic wand tool (this selects the area around the woman’s face), then return to your scales layer and hit delete. This should leave scales only covering the woman’s face, and none of the background. Then set this layer’s blend mode to ‘multiply’ and reduce it’s opacity to around 60%.


Now create a new layer above your hard light face layers and below your scales layer called ‘shadows’. Select a smallish, soft black paintbrush and set it’s opacity to 10%. Then paint over the areas of existing shadow in the woman’s face (around the eyes, under the nose, the sides of the face etc…). You could heighten the shadows a number of ways, but this way really gives you the most control.

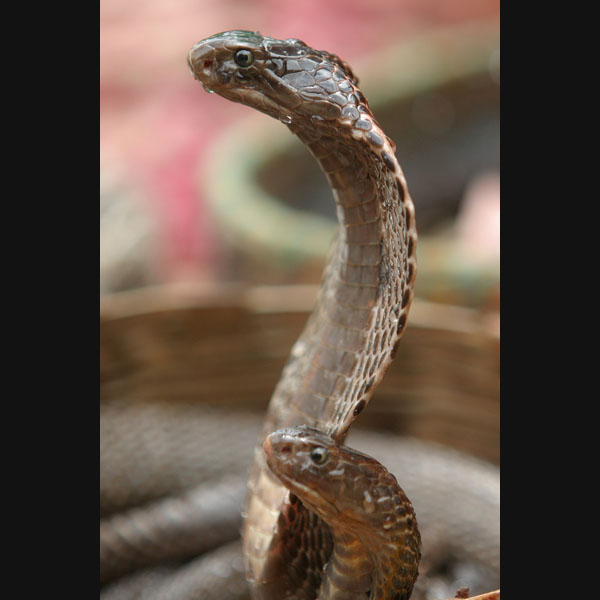
Now paste in an image of a snake. Cut the snake out very carefully using the lasso tool. By the way… this should probably be a good time to tell you that I really don’t like snakes. Dumbest idea for a tutorial ever…
Anyway, then resize/rotate the image to fit nicely onto the top of the woman’s head. Then duplicate this layer and go to edit>transform>flip horizontal. Move the flipped duplicate to be symmetrical on the other side of the woman’s head.

Now go to image>adjustments>hue/saturation and apply the settings below to make the snakes blend in a little better with the woman’s head.

The scales over the woman’s face are looking a little intense right now. To fix this I select a large, soft eraser brush at 10% and erase away parts of the scales to create the impression that they are gradually coming in from the sides of her face.
I also made the two snakes blend a little better with the woman’s face by first going to image>adjustments>brightness/contrast and upping the contrast. Then I reduced the saturation and darkened the layer a little.

I repeat the same technique that I used to place the original snakes to place two new ones on a new layer above the cobras layer. Again, I reduce the saturation and play around with brightness/contrast until the images blend nicely with the rest of the image. Then I take a large, soft eraser brush and erase away the bottom of the snakes so that they appear to be growing from the woman’s head.

Now duplicate this new snake layer and move the duplicate behind the cobras layer. The trick is to interweave the various snakes so that they appear to be part of the same mass of ‘hair’. Once you’ve moved the duplicate layer go to edit>transform>scale and then in the options bar (above your canvas) change the width/height of the object to 90%. This will resize your duplicate snakes to 90% of their original size, but will keep them centered in your canvas. Then simply move the snakes up so that they are above your original snakes. Repeat this process again, moving your second duplicate behind the first duplicate layer.

Now I add some more snakes, trying to fit them together nicely. It would take far too long to explain the exact steps that I used to make them blend together reasonably well, so I’ll try and give a few pointers…
If an object is looking too light, then reduce it’s brightness.
If it’s looking washed out or flat then up it’s contrast.
If it’s looking too bright then reduce it’s saturation.
These are pretty basic techniques, and a lot more can be done. However, for this stage of the work it’s really sufficient to get the various photos blending together fairly well.

Now add a LOT more snakes. Use the same basic principles of duplicating/flipping, and then reducing saturation/brightness where necessary. Try to completely surround the woman’s face with snakes, and arrange them in a creative way, keeping track of layer orders.
If you remember we originally created a dark gray background. Select your background layer and then fill it with solid black. If you look at the previous step’s image you will see that some of the edges of the woman’s face don’t blend well into the black background. To fix this create a new layer called ‘shadows merge’ above your face layers (and scale overlay layer). Use a small, soft black paintbrush at 10% to gently brush the edges of the face into the background. You can see an example of the areas that I blended below:

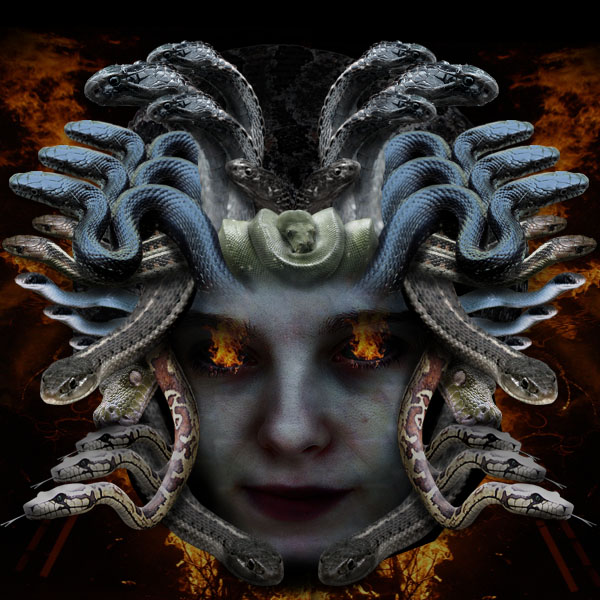
Now paste in a photo of some fire. It’s very important that this photo has a completely black background. Change the layer’s blend mode to screen, and the black background becomes transparent, meaning that the fire now appears to be over the woman’s face.


Now resize the fire so that it fits over the woman’s eyes. Reduce the layer opacity to around 70% to make it a little more subtle. Then use a soft eraser brush to gently erase the tops of the fire, so that it’s mostly contained within her eyes. Repeat this for each eye.

Now create a new layer just beneath your fire layer (the fire layer should be your top layer). Call this layer ‘black eyes’. Then zoom in and carefully outline where the woman’s eyes are using the lasso tool. Fill this selection with black. Then reduce the layer’s opacity to around 90%.

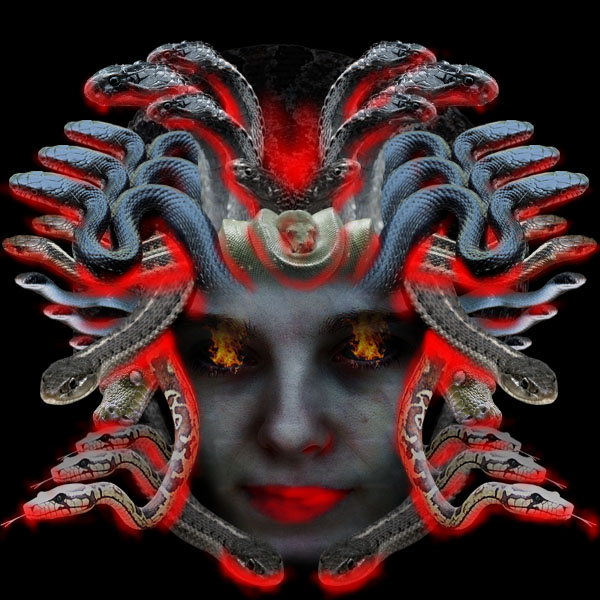
Now this step is a little tricky, and you’ll have to use your own judgement. To make the whole image fit together a little better we’re going to add shadows that are being cast by the shapes of the various snakes. If you notice, currently none of the snakes are casting a shadow on the other snakes beneath them. The trick here is to use a soft, black paintbrush at very low opacity keep painting over where you judge the shadows to be. You can do this on the various snake layers, but it’s more sensible to create a new top layer called ‘snake shadows’ and then have all your shadows on one single layer. Another reason for doing this is so that you aren’t doing anything permanent, or destructive to your snake layers.
I applied a red color overlay to my layer in order to highlight where I added shadows. You can see the result of the shadows below, and if you compare it to the previous step you’ll see how much improved the image is.

Now I paste in an image of some fire over my black background layer. I set the layer blend mode to ‘screen’ again, and reduce it’s opacity to around 60%. Then just to keep things looking symmetrical I copy the left half of the fire background, paste it and flip it horizontally, and then move it so that it takes up the right half of the canvas.
The image is looking good, but for a final touch I want to add some more scale details to the face. The previous scales were too large, so I create a new layer above it and paste in parts of scale from one of my original snake photos. Then I set the layer’s blend mode to multiply and reduce it’s opacity to around 60%. Finally I use a small, soft eraser brush at a very low opacity to erase the edges of these areas of scale, so that they blend seamlessly into the woman’s face. The scales are too bright/green and are distracting from the rest of the image, so I go to image>adjustments>hue/saturation and make saturation -100 and lightness -30.

To finish off the image I erase the bottom of the flames background a little with a low opacity eraser brush and then also erase the black shadowing applied to the woman’s chin as it was looking a bit intense. You can see the final image below:
As always I’d really appreciate your comments.

Tom is the founder of PSDFAN. He loves writing tutorials, learning more about design and interacting with the community. On a more interesting note he can also play guitar hero drunk with his teeth.


Do you know the basic tools in Photoshop but feel that your work is still looking average? Join our creative community at FanExtra and get the direction you need to take your work to the next level.


Another great tutorial. I was wondering when you were going to post again. Keep up the great posts.
Best,
John
http://www.designbump.com
Thanks John. This tutorial came a day later than expected due to a really hectic few days and quite a long time to write it.
At first, the idea is great.
I think you’ve been inspired by the mystic face tutorial
Many steps are equal, but you tried it another way.
I like how you converted the beautiful face into a medusa, though I think that the burning eyes don’t fit into the image at all.
I’m not that satisfied with the end result, I think you could have done more out of it. Maybe it’s because of the symmetric snakes and all that.
Maybe you should have taken more time to perfect it. For me it isn’t so important that every day there is a new tutorial. I’m especially looking for high quality tutorials with a great end result.
It’s good anyway.
Greetings,
LBrother
a good tut m8 …
the final outcome is really good… Thanx for the tut
wow she pretty look scary.another great quality tutorial from PSDfan. Keep up the good work Tom
Ronald
LBrother: I’m sorry that you didn’t like the end result that much. I did my best, but what can I say, I’m still learning too.
Crazyhunk/Ronald: Thanks for the kind words, always appreciated
By the way LBrother: I appreciate the fact that you were constructive with your comments
i think it’s great… and yeah, there’s a couple things i would have done differently, but that’s what makes us all individuals. In the end, all that matters is that the tutorial itself is written well and teaches those who need it.
I think you did great on both marks, Tom.
I like very much
this tutorial is great
thank u
i like it
thanks great tutorial
this has a very interesting effect. i like it. thanks (^_^)
Excellent; thank you
Thanks so much guys, I’m really glad you liked this one!
Beets: As always your support is much appreciated
I just went through the tutorials Creating Medusa with photo manipulation, I think it was a wonderful programme and I am happy because it has actually help me to realise that a lot can still be done with still images and also can be transposed to animation.
Please keep it up to help learners and beginners like myself
I’m glad that you enjoyed the tutorial Joseph, I hope that you’ll check out some of my others
hey great tutorial again!!! trhis ismy secind time going through it in class. your work is well appreciated
thanks,first tut i have ever done,and i am pleased with thened result,all the best lily,ps keep up the tuts,as u learn i learn
Wow.. Fabuolus tutorial..
Soo cool how u did medusa.
Wow, that’s nice. I’d love to be able to use that medusa photo as an album cover. Let me know if it would be okay for me to use. Thanks!
Thanks for the tutorial it’s great….if people have different ideas they can use them in their project and make it unique…but I think yours is great. I would probably use different eyes as well and the fact that it’s so symetrical but still it’s brilliant…I can’t fault it as the end result is pretty good!!
maybe if the snakes have the same color, the result would be much better … anyway good tutorial
i LOVED the burning eyes effect, it really adds the effect of *mudusa* ..also what is another great effect in replace of the burning eyes effect is to add flair spots is someone dont like the burning eyes effect for me the burning effect is a wonderful outcome and perfect and the skin as well!