 Create an Emotional Dreamscape Digital Photo Manipulation
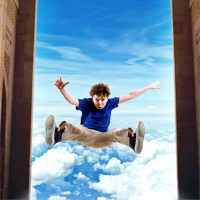 Members Area Tutorial: Photo Manipulate a Striking ‘Falling Dream’ Composition
 Turn an Ordinary Day Scene Into a Magical Night Scene
Have every post delivered to your inbox and get access to hundreds of useful design freebies.
Today we will be creating a surreal and dream-like photo manipulation from various stocks, brushes, and textures. We will be using Adjustment Layers to modify and blend our images non-destructively into a cohesive scene. We will also cover some pretty advanced masking techniques as well as exploring some color and light effects to bring it all together. If you are ready to begin then fire up Photoshop and let’s go!
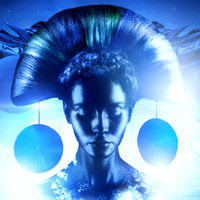
Here is a preview of the image that we are going to be creating:

After starting up Photoshop, create a new document that is 2560 x 1440 pixels in size and set to 300dpi. Open the frozen tundra image from the resources folder and drag it into your document before using the Free Transform (Command/Ctrl + T) option to scale the image up until it spans across the whole canvas.

The next thing we want to do is open the image of the castle from the resources folder to prepare it for our main document.

Double click the “Background” layer and type in any name you like for the layer as shown below:

With your layer selected, press Command/Ctrl + J to duplicate your layer, and then turn the visibility of your original layer off.

You will notice in the image above that we have a few people in the image that we want to remove. There are a few ways of doing this but I would recommend using the Clone Tool (S) or simply brush over the people using the Brush Tool (B).

After patching up a few more areas of the image we will add a Layer Mask by clicking on the icon highlighted here:

Using a hard round brush with a solid black color selected, paint into your castle image to remove the background from the image. Alternatively, you could do this using the Pen Tool (P) but for the purposes of this tutorial I won’t be going into too much detail of the process for isolating the image.

Here you can see I have started to remove the unwanted background and will continue to paint into the mask to also remove the snow-covered ground. Once you are happy with your selection and have spent some time getting a nice clean cut out, drag this whole layer into the document we have set up.

What we want to do next is focus on making these two images blend together in a more natural way and to do this we will be applying a few Adjustment Layers. The first thing is applying a Curves Adjustment by clicking on the icon at the bottom of the Layers Palette as shown below:

We want to keep the effect just on our castle for now, so we can use the built-in mask on the Adjustment Layer we have just created. To ensure that the effect doesn’t apply to the entire image, hold the Command/Ctrl Key and click on the layer thumbnail icon to activate a selection around the isolated castle.

Once you activate your selection, press Command/Ctrl + Shift + I to inverse your selection. Once you have done that, fill the area with solid black using your Paint Bucket Tool (G).

For the Curve settings, I have targeted the Blues and created three points. Below you can see the settings that I am using:

Your result should look something like this:

Using the same technique we used in the previous step, we will also apply a Hue/Saturation Adjustment Layer. Mask out everything other than the couch and apply the settings shown here:

Below is the result after applying our second Adjustment Layer.

Now that we have made some adjustments to the castle we want to also make a few adjustments to the ground. Select your “Frozen Tundra” layer in your Layers Palette and apply a Curves Adjustment Layer. This adjustment will go just above the ground layer and will affect only this layer when we change the settings.
Create three points on your adjustment and use the settings shown below:

After modifying the RGB colors we will also modify the settings of all of the blues in the image. Below are the settings for each of the three points I am using.

The result of these adjustments should give you a result similar to this:

Double click on the castle layer to bring up the Layer Style Options and apply a Color Overlay and set it to Multiply as shown here:

For the color, we will be using a medium blue/gray color such as #1E4E8A.

Once you have applied your Color Overlay you can click OK to apply the changes and you should now be able to see how we can start to blend the scene together using a combination of Blending Modes, Layer Masks, and Adjustment Layers.

Create a new layer at the top of your Layers Palette and switch to your Marquee Tool (M). Make a rectangular selection that is short in height but spans the entire width of the image.

With your selection still active, pick a vibrant blue color that has been sampled from the image – #5EC6F4.

Next, switch to the Gradient Tool (G) and make sure that you have a Linear Gradient selected that fades from solid color to completely transparent.

Click your mouse and drag upwards to create your gradient within the selection area. Once you are happy with your gradient, change the Blending Mode of the layer to Overlay.

With your gradient layer highlighted in your Layers Palette, hold down the Command/Ctrl Key and click on the layer thumbnail icon of the castle layer to create a selection around it – Once you see the marching ants you will know that it worked.
While your castle selection is active, add a Layer Mask to your gradient layer by clicking on the icon highlighted below in the Layers Palette:

You should now only see your gradient within the shape of the castle. The last thing we want to do here is just reduce the opacity of the layer to somewhere around 80-84%.

Select your Overlay gradient layer from the previous step (should be the top layer in your Layers Palette) and press Command/Ctrl + J to make a duplicate of this layer. We want to build up a misty look to add some atmosphere and depth to the image. To do this, we can start by changing the Blending Mode of our newly duplicated gradient layer to Screen before reducing the opacity of the layer to about 65%.

Create a new layer above this layer and make another Linear Gradient fading from the same blue color, the only difference is that this time we want it to go across the entire horizon of the image. Change the Blending Mode of this layer to Screen and reduce the opacity to about 75%.

Duplicate this layer by Pressing Command/Ctrl + J and then use the Free Transform (Command/Ctrl + T) to flip the gradient layer vertically. Move it down below the previous gradient so that it creates some haze over the tundra. We can also reduce the opacity of this layer even further (somewhere around 40%).

I have named each of these two layers “Mist 1” and “Mist 2” to help keep things organized. Create a new layer below both of these mist layers and fill it with a solid black color using your Paint Bucket Tool (G) before changing the Blending Mode of the layer to Soft Light. Doing this will create an effect similar to a Levels Adjustment where the darker colors of the image have been boosted to add more contrast overall.

Here I have used a few additional Layer Masks to blend the mist and the Soft Light layers with the background. For this I have used a large round soft brush with a solid black color selected and painted into the layer. The goal here is to try and create balance and to also set the tone of the piece.

The castle isn’t going to be the main focus of the design, so we have made it darker and added mist to push it into the background. A general rule of thumb to keep in mind that light colors pop out and dark colors usually recede further back into space.
Select your castle layer and then while holding down the Command/Ctrl Key, select the other layers and adjustments that are related to the castle. Once these are all highlighted, press Command + G to put them into a Group Folder.
We may also want to do the same thing here with the mist layers and place them into a Group Folder to help keep things organized. The image below shows the process of selecting the layers and placing them into a folder. In the final image on the right you can see the layers that I have selected and placed in each of the corresponding folders.

We can also continue to do this with the background layers as well as it will help keep track of our layers and also allow us to apply certain adjustments or masks to the group as a whole.

Next, open the image of the crazy haired model from the resources folder.

What we want to do is isolate the model from the background, just like we silhouetted our castle earlier on. The easiest and most accurate way of doing this is going to be a Layer Mask. Double click on your “Background” layer to unlock it first, and then click on the Layer Mask icon shown below:

From here, you can use a hard round brush with a solid black fill color to mask out the background. Take your time here to ensure a clean selection around the contours of the body, hair, and earings.

Once you are happy with your mask, drag the model image over into your working document and make it about the same size as what I have here:

You should now have the image of the model in your document and we now need to make a few adjustments to it in order to help it fit better with it’s surroundings. The first thing we are going to do is add a Levels Adjustment Layer. We will do this in the same way we added our other adjustments earlier on.
Click on the Adjustment Layer icon at the bottom of the Layers Palette and when the menu pops up choose “Levels.” After the histogram appears we just want to move the middle slider to the right so that it has a value of 0.86. Use the image below as a guide for this.

With your newly created Adjustment Layer highlighted in the Layers Palette, hold down the Command/Ctrl Key and click on the layer thumbnail (highlighted in red below) of the model layer in order to activate a selection around it.

With the selection still active, press Command/Ctrl + Shift + I to inverse the selection.

From here, switch to your Paint Bucket Tool (G) and fill the active area with solid black to ensure that the adjustment will only affect our model.
We will repeat this process and add a Hue/Saturation Adjustment Layer before we apply the settings shown below:

Make sure that “Colorize” is checked off here if you haven’t already done so.
Now that we have a mask attached to our Hue/Saturation Adjustment Layer we want to brush some of the original color back in. To do this, select a large soft round brush with a solid black fill. Below are the settings that I am using for this:

Brush over most of the skin and the face so that the affect is subtle. We mostly want it to appear over the hair of the model so keep that in mind as you go. The reason we are leaving the skin the way it was is because we will be adding some highlights and overlays in subsequent steps to achieve a slightly different result. Once you have done this, you should have something similar to the image shown here:

You can see how the hair and the earrings fit better with the overall scene. We have some good values that are already starting to appear although they are mostly dark. We can establish these tones so that later on we can focus solely on the highlights and bursts of color that will really stand out in the design.
We now want to apply a couple of Adjustment Layers to the overall image. Clicking the icon at the bottom of the Layers Palette, add both a Color Balance and Levels Adjustment.
For the Levels, simply move the middle slider over to the right so that it’s set to 0.91 as shown below on the right:

And this image shows the settings we will use for the Color Balance settings:

Once you have set these up, select both layers by clicking them while holding down the Shift Key, and then pressing Command/Ctrl + G to put them both into a Group Folder. I have named folder “Adjustment Layers” to keep things simple.

Create a new layer just above the model layer but below both of the Adjustment Layers and switch to your Gradient Tool (G). Choose a solid white color for the fill and make sure you have a Radial Gradient that fades from solid to white as shown here:

Click and drag your mouse outwards from the center of the image and then change the Blending Mode to Overlay. We want to place this layer over the face and hair of the model.

After that, add a Layer Mask to the Radial Gradient and brush around and on the hair a bit to tone down the effect. You should now have something like this:

Create two new layers and make another white Radial Gradient on each one, this time leaving the Blending Mode of these two set to Normal. Place one of the highlights over the left shoulder and earring, and the other a bit higher up similar to this:

From here I have selected both of these highlight layers and placed them into a Group Folder called “Front Highlights” to once again help keep things organized.

At this point things are starting to come together but I want to change the background up a bit. Rather than having one large castle in the background, we are going to reduce the size of it and place one on each side of the model.
Select the “Castle” folder in your Layers Palette and drag it down to the New Layer icon to create a copy of the entire folder. Repeat this once more so that you have two copies, plus your original folder. Once you have done that, turn the visibility of the original folder off.

Select the most recent copy of the folder and drag it over to the right side while holding down the Shift Key to keep things aligned.

From here, I have decided to also add a Layer Mask to the “Mist” folder to have more control over this. You can use a large round soft brush to gradually brush out some of the mist on both sides.

Once you are happy with the way the mist is looking as well as the placement of the castle folders, select both of the folders and put them together by once again pressing Command/Ctrl + G.

If we now open up the folder you should see a structure like this:

Click on the layer thumbnails of each of the castle layers while holding down the Command/Ctrl Key to activate a selection around both of them simultaneously.

Create a new layer inside of the folder and name it something like “Haze” so that we can proceed to add some color within the shape of our castles. Switch to your Gradient Tool (G) and using a light blue color sampled from the image (press the Alt Key to toggle between the Brush Tool and the Eyedropper Tool) we will set up a Linear Gradient that fades from solid to transparent.

Click your mouse just below the castles and drag upwards to create your gradient on your new layer and change it’s Blending Mode to Overlay. You should now have a smoother blend happening on top of the castle that we can continue to work with as our design progresses.

Your selection should at this point still be active around the castles, and we now want to inverse this selection by pressing Command/Ctrl + Shift + I and select the Background Folder.

Next, click on the Layer Mask icon to mask out this area from the background. You will also need to click on the layer thumbnail icon of the model layer to activate a selection and brush this area out as well.
Once you have done that, create a new layer and place it below the Background Folder, filling it with solid black using your Paint Bucket Tool (G).

You will now just see the solid black in the background. We can now work on recreating our sky background.
Open the space texture from the resources folder and bring it into your document. Place the layer between the Background Folder and the solid black layer that we just created at the end of the previous step.
With your space layer selected, press Command/Ctrl + Alt/Option + U to bring up the Hue/Saturation options. Move the middle slider all the way to the left to desaturate the layer and then press the Enter Key to apply the changes.

Change the Blending Mode of the space texture to Hard Light and add a Layer Mask by once again clicking the Layer Mask icon at the bottom of the Layers Palette.

We need to quickly mask out the texture on the entire area below the castle or the foreground by painting into the image with your Brush Tool (B) using a hard round black brush.

Create a new layer just above the Castle Folder and select the color #5EBEFF as shown below:

Using a low opacity soft brush, begin to paint over the space background after setting the Blending Mode of the layer to Color.

Create another new layer above the previous one and now select a rich blue color such as #0334AC.

Change the Blending Mode of this layer to Screen and begin to paint into the layer with your soft brush.

Make a new layer above both of the previous color layers and sample a dark blue color from the image. Using your Gradient Tool (G), create a few dark gradients to vignette the top of the image so that it fades to the darker color along the edges of the image.

You may also wish to add some of these gradients inside of the castle by first holding the Command/Ctrl + Shift Keys and clicking both of the layer thumbnail icons to activate the selection. From here, click and drag your mouse from the outside edges towards the middle to gradually fade the castle into darkness on both sides.

From here, work on creating some unity between the mist and the vignettes, reducing the opacity of the castle vignette down to about 80%.
I have also decided to add two more layers for some mist that goes across the horizon line. You can do this easily by painting across the horizon with a soft round brush. Here I have just sampled a lighter color from the composition with the Eyedropper Tool (I).

Next, create a new layer and place it just below your model layer. Select a solid white color and then switch to your Gradient Tool (G). Make sure that you have a Radial Gradient that fades from solid to transparent and create a mid-sized gradient on the canvas.

Here I have just called the layer “Ground Highlight” before changing the Blending Mode to Overlay.

Press Command/Ctrl + T to initiate a Free Transform and hold down the Alt/Option Key while pulling either the left or right handle outwards.

The next thing we want to do is bring in our polar bears so find the first one in the resources folder and begin to cut it out from it’s background using the same Layer Mask technique we used earlier.

Once you have made your selection, bring the polar bear into the working document and drop it just below the model layer. Notice I have flipped the bear horizontally to keep things consistent with our light source and also to make sure that the bear is facing the focal point or the center of the illustration.

Double click on the polar bear layer to bring up the Layer Styles Dialog Box and check off the Color Overlay box. Also set the Blending Mode of the Color Overlay to Soft Light as shown here:

For the color we will use a medium blue from our image, here I am using #114B9B.

Press OK or hit the Enter Key to apply the style to the polar bear.
Hold down the Command/Ctrl Key and click on the layer thumbnail icon of the polar bear layer indicated here by the red box:

With your selection active, add a new layer just above this one and switch to your Brush Tool (B). We will be using a large soft round brush similar to this:

We will now need to sample a color from the lighter part of the image such as #5AE3FF.

In your new layer, begin to paint to blend the bear with the background a bit by adding some of this misty color we have selected.

We will also use a slightly darker color (#3095F2).

With your polar bear selection still active, begin to paint over the bear on another new layer. Change the Blending Mode of this layer to Color as shown below:

You should now have your original polar bear with a Color Overlay Layer Style applied, in addition to having two more layers of color to blend the bear with the background.
Next, open up the second polar bear image and clip it out from the background. Bring the polar bear into the document and place it on the opposite side of the other bear and reduce it’s size slightly to match the image below:

We will now apply the same Layer Style and use the same technique described in the previous step to blend this polar bear with the background. You should now have three layers for both the left and right polar bears.

To keep things running smoothly I have decided to group the left and right polar bears in each of their own Group Folders by selecting the layers and then pressing Command/Ctrl + G.

To add a bit more realism, we will also want to create some shadows for our bears. The easiest way to do this is to create a new layer below each polar bear and paint with a soft round brush using some of the darker colors, which you can sample from the image. Below you can see how I have started to work in some shadows:

At this point we just want to check our work and see how things are looking overall.

Next, open up the light wave image from the resources folder and drag it into your document placing it just below the model layer.

Press Command/Ctrl + T to initiate a Free Transform, and then hold down the Shift Key and move any of the four corners clockwise to rotate the image 90 degrees. Once you have done that, change the Blending Mode to Screen.

What we want to do now is add a Layer Mask to the light wave layer and mask out everything except for the parts that overlap the bear and the castle on the right side.

With your light wave layer selected, press Command/Ctrl + J to duplicate the layer and then delete the Layer Mask by holding the Control Key and clicking on the mask thumbnail icon to reveal the dropdown menu.

We can then play with the positioning of the image as we place it on the left side before adding a new Layer Mask to leave only a small area of the texture overlapping the castle and the polar bear on the left. You should now be left with something like this:

Adding this texture with some subtle floating lights and streaks of light helps to bring the piece to life a bit more while also making it more dynamic.
Next, create a new layer above the model layer and select the color #A7F3FF.

Switch to your Gradient Tool (G) and make sure that you have a Radial Gradient selected that fades from solid to transparent.

Click and drag your mouse outwards from the middle of the image to create a gradient on top of the model. Once you have done that, change the Blending Mode of the layer to Color.

Add a Layer Mask to the image and brush out the color on the model so that the effect is subtle by using a low opacity soft round brush. For this we just want to have some hints of light blue on the skin.

Create another new layer above the previous layer and now choose a richer blue color such as #0548F3.

We will once again leave our gradient settings the same as below:

Create your Radial Gradient on top of the model layer as shown here:

We now want to change the Blending Mode of this layer to Overlay and reduce the opacity to somewhere around 80-85%. Once you have done that, hold down the Command/Ctrl Key and click on the layer thumbnail icon of the model layer (highlighted in the image below) to activate a selection around it. You should now see the marching ants around the model to indicate your active area. With this area still selected, click on the Layer Mask icon highlighted at the bottom of the Layers Palette.

Paint into your layer mask so that you leave blue only on the skin – both the shadows and the highlights. We will make one more color layer using this same technique to build up our layers of color. Doing this will help fit the model into the scene a bit better and you can see how using this combination of gradients with masks can be quite useful. After playing with this for a few minutes you should now have something like the image shown here:

Next, we will create another new layer and this time we want to select a darker shade of blue/gray – Here I am using #0057AC.

Using the same gradient settings we used in the previous steps, create a large Radial Gradient on both ends of the image as shown here:

Now, change the Blending Mode of the layer to Overlay and reduce the opacity to about 50%. The reason we are doing this is because the edges of the design look a bit washed out, and we can help this by adding some darker tones to create a more saturated landscape. Remember that even the shadows need to have some of the surrounding colors in them when creating a scene like this.

Create a new layer just above the model layer and name it “Splatter.” What we want to do now is bring up our Brushes Palette by pressing the F5 Key and then you should see the panel. Go to the icon on the top right of the panel as indicated in the image below:

From the menu, we want to choose “Load Brushes” and then we can navigate to our splatter brushes from the resources folder.

Using a solid white color, begin to paint with some of the splatter brushes along the bottom of the model image as shown here:

We just want to build up a random looking splatter texture so there is no right or wrong brush for this, just experiment with the size and placement of the various brushes.
Once you have a nice shape going, turn the visibility of the splatter layer off, and then hold down the Command/Ctrl Key and click on the layer thumbnail icon of the layer to activate a selection around your shape.

With the selection still active, select your model layer and press Command/Ctrl + J to duplicate the selection onto a new layer. If you now turn off the visibility of your model layer you should have something similar to the image below:

You can see the visibility of the splatter layer and the model layer are both turned off, revealing only the parts of the model image that are contained within our selection area that we made with our splatter brushes.
Add more splatter brushes in different areas to build up more shapes, and continue this process by turning off the visibility of your splatter brushes, clicking the thumbnail layer icon, and then pressing Command/Ctrl + J on your model layer to duplicate the selections onto there own layers.
As I mentioned in the previous step, you would need to turn the visibility of the model layer off in order to reveal the shapes we have created. What we want to do to reveal them is to turn the visibility of the model layer back on and add a Layer Mask by selecting the icon at the bottom of the Layers Palette.
Use the same splatter brushes with a solid black fill to mask out certain areas. By using our splatter brushes we will keep the arbitrary shapes of the splatters and reveal some knocked out areas at the same time.

Select all of your splatter shapes (now containing pieces of the model image) by clicking the first, holding down the Shift Key, and clicking on the bottom layer. Once all of these layers are highlighted, press Command/Ctrl + G to place them into a Group Folder. Apply another Layer Mask to this folder, again using the splatter brushes to knock out the areas along the bottom of the model image.
The reason we have put these layers into a folder first is so that once we apply a mask we are affecting all of the layers together, rather than having to turn the visibility of our layers on and off in order to figure out which one we want to modify.

We want to make it look like the model image is sort of gradually deteriorating from the neck down, and at this point you can see how this has started to take shape. One detail that we have overlooked is that the Adjustment Layers we created earlier on are leaving an outline around the shape of the model layer, which we do not want.
To correct this, we will again select both the Levels and Hue/Saturation Adjustment Layers that we applied to the model and put them both into a Group Folder before applying a Layer Mask so that we can mask out this coloring.
The image below shows the areas that I am referring to that we want to get rid of.

Next, we are going to select all of the layers between the “Model Adjustment Layers” folder and the “Front Highlights” folder as shown here:

Once again, press Command/Ctrl + G to put all of these layers into a Group Folder and name it “Extra Color” or a similar naming of your choice.

We can now add a Layer Mask to this folder in order to get rid of any artifacts or edges that we do not want to appear.

We will now select all of the layers from our “Model Adjustment Layers” folder down to our model layer as shown below:

Press Command/Ctrl + G to place all of these related layers into another Group Folder simply named “Model.” I know this may seem a little much with all of the folders but not only does it help to keep related layers together, it gives us much more control over the image.

Add a new layer above your newly created “Model” folder and use some of the splatter brushes to work along the bottom and outer edges of the model. The goal here is to try and blend some of the colors between the model and the foreground.
An easy way to do this is to select your Brush Tool (B) and then zoom in on the area you want to tidy up. Press the Alt/Option Key on your keyboard to toggle between the brush and the Eyedropper Tool (I) that can be used to sample colors directly from the image before painting with your splatter brushes.

After spending a few minutes cleaning up the edges and blending things together I am going to drag this layer into the “Model” folder and place it at the very top to make sure it’s above all of the other layers inside.

We now have a very nice effect going that evokes energy and motion while sticking with the mood and atmosphere that we have already built up.
Next, select a deep blue color (#101E76) and add a new layer just below the “Lightwave” folder.

Using your Marquee Tool (M), create a medium sized circle, making sure to hold down the Shift Key as you drag to constrain the proportions of the shape. From here, fill it with the deep blue color using your Paint Bucket Tool (G).

Hold down the Command/Ctrl Key and click on the thumbnail layer icon of the sphere shape we just created to activate a selection around it.

Create a new layer just above the sphere layer while keeping the selection activated.

Now choose a more vibrant shade of blue (#51BFFF) as shown in the image below:

Switch to your Brush Tool (B) and using a large soft round brush at a low opacity, begin to paint around the edges of the sphere to add in some highlights. Make sure that your selection is active while you do this to ensure that it stays within the boundaries of the shape.

Repeat the previous step in order to create another smaller sphere shape with a second layer for a highlight.

Create a new layer between both of the sphere layers and change the Blending Mode to Multiply. We will now add a shadow, and to do this we want to use the same deep blue color as before (#101E76) and paint on the layer so that it appears underneath the smaller sphere shape.

Continue this process, adding an even smaller sphere to give the image more depth. The idea is to make these appear as free-floating forms that cast both a shadow and a highlight.

From here, do the same on the opposite side, altering the sizing and positioning of the various spheres. If you don’t want to recreate each of the shapes, you can simply copy the layer before flipping or rotating it with a Free Transform (Command/Ctrl + T).
After adding some sphere shapes to the opposite side trying to achieve some balance and symmetry, I have selected all of the sphere layers in the Layers Palette. To do this, select the top sphere layer, then hold down your Shift Key and then click on the bottom sphere layer.

Once your layers are all highlighted, press Command/Ctrl + G to put them all into a Group Folder called “Spheres.”

Next, open the flare image from the resources folder and select any of the flares that you like. Simply make a selection around it, press Command/Ctrl + J to duplicate it onto a new layer, and drag the layer over into your working document.

I have used a Free Transform (Command/Ctrl + T) to scale the flare up a bit before changing the Blending Mode to Screen.
Place a few of these flares around the image and feel free to experiment with the size and placement here until you get something you like.

I have erased some pieces of the flares to help things blend a bit more. Once you are happy with the way the flares are looking, select them all and place them into a Group Folder by once again pressing Command/Ctrl + G.

Adding some flares to the image not only makes it look more polished but it also adds to some of the horizontal motion that we established earlier with our light wave texture.
What we want to do now as we continue moving forward is to group similar layers together. Here I am grabbing both polar bears along with the folder containing the shadows.

Once you have all three folders selected, press Command/Ctrl + G to put them into one folder that we can simply name “Polar Bears.”

Repeat this process grabbing both of the “Ground Highlight” layers as shown below:

And now we will put both of these layers into a Group Folder as well.

Next, open up the image of broken ice as shown here:

Bring the image into your document and place it just below the “Castle” folder. Do a Free Transform (Command/Ctrl + T) to enlarge the image so that it spans across the entire canvas.

Press Command/Ctrl + Alt/Option + U while your layer is selected and it will bring up the Hue/Saturation Adjustment. Once the dialog box appears, apply the settings shown below:

Press the Enter Key to apply the changes and switch the Blending Mode of the layer to Overlay and reduce its opacity to about 50%.
What we want to do now is add a Layer Mask to the broken ice layer so that we can get rid of the top portion of the image, only leaving pieces on the bottom to blend in with the foreground.

Use a large soft round brush with a solid black fill to do the masking. We want to blend this in gradually so we don’t have to worry too much about zooming in and being precise. Zoom in and out just to make sure that things are looking even and smooth across the canvas.

Next, open up the image of the snowy landscape shown below:

Bring this image into your document placing it on top of the previous broken ice layer. Just as we did in the previous step, we will use the Free Transform (Command/Ctrl + T) to scale the image up, holding the Shift Key down as we drag outwards from any of the four corners of the image.
We will be leaving the Blending Mode of this layer set to Normal but we do have to make another Hue/Saturation Adjustment. Make sure that this layer is highlighted in the Layers Palette and then press Command/Ctrl + Alt/Option + U to bring up the Hue/Saturation Adjustment window and apply the following settings:

After applying the changes, add a Layer Mask to the snowy landscape and mask out everything on top and use the same soft black brush to blend this texture into the foreground.
We are mostly concerned with the horizon line and area just below the bears. Adding these images and blending them will create more of an arctic look.

To push this just a bit further we are going to use one more image to add more texture and unity to the foreground. First, open up the image shown below:

Bring this layer into your Photoshop file and place it on top of the previous snowy landscape layer. It may sound redundant but we will once again scale the image up so that it covers the entire area of our image. We can leave the Blending Mode set to Normal and will apply another Hue/Saturation Adjustment with these settings:

Again, use a Layer Mask and a soft round brush at a low opacity to help blend this into the image. Focus on the horizon line area and fitting these pieces together by utilizing the masks. You will start to see how adding some variety to the foreground makes the image appear more organic and creates a slightly more believeable landscape.

We will now select the very bottom layer in the Layers Palette, and then while holding down the Shift Key, select the most recent foreground image that we added which should look like this:

Press Command/Ctrl + G to put these layers into a Group Folder and give it a simple name like “Background.”

You can see in the image above that our Layers Palette is pretty organized considering we have added so many layers. Now, instead of having to scroll through an endless list of unnamed layers we can save ourselves time if we need to make an adjustment to a specific area of the design.
Open the next space texture and bring it into your Photoshop document. Place this layer just below the Adjustment Layers Folder at the top of your Layers Palette as shown below:

We will now make a Hue/Saturation Adjustment to the layer by pressing Command/Ctrl + Alt/Option + U and applying the settings shown here:

These settings are basically the same ones that we used when adding more texture to the foreground. We want to make sure that now we stay consistent with the colors and use what’s already there to build off of.
We want a subtle effect here so we will reduce the opacity of the layer to about 12-15% and change the Blending Mode to Overlay.

From here we just need to focus on blending the disintegrating model into the scene a bit more and to do this we just need to illuminate the ground behind the model, as well as placing some light in front.

Switch to your Gradient Tool (G) and use the Radial Gradient fading from white to transparent to place one or two more layers into the Ground Highlights folder beneath the model. You can adjust the opacity as you see fit, but change the Blending Mode to Soft Light.

Now we can either use a low opacity soft white brush or continue to use our Radial Gradients to place some white light in the foreground, above the model layer. Doing this will help blend the figure into the environment and really help to draw the viewer in to the focal point of the image.

You may choose to add some more splatters or highlights around the model to help with the blending, and feel free to play around a bit until you are happy with the results. We just have a few more details to add to our masterpiece before wrapping things up.
Next, open up the first render from the resources folder – I have highlighted the two that we need in a blue color so you can easily spot them with the other renders.

You can use your Magic Wand Tool (W) to quickly get rid of the background for this as the edges are clearly defined. Once you have isolated the object, bring it into your Photoshop document and place it just below the “Lightwave” folder.
Press Command/Ctrl + Alt/Option + U to bring up the Hue/Saturation Adjustment and apply the following settings:

Flip and rotate the object so that it’s horizontal and coming out from behind the right side of the model as shown here:

Make a copy of the render by pressing Command/Ctrl + J and flip it horizontally using the Free Transform (Command/Ctrl + T) so that we have the same thing on both sides. You can keep the shape in line by holding down the Shift Key when sliding it over to the left side.

We now want to open the second render image and once again isolate it from the background using the Magic Wand Tool (W).

Using the same keyboard shortcut (Command/Ctrl + Alt/Option + U) we will bring up our Hue/Saturation Adjustment and apply the settings below:

Place this layer below the “Polar Bears” folder and transform it so that it matches the image shown here:

This next image shows the render layer turned off so that you can see the shape we have created.

After placing this render, we will once again press Command/Ctrl + J to duplicate the layer and then Command/Ctrl + T to do a Free Transform. Hold down the Control Key and click on the image to reveal the menu where we can select the option to “Flip Horizontal.”

Once you have flipped the render we will do the same thing where we place it on the opposite side to create a symmetrical shape.
Play around with this by making a few more copies and varying the size and placement of the renders, making sure that you do the same thing on both sides of the model.
When you are happy with the shape you have created, hold down the Shift Key and select the first, and then the last render shape so that they are all highlighted in your Layers Palette as shown here:

Press Command/Ctrl + G to put them into a Group Folder and name it “Renders.” After that, click on the small black and white icon at the bottom of the Layers Palette to bring up the Adjustment Layer Menu. From this menu, choose “Curves” and you should notice that the Adjustment Layer has now been added just above the Renders Folder.

If you open the Renders Folder (if it isn’t already open) then you should see all of your render layers inside. Hold down the Command/Ctrl + Shift Keys and click on each of the layer thumbnail icons so that you end up with an active selection around the entire shape as shown here:

Press Command/Ctrl + Shift + I to inverse the selection and then use your Paint Bucket Tool (G) to fill the image with a solid black color. This will ensure that the Adjustment Layer only affects the shape of the renders just as we did earlier on with some of the other objects in our composition.
Add a few points to your Curves Adjustment Layer and use the same points and settings as I am using below:

Here I have also decided to add a Layer Mask to the entire Renders Folder so that I can mask out the bottom of the shape behind the model with a large black brush.

Now we want to add two more Adjustment Layers – we will use both the Level and a Hue/Saturation Adjustment Layers.
Repeat the process of selecting the shapes by clicking on the layer thumbnail icons and inversing the selection before painting into the mask to target the render shape.
The image below shows the process of adding the Adjustment Layers as well as the settings that we will be using for both.

Create a new layer just below the “Soft Light” layer in the Layers Palette and select a solid white fill color. After that, switch to your Gradient Tool (G) and make sure you have a Radial Gradient that fades from solid to transparent.
Click and drag your mouse outwards from the center of the image to create a medium sized gradient. We will make two more gradients on two additional layers and place them in both of the bottom corners as well as one behind the head of the model as shown here:

The image below shows you the placement and settings I am using for the gradient in the bottom left corner:

And next, this image shows the placement and settings for the gradient we want to place in the bottom right:

Lastly, we have our third gradient that we will be placing behind the head of the model to add an extra bit of color that brings more contrast between the model and the background.

By adding the gradients in the foreground we are also bringing some more balance to the landscape so that we don’t have such intense dark colors along the bottom of the image. Instead, we now have a smoother transition that goes from the distant horizon to the closest areas on the ground.
At this point we have just about finished our design and from here I am just cleaning thins up for consistency. Select the three new gradient layers we created in the previous step along with the few loose layers below them so that they are all highlighted.

Press Command/Ctrl + G once more to put all of these related layers into a folder called “Atmosphere.”

As a final touch we are just going to add a very subtle amount of noise to the image. Create a new layer at the very top of your Layers Palette and fill it with a solid black color using your Paint Bucket Tool (G).
Next, go to the Filter Menu and select “Noise>Add Noise” as shown here:

When the dialog box pops up, apply the following settings:

Press the Enter Key to apply the effect and then change the Blending Mode to Soft Light before lowering the opacity to about 12%.

We have no completed our design and although there were a lot of steps to follow, I hope you will find that the techniques we covered and the end result was worth it. Thanks for watching guys, happy Photoshopping!
You can view the final outcome below. I hope that you enjoyed this tutorial and would love to hear your feedback on the techniques and outcome.


Eric is a Graphic Designer, specializing in Print and Web Design. He's a graduate of the New England Institute of Art in Boston and has over 4 years of professional and freelance work experience. He lives in Brooklyn, New York working as a Graphic Designer and he has been featured in Advanced Photoshop Magazine, The Art of Fashion Art Exhibit and Artists In The Station Art Exhibit. Visit Eric's portfolio at ericvasquez.net.


Do you know the basic tools in Photoshop but feel that your work is still looking average? Join our creative community at FanExtra and get the direction you need to take your work to the next level.


Very interesting tutorial Eric! It gave me a lot of ideas for photo manipulations as I watch your steps!
Thanks Chris! I am glad that the tutorial has inspired you to make some new creations of your own and I hope that the techniques were useful to you as well.
Loving this Eric! The lighting is amazing. I just showed my dad and he said ‘it’s absolutely incredible’
Thank you very much for the compliment! I really appreciate that and am glad that he liked it!
Oh, just one thing that confused me though. Why aren’t you using clipping masks for your adjustment layers, rather than the overly complex method of selecting layer’s data and creating a mask from scratch?
That is a good question..the short answer is just that is the way that I learned how to do it, but to your point, that would have been a great alternative approach.
In my experience though, I usually use Clipping Masks when I want only part of an image to show through a shape below the layer so I am not sure how I could use this method to create the masks?
Hey Eric, whilst that’s the usual use for clipping masks, try just creating an adjustment layer, and with that adjustment layer selected click on ‘create clipping mask’. You’ll notice that your adjustments will then only effect the underlying layer. It’s just a lot easier if you later want to move/resize your object layer around but don’t want to keep shifting your mask layers to fit with your changes. Also you can still apply a mask to your adjustment layers, so for example – if your adjustment layer desaturated the woman’s head object in this photo manip, then you could mask off part of your adjustment layer to reveal the saturated image beneath it (whilst your clipping mask remains in tact). Hope that wasn’t too convoluted an explanation anyway .
.
That was actually a very lucid and clear explanation and a great tip! I haven’t tried that before but will be sure to try it out and use that method in my future designs. It sounds like a great technique. Always something new to be learned about Photoshop!
Ah glad to hear it . It honestly should be a big time saver for you.
I got this tutorial from your Hank story. I am still a beginner and would like to check this out. However, apparently you have to buy some of the needed images from istock. I’m not able to afford this for a tutorial that I am not sure will help me or not. How about providing some alternative sources on stock.xchng as you did with other pictures?