
 Members Area Tutorial: Create a 3D, Textured Safe Illustration From Scratch Using Photoshop
 Create A Speeding Car Scene With Light Effects In Photoshop
 Design a Retro Futurism Space Scene
Have every post delivered to your inbox and get access to hundreds of useful design freebies.
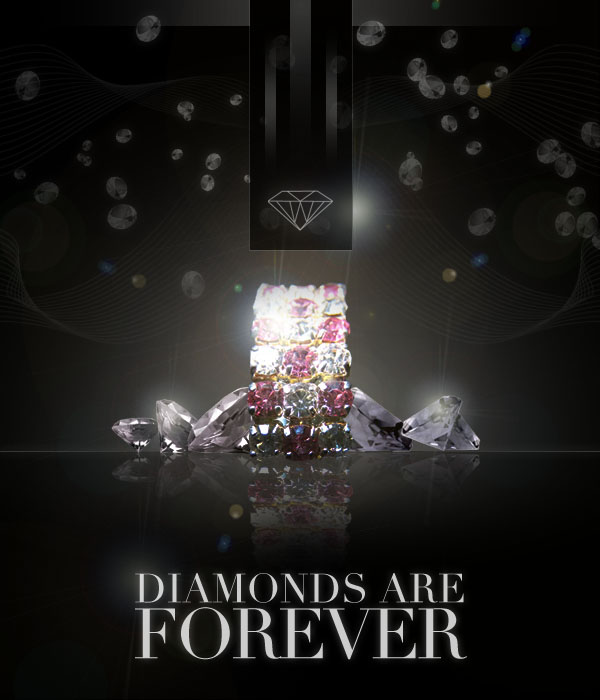
As always, this is the final image that we’ll be creating:
Create a new document (600X700px). Fill your background with black:

Use your rectangular marquee selection tool to create a selection for the top 450px of your canvas. Then drag upwards a radial gradient (white to transparent).
Reduce the opacity of this layer to 40%.

Cut and paste this photo of a diamond into your composition.
Then go to image>adjustments>desaturate.
Then apply the levels settings shown below to make your diamond more intense:


Hide all layers apart from your diamond layer and then go to edit>define brush preset. Call your brush ‘diamondbrush’.

Now select your brush tool and load your ‘diamondbrush’. Apply the shape dynamics and scattered options, and make sure that ‘smoothing’ is turned out. Then make sure that your brush is white, and 30px.

Now create a new layer called ‘diamonds’ and brush across your canvas:

Apply an outer glow blending option to your diamonds layer (settings below):


Copy and paste this photo of a ring into your document:

Duplicate your ring layer and move the duplicate beneath the original. Then reduce this layer’s opacity to 40% and go to edit>transform>flip vertical. Move the duplicate below the original. Erase the bottom area of your duplicate to give the impression of it fading into your background.

My diamonds in the background are looking too intense, so I drop the opacity of this layer to 35%. Then I go to filter>sharpen>sharpen to make the diamonds more clean.
Now download this great lines brush set Lines Brush Set.
Apply some white brush strokes across the top portion of your canvas. Then reduce the opacity of this layer to 10%:


Now create a new layer called ‘black strip’. Using your shape tool create a 100px wide black strip running from the top, center of your canvas. Then reduce the fill of this layer to 80% and apply a 1px white stroke blending option (settings below):
Also select your diamonds layer and apply a layer mask. Then use a large, soft black paintbrush (30%) to erase away the edges of your diamond cluster, making it seem more random.


Now create a new layer called ‘diamond lines’. Use your line tool to draw out a basic diamond shape. Then merge all of your line layers together.
Apply an outer glow blending option (settings below) and then reduce the opacity to 40%.

Use your marquee tool and gradient tool to create a variety of ‘bars’ that add detail to the top of your advert:

Now add some text to the bottom of your advert. Then add an outer glow blending option (settings below):

Now return to your radial gradient background layer. Duplicate the layer, and flip your duplicate vertically. Then move the duplicate gradient downwards, so that it acts as a reflection to your main gradient. Go to edit>transform>scale and reduce the height of your gradient, squashing it. Then reduce the opacity from 40% to 20%:
Then create a 1px white line dividing your two radial gradients. Use an eraser brush (40% opacity) to erase away parts of the center of your line:

Now create a new top layer called ‘highlights’. Fill this layer with black and set it’s blend mode to ‘screen’. This will completely hide all of the black. Then go to filter>render>lens flare and apply several lens flares over your document:
Generally I would advise against using the lens flare filter in your work, but for this example it’s a quick easy way to give your product an extra polish.

Use a large, soft eraser (30% opacity) to erase areas of your lens flare layer until it looks good to you. Then use your dodge/burn brush tool to dodge/burn your ring layer, giving it more depth and intensity:

Cut and paste in these images of gems:
Resize and distort your gems so that they fit nicely into your composition. The gems are quite bright colors, not really fitting with the overall piece, so I go to image>adjustment>hue/saturation (settings below):

Go to image>adjustments>levels and apply the settings shown below:

Add more diamonds to your composition and then use the same reflection technique that you used on your ring:

Repeat the lens flare technique, this time adding lens flares to your diamonds:

Finally, you want to make the colors of your ring ‘pop’ more. Create a series of white-transparent radial gradients over your pink areas of the ring, and then change this layer’s blend mode to ‘overlay’. This should make the colors of your ring more saturated.

To finish, return to your dividing white line layer and add a white outer glow blending option (settings below):

I really hope that you enjoyed this tutorial and would love to hear your feedback!

Tom is the founder of PSDFAN. He loves writing tutorials, learning more about design and interacting with the community. On a more interesting note he can also play guitar hero drunk with his teeth.


Do you know the basic tools in Photoshop but feel that your work is still looking average? Join our creative community at FanExtra and get the direction you need to take your work to the next level.


WoW. I love it.. really appreciate it !
Thanks!
This is cool. Love the final flashy effects. Good work!
Wow Tom, this poster is really good, i like the effects that’s been used in these, really looks glamorous.
Thanks guys . I’ll try using some more flashy effects like these in upcoming tutorials!
Great poster. The effects used are what make this stand out and I like the end result. Very in-depth tutorial and easy to follow. Can’t wait to see your upcoming tutorials. Thanks.
nice tutorial…
wow.so beautiful.brightness and shade.I like this.
Really liked the end result specially in dark the diamond effect.
Check out my version and let me know what you think. I am an upcoming designer out of St. Louis, MO
http://lh6.ggpht.com/_qOMAsDKNX2U/S9aNjURm6AI/AAAAAAAAAHc/LHSNpccvvIs/s800/diamonds_graphic.jpg
Rasheed: Wow, I’m seriously impressed by your result! Nice job!
Thanks! I used what u gave me in the tutorial and added a few other techniques I learned else where. Great tutorial tho. Learned plenty
wow really nice tut
Sweet Design, looks really crisp and clean!!
Nice work.
wow……gr8….
tom wat’s ur mail Id…….ill send my work to u…..
Awesome Diamond Design along with a simple tutorial….
Appreciate your hard work….Thanks
Fantastic thank you very much,
Fantastic tutorial, just learning photoshop and really nice to work on something with such a slick outcome!
Keep classy ideas coming.
ps what was the your font?
great stuff, thanks! i used the light effects for a rendering which i made, really usable!
cheers
Thanks STUDE13! Feel free to post your rendering here for review .
.
Really Nice tutorial,
Thnaks
Thanks a lot Tom, I am just starting out, and although it took me a lot of time to do, I am glad I did it!
Hi there,
What a great tutorial, so in-depth, graphic work is my weak point but love how this was put together. Slowly getting better, thanks mate.:)
wow, such a good detailed tutorial i have ever seen here,
thank you so much.
Thank you for the tutorial!
great stuff, thanks! i used the light effects for a rendering which i made, really usable!
hi tom superb and thank u.
Thankyou!
awesome ..Thankss
Great tutorial! Thanks so much for the step-by-step instructions and beautiful design!
You’re very welcome Jen! I’m so glad you enjoyed this tutorial.