
 Create a Dark Night Hunter Scene with Photoshop
 Create an Advanced Reflective Clear Layer Style in Photoshop
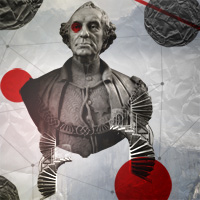 Create a Striking Collage Fusing Ancient and Modern
Have every post delivered to your inbox and get access to hundreds of useful design freebies.
As always, this is the final image that we’ll be creating:

We will start with importing a stock image named anger.jpeg taken from sxc.hu

Press W to select magic wand tool, keep Tolerence 45 and select the black area around the face. Press Ctrl + I to invert the selection and press Ctrl + j to separate the face from its background.
Keep in mind that we are not removing black background but making a selection of face. Hence don’t delete the original background.

Now it’s time to add crack. You can download crack brushes from any websites like brusheezy.com or in inspiration category in psdfan.com. Or use brush which I downloaded it from http://hawksmont.com and http://hawksmont.deviantart.com
So let’s start to add crack brush.

The crack will look like this;

Now choose another brush and create second crack like this;

And it will look like this;

I think this is enough to explain the method by which I created crack. Feel free to experiment with more brushes and use brushes carefully to make crack more natural and original. I used these brushes.

And our crack will look like this;

Select all crack layers and merge them into single layer and name it “crack”. Fill this crack layer with dark red color 8e0f0c. Set blending mode to linear burn.

Duplicate the crack layer and set blending mode to pin light. Again duplicate this layer and change the blending mode to pin light. The crack will look like this;

Merge all the layers and name it “destroy”. Always keep a copy of all layers so that you can go back to any step and access all layers. Duplicate the “destroy” layer and set the blending mode to multiply. Rename this layer to “multiply”

Now the image looks too saturated and reddish but crack looks perfect. So we will mask all area of face which don’t looks impressive and will show only area of crack. Now keep selected the “multiply” layer and Ctrl + click the “crack” layer which we created in step 4. This will create a selection of crack.

Now click on the “Add vector mask” button at the bottom in the layer panel to add layer mask.

Now crack will look more realistic.

Now it’s time to make some color correction to give it dramatic & bold look. Create an curve adjustment layer with these settings;
R = Output – 134, input – 147;
G = Output – 136, input – 129;
B = Output – 123, input – 139


Create a vibrance adjustment layer with these settings; vibrance = -10, Saturation = +1.

Create a hue saturation adjustment layer with saturation -5

The image will look like this;

We are in last step to complete this tutorial. Image and crack are looking more impressive and realistic but you can add some more depth to the image. Duplicate all the layers and name it “destroyed anger”, duplicate this layer and name it “black and white”. Apply black and white adjustment layer with these settings;

Select the “black & white” layer and black and white adjustment layer and merge them. Apply Gaussian blur of radius 2 pixel and set the blending mode to multiply with 20% opacity. And this is the final result.
You can view the final outcome below. I hope that you enjoyed this tutorial and would love to hear your feedback on the techniques and outcome:

Narendra is a freelance graphic designer specializing in the fields of corporate identity (logo) design, print design, advertising and web designs. I'm currently living in India. I design because it's my passion and I love to do it. To know more about me please visit to my online portfolio.


Do you know the basic tools in Photoshop but feel that your work is still looking average? Join our creative community at FanExtra and get the direction you need to take your work to the next level.


It doesn’t look too real, but it’s cool.
You’re articles are really good man.
I’m sorry to say, but this does not look ‘realistic’. I also think you’ve gone over the top with the cracks. Nice try tho
First comment on this blog, your content is pretty interesting, keep up the good work. But this is a little too far from realistic to be titled ultra-realistic. Sorry.
I would love to see if you can show me some more realistic crack effect. Also can you explain in details that what is things which makes it less realistic? Would appreciate if you can suggest that how this effect can be more better and realistic.
The main problem is that the crack is plain, it’s flat, but a human head is rounded, spherical, the crack isn’t following the form of the head.
I think you could do a couple of things to improve the realism of this effect. First, the cracks should follow the topography of the head – they could wrap around the egdes of the skull slightly – curving up slightly at the edges to look like they are going ‘around’ the head. You could probably do this with a distort filter.
Secondly the fine ends of the hairline cracks should be faded out slightly so that they appear thinner and finer. This will look like the cracks are really ending at the subcutaneous layer of flesh.
Another possibility would be to mask out the main crack in places so that it looks like the skull was cracked more in some places and less in others. If you think about an egg for example – when you crack it, even with a spoon, the cracks are not all evenly distributed across the point of contact.
Good luck and looking forward to future tutorials.
awesome!
Agreed with Cal. But a simple fix that can add more depth and a pseudo curviness to the cracks is to simply add some burn and dodge to the cracks. Following the light-source of course.
This is merely a suggestion, personally I haven’t tried this yet so it may end up not working in this situation.
Thanks to you all guys for your suggestion, keep more suggestions coming. I will consider them in my future works.
is it a egg or a head… why you use this type of crack on a head ???????
That’s not bad mate, thanks for posting.It’s a very easy to follow tutorial and people could always take it further if they want to. A better name for it would have been CRACKHEAD lol but anyways.
I agree with first few comments. It isn’t look real but some photos may need some kind effect. 7/10 for willingness
How about that? http://www.behance.net/gallery/Hate-Mondays_/278569
Wow, awesome work Taylor!
thanks Tom!
Thanks for the interesting read! Thank you.
i have that crack brush but i dont know how to put in my photoshop cs5. can u tell me how??
To use any brush you just Right Click > Load Brush, browse and select the brush you want to use and press OK. That brush will load in your brush palate then you can use it.