
 Create a Dark, Atmospheric Photo Manipulation
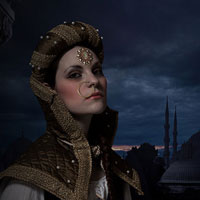 Members Area Tutorial: Get Better at Photo Blending Starting Today
 Create A Speeding Car Scene With Light Effects In Photoshop
Have every post delivered to your inbox and get access to hundreds of useful design freebies.
In this advanced design lesson you will learn how to photo manipulate a dark image of a devil woman.
You will master various photo manipulation techniques such as portrait/photo retouching, manipulating a natural landscape, creating a dark cloudy atmosphere, digital painting, image blending, multiple adjustments, advanced masking and many more.
There’s a ton of actionable, professional tips to learn in this lesson, so let’s get started!
As always, this is the final image that we’ll be creating:

Create a new document with size about 1500×1000 px and fill with any colors you like (I use black). Press Cmd/Ctrl+Shift+N to make a new layer and choose G to active Gradient Tool. I use Radial Gradient with colors # 021335 and #20446c:

Open sky stock. I use Retangular Marquee Tool to make a selection on sky part then use Move Tool (V) to drag it into our black canvas, resize (Cmd/Ctrl+T) and change the mode to Soft Light 100%:


I use an adjustment layer with Clipping Mask to desaturate the sky. Go to New Layer-New Adjustment Layer-Hue/Saturation:


Extract model and place her at the middle section of our image after resizing:

There are something I don’t want on her face so I make a new layer (Clipping Mask) and use Clone Tool (S) to remove it:


I use some adjustment layers: Hue/Saturation, Photo Filter, Curves (Clipping Mask) to change color and brightness of model to be fit background:


Open rock stock. I cut out the one on the right, place it behind the model. I want the rocks to have an evil look so I use Warp Tool to distort it to be sharper (Edit-Transform-Warp), remember to convert it to Smart Object before transforming. I set this layer under model one.


Thank you for reading this tutorial, I hope that you enjoyed it. If you want to view my other arts and tutorials you can look at my Deviantart page or follow me on Facebook.


Do you know the basic tools in Photoshop but feel that your work is still looking average? Join our creative community at FanExtra and get the direction you need to take your work to the next level.


Thank you for the wonderful tutorial for the designers. It’s always great when experienced professionals share there knowledge – because no matter how professional yo are there’s always something to learn. Plus the final image is really inspiring!
Thank you again for this very informative tutorial.
Unfortunately, I have not been very successful blazing reflection on the rocks.
Here is my work:
http://www.chez-mireilled.com/article-image-sombre-femme-de-diable-118135579.html
Hi Mireille. It’s a really nice version you’ve produced. I would recommend either lowering the opacity of your light layers, or experimenting with the color (something more yellow, less orange, and a little softer). You can even paint over your existing shadows with more blue versions at a lower opacity to help even out the lighting. Was there a particular point in the tutorial where you struggled?
Thank you Tom!
I struggled with the reflection of the flames. There are many layers and I’m not coming to the same report that the tutorial.
I’ll try again.