
 Create an Awesome Paint Explosion Image
 Create an Atmospheric Under-Water Text Effect
 Digital Painting Lesson: Monkey Island 2: LeChuck’s Revenge Special Edition
Have every post delivered to your inbox and get access to hundreds of useful design freebies.
These are the final images that we’ll be creating:

The photographs produced by most digital cameras need some degree of sharpening, even when working with a high-end camera bearing a sophisticated sensor. So a clear understanding of sharpening process and its application within Photoshop is essential for creating that perfectly focused crisp image.
Loosely saying sharpening is a technique for defining the outlines of an object more prominently. Sharpening a digital image means making the edges of the image or edges of the objects within the image more pronounced. The process is carried out by enhancing contrast between pixels or more precisely between lighter and darker pixels. This edge contrast increment process is defined within neighboring pixels or adjacent group of pixels. Edge contrast is also known as local contrast or precisely acutance. Sharpening exaggerates the edges by increasing the contrast and creates a highly defined edge with sharp transitions between light and dark, which tells us where an object begins and ends.
Inevitably, every photograph needs some sharpening to bring out the detail that otherwise gets lost in translation between camera, computer, and print. Sharpening works by increasing the contrast around the edges of your image to bring it more into focus, adding detail to your image. Sharpening enhances the definition of edges in an image. Whether your images come from a digital camera or a scanner, most images can benefit from sharpening.

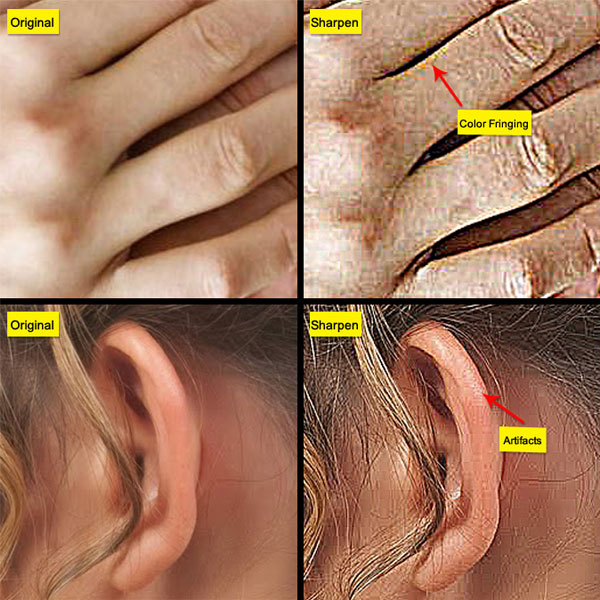
Sharpening doesn’t compensate for bad focus. Also no amount of sharpening will make up for depth-of-field problems. The best way to get a sharp photo is to shoot a sharp photo in the first place. Nothing can take the place of an optically sharp image. Another thing is filter application is a destructive edit that alters pixels in an unchangeable way. But then, no perfectly focused image is going to “pop” without the appropriate amount of sharpening applied, either. Keep in mind that sharpening cannot correct a severely blurred image. Be careful; an over-application of sharpening creates harsh images with ragged edges and shadows. Over sharpening also tend to produce damaged pixels or “artifacts” and color fringing or “halos”.
I have given the links to the images, if you want to follow along. My advice will be, use your own images to get a clear understanding of the principles and their applications. But remember this tutorial is more of an exploration than rather being a process or steps tutorial. So don’t concentrate on the process or steps only to achieve a specific effect. But think more about it, why are we sharpening? How can we use the same principles in some other projects? What are the advantages? Now let’s start!
We will always start working by duplicating the background layer. This way we will ensure a non-destructive workflow. Later if things are not looking the way they should be, then we can always delete the layer and start afresh. After the sharpen procedure we can further control the effect of the sharpen layer by adding a layer mask to it, which is visible in the below screenshot. It is also possible to adjust the sharpen effect by using the layer opacity or layer blend mode settings.
Let’s explore this process:
Without duplicating the background layer directly apply the Smart filter. Select the layer and choose Filter > Convert For Smart Filters, and click OK. Photoshop will automatically convert the layer to Smart layer and apply the Smart filter to it. Smart Objects preserve an image’s source content with all its original characteristics, enabling you to perform nondestructive editing to the layer. To expand or collapse the view of Smart Filters, click the triangle next to the Smart Filter icon, displayed to the right of the Smart Object layer. There you will find a mask is already attached with it, known as filter mask. Use filter masks to selectively mask Smart Filter effects by painting with a black paint brush within it. The advantage of smart filters are you don’t have to use a separate layer mask to control the sharpen effect later.
For this tutorial though we will take the traditional approach for the sake of maximum users’ familiarity, which is duplicating the background layer and then apply the filter on it. But feel free to follow the Smart object and then Smart filter process.

Let’s take a look at some of the sharpening tools available to us in Photoshop.
Under the regular tools menu there is the ‘sharpen’ tool.
Under the filter menu there are several sharpen filters available to you. They are – Sharpen, Sharpen Edges, Sharpen More, Smart Sharpen and Unsharp Mask.
Another powerful filter, which we use for sharpening but is not known for its sharpening capabilities is the High Pass filter, hiding within the obscure “Others” filters group.

The Sharpen tool increases contrast along edges to increase apparent sharpness. The more you paint over an area with the tool, the more sharpening increases. The main advantage is you can use this tool locally like the Brush Tool.
Open the face.jpg image in Photoshop. Right click on the background layer and select Duplicate layer. Rename the layer as “Sharpen”. Select the Sharpen tool from the Tool Box. In the options bar choose a soft brush tip and set Luminosity as blending mode. Select Protect Detail to enhance details and minimize pixelated artifacts. Now click and drag over the part of the image you want to sharpen.

Though for this image we are using the Sharpen tool at 100% opacity, but ideally use low opacity and slowly build up the sharpen effect. As Sharpen tool tend to produce “halos” or color fringing around the edges, Luminosity blend mode is used to avoid that. Luminosity blend mode will only utilize the luminance data from the color blend but omit the color information. Below screenshot represents visible fringing in Normal Blend mode, which appears reduced after changing of Blend mode to Luminosity.

The Sharpen filters focus blurred images by increasing the contrast of adjacent pixels. Let’s explore them one by one.

Never apply the filters directly on the image itself. Always duplicate the image by duplicating the background layer and then apply the filter on the newly created duplicate layer. The advantage is later on we can experiment with various blend modes and also apply a mask on that duplicate layer to control the effect.

The Sharpen filter focuses a selection and improves its clarity. The Sharpen More filter applies a stronger sharpening effect than does the Sharpen filter. Both of them are basic filters with one shot operation. No option box available for further controlling the effect.
Target the layer, then Filter > Sharpen > Sharpen or Sharpen More. To increase the effects apply the filters again with Ctrl + F.

This filter finds the areas in the image where significant color changes occur and sharpen them. The Sharpen Edges filter sharpens only edges while preserving the overall smoothness of the image. There is the same disadvantage as with the previous two filters in that we don’t have any control over the amount, because there is no option box/ dialogue box.
Target the layer, then Filter > Sharpen > Sharpen Edges.

The Smart Sharpen filter uses the same algorithm as the Unsharp Mask filter. The Smart Sharpen filter also allows you to remove previously applied Gaussian, Lens, and Motion Blur filters. You can set the sharpening algorithm or control the amount of sharpening that occurs in shadow and highlight areas.
Open Fish.jpg image in Photoshop. Duplicate the background layer. Then Filter > Sharpen > Smart Sharpen. Select the Basic option if it’s not selected and change the amount to 300. Change the Radius to 3. Then click the Remove drop down list and select Lens blur to remove any camera lens blur. Gaussian Blur will produce results similar to Unsharp Mask. But Lens Blur will produce better quality for images with detail. Select the More Accurate check box for a slower but more accurate sharpening effect. Actually without the More Accurate option checked Smart Sharpen will perform more or less like the Unsharp Mask filter.

In advance settings you can adjust sharpening of dark and light areas separately using the Shadow and Highlight tabs. But first select the advanced option from above below the preview checkbox. Shadow and Highlight have three common parameters. They are Fade Amount, Tonal Width and Radius.
Fade Amount will reduce the amount of sharpening separately in shadows / highlights. Higher amount of sharpening tend to reduce the amount of finer detail in the highlights / shadows, which we can protect with the use of ‘Fade Amount’ option.
This option determines which tonal value will be affected by the ‘Fade Amount’. Smaller value will affect only the lightest highlights, whereas larger value of Tonal Width will affect a wider range of the highlights.
Radius option specifies the size of shadows/ highlights. Basically it determines the amount of the sample data, which will be used in the determination of the ‘Tonal Width’.
Sharpen without Shadow adjustment. Sharpen related grain is visible in the dark areas.

Sharpen with Shadow adjustment. Adjusting the Fade Amount removed grain from the dark areas.

Sharpen without highlight adjustment. Notice sharpen related grain is visible in the highlight areas.

Sharpen with highlight adjustment. Grain removed from the highlight areas by adjusting the Fade Amount.

The Unsharp Mask filter, which is an advanced method of sharpening, is different than the basic sharpening methods. Unsharp Mask filter finds pixels that are different from the surrounding pixels, and then increases the contrast in the surrounding pixels. Basically this is done by finding areas of high contrast between pixels and then increasing that contrast.
Open the face.jpg image in Photoshop. Then choose Filter > Sharpen > Unsharp Mask. Use 500 for the amount and 1.0 for the radius.

Use the radius to determine the number of pixels surrounding the edge pixels that affect the sharpening. A low radius means that the sharpening will be applied right next to the edge only. A larger radius applies the sharpening further out from the edge. For high-resolution images, a Radius value from 1 to 3 is usually recommended. A lower value sharpens only the edge pixels, whereas a higher value sharpens a wider band of pixels.

Amount determines how much to increase the contrast of pixels. For high-resolution printed images, an amount between 150% and 200% is usually recommended.

Determines how different the sharpened pixels must be from the surrounding area before they are considered edge pixels. For instance, a threshold of 2 affects all pixels that have tonal values that differ by a value of 2. For example, pixels with tonal value difference 10 and 12 will be affected but not 10 and 11. The default Threshold value (0) sharpens all pixels in the image. In addition, you specify the radius of the region to which each pixel is compared. The greater the radius, the larger the edge effects. In other words, if a pixel is darker than the surrounding neighborhood, then the neighborhood is lightened even more.
In addition, you specify the radius of the region to which each pixel is compared. The greater the radius, the larger the edge effects. In other words, if a pixel is darker than the surrounding neighborhood, then the neighborhood is lightened even more. Use Threshold on grainy images to avoid sharpening grain in flat areas.

Over sharpening an image produces a halo effect (color fringing or color halos) around the edges. The effects of the Unsharp Mask filter are more pronounced on-screen than in high-resolution output. If the final destination is print, experiment to determine what settings work best for your image.

This process involves by selecting a channel from the channels panel that displays good contrast than the others. As each channel contains only grayscale information, thus omitting unwanted appearance of color fringing or the ‘halo-effect’.
Open the Banana.jpg file. Then in the Channels panel examine the channels for a channel with good contrast. Finding a channel with good contrast is essential for good luminosity mask. Here the red channel is showing good contrast between the banana and the background.

Duplicate the red channel by dragging it over the ‘create new channel’ icon below the Channel Panel. You can also right click on the red channel and select duplicate channel. Ctrl click on the Red channel to load that channel as a selection.

Then go to Layers panel and duplicate the background layer and rename it to “Sharpen”. Selection still loaded choose Select > Inverse or press Ctrl + Shift + I to inverse the selection. Then “Sharpen” layer targeted click on the Add Layer Mask icon below the Layer panel to create a layer mask based on that selection.

Now make sure that Layer mask is not selected by clicking on the layer beside the layer mask thumbnail. Then Filter > Sharpen > Unsharp Mask and match the settings from the below screenshot. If needed it is possible to use Level command on that red copy channel to increase the contrast. We can also paint with a soft black brush within the Layer mask to hide unwanted area.

First let’s take a look at what High Pass filter does. This filter removes low-frequency detail in an image, retaining the edges and smoothing the other areas into a medium gray color. Then we will use a blend mode like Linear Light to use only the contrast data. One can describe this process as a non-destructive sharpen method also. Combined with a Layer Mask for controlling the sharpen effect, probably this technique is the most versatile.
Open the face.jpg file in Photoshop. Duplicate the background layer by right click and select duplicate layer. Rename the background copy layer to “Sharpen”. Then change the Blend mode to Linear Light. Linear Light blend mode darkens or lightens the colors by decreasing or increasing the brightness, depending on the darkness or lightness of the blend color. Purpose of this blend mode is to enhance the image edges by making them more pronounced.

Choose Filter > Other > High Pass. Play with the radius for a suitable sharpness effect. Low radius value will sharpen the edges only.

Adjust the opacity of the layer if effect is too strong. You can also duplicate the layer to make the effect more prominent. For controlling the sharpen effect create a mask on the duplicate layer (by clicking on the Add Layer Mask from below the layer panel) and paint with a black color Soft Brush within the mask to selectively apply the sharpen effect.

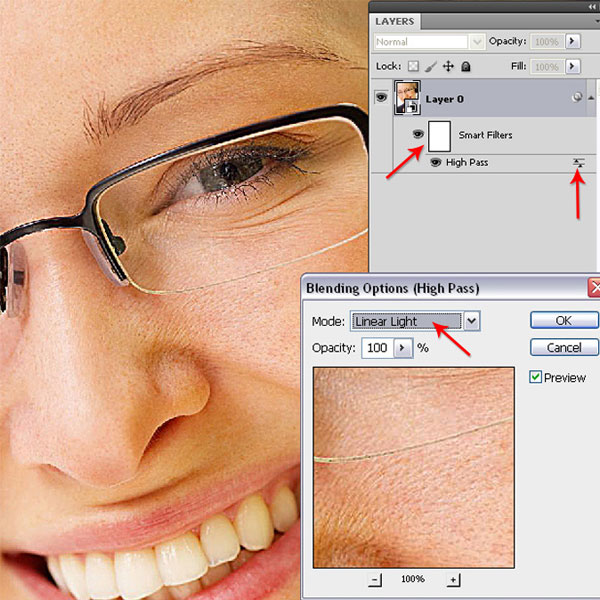
For those, using Smart Filter procedure for High Pass, there will be slight variation than the previous Smart Filter operations.
Open the face.jpg file in Photoshop. Then target the layer and choose Filter > Convert For Smart Filters, and click OK. Photoshop will automatically convert the layer to Smart layer and apply the Smart filter to it. Now Filter > Other > High Pass.
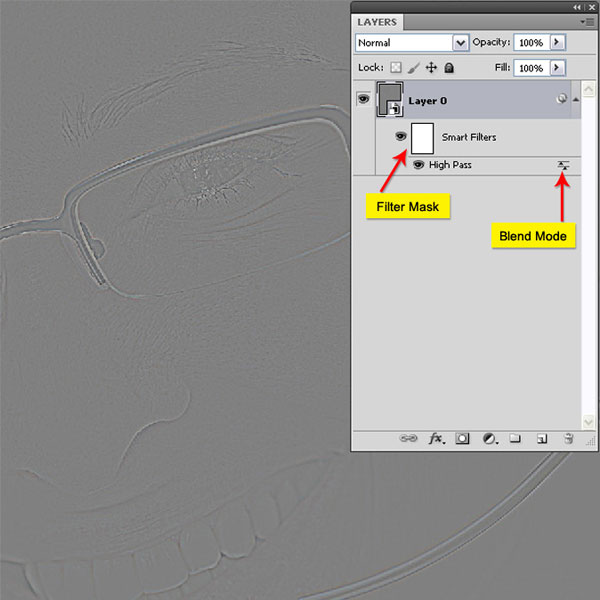
But we need to apply Linear Light blend mode and there is no duplicate layer here. Expand Layer 0 to reveal the High Pass smart filter entry by clicking on the arrow at the right side. Besides the High Pass text there is a small slider like icon which upon double click will open the Blending Option (High Pass).
Dialog box. Change the Blend mode to Linear Light. If needed double clicking on the High Pass text will reopen the High Pass dialog box, where one can further adjust the High Pass value. For controlling the High Pass filter effect paint with a black paint brush directly within the Filter Mask.
From the above discussions of various sharpen techniques I hope that a clear understanding has been established. As well as the appearance of a fundamental question, i.e. which is the best technique? Unfortunately there is no best technique. The best technique depends on the complexity of the project, the level of the user and the amount of time one is willing to spend. But the most common method will be invariably the Unsharp Mask and Luminosity blend mode combination, which offer more flexibility and ease of use probably.
The source files for this tutorial are available to our FanExtra members community. If you want to access the source files for this tutorial (and all of our tutorials + thousands of other resources) then sign up here.
If you’re already a FanExtra member then you can login here to access the source files.

Arindam Bhaduri is a designer and an Adobe Certified Instructor. He is currently teaching Communication Design in Kolkata, India.


Do you know the basic tools in Photoshop but feel that your work is still looking average? Join our creative community at FanExtra and get the direction you need to take your work to the next level.


Very nice tutorial. Thanks.
I’m really glad you enjoyed it Amit
Great article with awesome detail. Thanks.
Probably this is one of the best if not the best sharpen tutorial I have ever came across. Amazing.
Thanks! That’s great to hear. We’ll keep producing advanced tool guides such as this one for you to enjoy.
Well now I know why the famous ChrisSpooner@SpoonGraphics recommended this tutorial in his tweet. “Brilliant insight into the various sharpening tools in Photoshop” – this is his own words. Awesome detail. Thanks PSDFan for this great tut.
I hadn’t realized Chris has tweeted us. I’ll go thank him now, thanks for pointing that out. So glad that you enjoyed this tutorial .
.
very good job.
WOW!!! I’ve been reading and watching countless tutorials about sharpen and I was failing to learn how to do what I need to do And finally… Thank you very much!!!
Very useful! Excellent tutorial. Thank you for taking the time to do this!
Nice piece on sharpening! I did not know all of this! I’ve experimented a little and knew of ‘high pass’ and using some of the blending modes to sharpen an image. I have tinkered with the sharpen filters, too. But, with a clearer understanding of the different uses, it makes knowing which one to use when easier.
Thank you! I really gained something from this piece!
Su
Thanks a lot for a great tut. I’ve been searching the web forever to find detailed tutorials like this.
Great article and Very Helpful.
Thank you very much.
Very helpful. Thanks.
Excellent tutorial.
This tutorial has been the most comprehensive one I have seen about sharpening the image. It is really well presented and thus easy to follow.
Thanks David, we really want it to be the go to guide for designers who are looking to advance their sharpening skills. I’m so glad you enjoyed the post .
.
good