
 Members Area Tutorial: Design a Clean, Engaging Church Website
 Design a Sleek Valentine’s Day Card
 Photo Manipulate a Beautiful Snow Queen Scene
Have every post delivered to your inbox and get access to hundreds of useful design freebies.
Here is the final image that we will be creating from scratch using layer styles and filters:

Please create new document. You can do this by pressing Ctrl+N.
Use 1200 px as a width and 800px as height.

Use dark grey for a background. To do this press Shift+Backspace, and from the dropdown menu choose color.
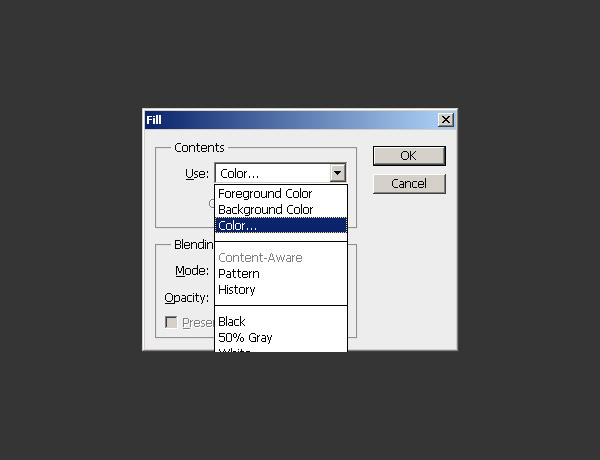
and choose 353535 from color window.


Select Horizontal Type Tool and type what you want, with desired font. Font I used is New Athletic M54. Color of the type is not important for now.

We will use Layer Styles to style the layer.
Inner Shadow:
Color: fbf504
Blend Mode: Normal
Opacity: 100%
Angle: 120 degrees
Distance: 0px
Choke: 100px
Size: 3px
Noise: 0%


Outer Glow:
Color: bd6401
Blend Mode: Normal
Opacity: 100%
Noise: 0%
Technique: Softer
Spread: 100px
Size: 3px
Range: 50%
Jitter: 0%


Inner Glow:
Color: 876a00
Blend Mode: Multiply
Opacity: 23%
Noise: 0%
Technique: Precise
Source: Edge
Choke: 100px
Size: 7px
Range: 50%
Jitter: 0%


Bevel and Embos:
Style: Pillow Emboss
Technique: Smooth
Depth: 800px
Direction: Up
Size: 9px
Soften: 0px
Higlight Mode: b9a56e Screen 20%
Shadow Mode: ac3900 Multiply 76%


Gradient Overlay:
Blend Mode: Normal
Opacity: 100%
Gradient Ranging From: a72f00 to ffd200
Style: Reflected
Angle: 90 degrees
Scale:102%


Satin:
Blend Mode: Normal
Color: cd9600
Opacity: 52%
Angle: 19 degrees
Distance: 12px
Size: 14px
Contour: Invert

This is how it should look so far.

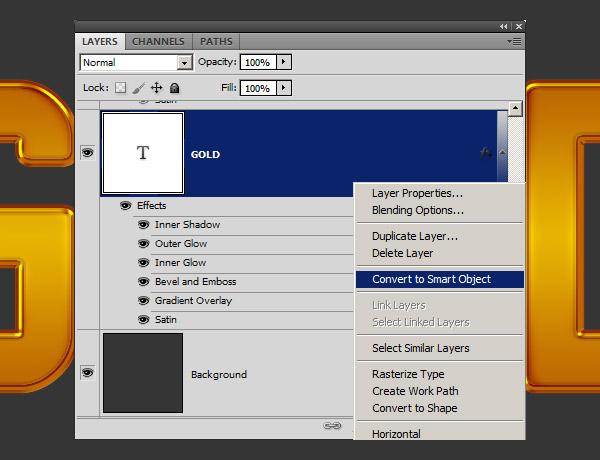
Now right-click on text layer and choose Convert to Smart object.
Then right-click on layer and choose Rasterize Layer

Create 3 copies of your layer by pressing Ctrl+J 3 times. Name them as follows.

Next choose Layer named “bottom” and while holding Shift press Down Arrow twice, then choose “middle” and again while holding Shift press Down Arrow once.

Now with “middle” selected go to Filter -> Blur -> Motion Blur
Angle: 90 degrees
Distance: 20px


After this still while “middle” selected press Ctrl+J 15 times, then select all copies of middle layers (you can do this by pressing “middle copy 15″ and while holding shift scroll to “middle” and click on it) then press Ctrl+E to merge these layers. Now again you will have three layers.

And this is how it should look.

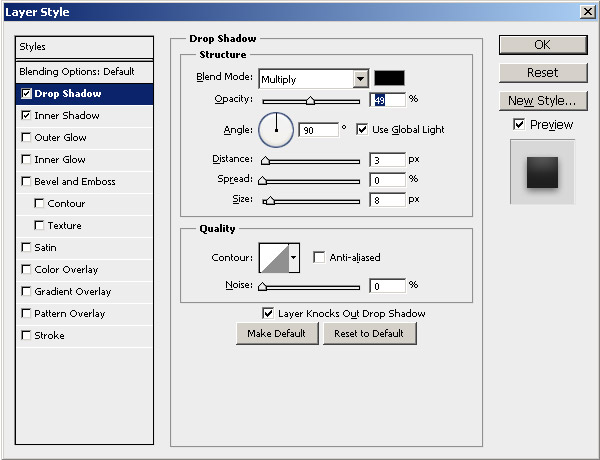
Please select “top” layer and apply Drop Shadow:
Color: 000000
Blend Mode: Multiply
Opacity: 22%
Angle: 90 degrees
Distance: 32px
Spread: 26px
Size: 29px
Noise: 0%

Select “middle copy 15″ layer and apply Layer Styles:
Inner Shadow:
Color: 000000
Blend Mode: Multiply
Opacity: 22%
Angle: -90 degrees
Distance: 21px
Choke: 0px
Size: 38px
Noise: 0%

Inner Glow:
Color: 000000
Blend Mode: Multiply
Opacity: 25%
Noise: 0%
Technique: Softer
Source: Edge
Choke: 0px
Size: 10px
Range: 50%
Jitter: 0%

and Color Overlay:
Color: 903300
Blend Mode: Multiply
Opacity: 27%


Select “bottom” layer and apply Drop Shadow:
Color: 000000
Blend Mode: Multiply
Opacity: 49%
Angle: 90 degrees
Distance: 3px
Spread: 0px
Size: 8px
Noise: 0%
and Inner Shadow:
Color: 000000
Blend Mode: Multiply
Opacity: 66%
Angle: -90 degrees
Distance: 21px
Spread: 0px
Size: 38px
Noise: 0%


Download the photo of a rock texture from the resources section for this tutorial. Paste it in the document, position over background layer. Center it verticaly and horizontaly. Use keyboard shortcut ctrl+T to resize it. My setting was 40%.

Next add Gradient Overlay
Blend Mode: Linear Burn
Opacity: 44%
Gradient Ranging From: a3a3a3 to 000000
Style: Radial
Angle: -180 degrees
Scale:150%

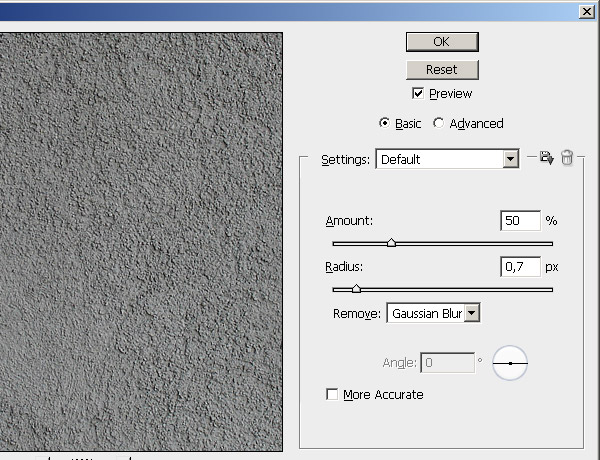
Finally go to Filter -> Sharpen -> Smart Sharpen
Amount: 50%
Radius: 0.7px
I hope that you enjoyed this tutorial and found it useful. Do not hesitate to leave your feedback!
The source files for this tutorial are available to our FanExtra members community. If you want to access the source files for this tutorial (and all of our tutorials + thousands of other resources) then sign up here.
If you’re already a FanExtra member then you can login here to access the source files.

Compulsive, obsessive, enthusiastic graphic designer. He loves to learn new things and evolve the ideas, because it's just a ride. Visit his website at Klefuemedia


Do you know the basic tools in Photoshop but feel that your work is still looking average? Join our creative community at FanExtra and get the direction you need to take your work to the next level.


wow thanks mate… it very helpfull …. do some more
Thanks…………. very helpfull.
Thanks!!