 Photo Manipulate A Mysterious Steampunk Man in a Victorian Setting
 Construct a Novel Victorian Theatre Setting
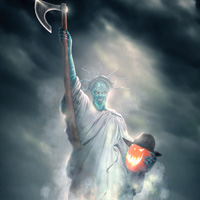 Photo Manipulate a Terrifying Halloween Demon in Photoshop
Have every post delivered to your inbox and get access to hundreds of useful design freebies.
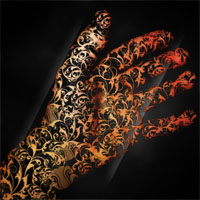
Swirls are not particularly new in design, but seem to be becoming increasingly popular lately. I keep noticing a design technique of replacing regular photos with swirls, but the swirls holding the data of the photo. You can see what I mean from two images recently included in our latest Daily Image Inspiration post:


Today we’re going to be achieving something very similar, using just 11 basic steps (hence the ‘mini tutorial’). This tutorial focuses on using a very simple photo, but with a little extra effort you can achieve some amazing results using very complex photographs.
This is the final image that we’ll be creating:

Open up a photo of a hand over a dark background. You can use whatever photo you like for this within reason, but this one just seemed to work well. You can find the original photo here: http://www.sxc.hu/photo/711174.

Now duplicate your photo layer twice. Set the first duplicate layer’s blend mode to ‘hard light’ and it’s opacity to 70%. Then set the second duplicate layer’s blend mode to ‘soft light’ and it’s opacity to 50%. Then merge all of these photo layers together.

Now select the black area surrounding your hand using the magic wand tool. Just click on any part of this black area, and make sure that you’re magic wand is set to 10% tolerance, and anti aliased. Then go to select>invert to invert your selection (thus selecting your hand). Then copy/paste this hand selection onto a new layer. The image below shows your new top layer, with the original photo layer hidden.

Now to work on your image’s background. Hide your hand layer. Then select your original photo layer and delete all data on it. Then fill it with a radial blur (181818 to 000000).

Now create a new layer above your radial gradient background layer called ‘clouds’. Go to filter>render>clouds. Then change this layer’s blend mode to ‘soft light’.

Next create a new layer above your clouds layer called ‘lighting’. Create a linear gradient ranging from white to transparent. Then duplicate the layer and move the duplicate across from the original.

Now set each of these lighting layers blend mode’s to ‘soft light’ and then go to edit>transform>rotate to rotate them to a nice position. Then use a large, soft eraser brush to brush away the ends of each shape for a subtle transition into the background.

Now grab a free swirly brush set such as this one. Create a new layer above your hand layer called ‘swirls’. Then use various swirly brushes from your set to brush over your hand. I used a purple brush color just to highlight where I’d placed my brush strokes. Try to use as many of the brushes as possible, varying size and positioning to create a random mess of swirls covering most of the hand. Don’t worry about going over the edges of your hand either, we’ll deal with that in the next step.

Now return to your hand layer and click somewhere around your hand using your magic wand tool. This should select the space around your hand. Then return to your ‘swirls’ layer and hit delete. This should leave your swirly brush strokes only covering your hand shape.

Now hide your ‘swirls’ layer. Select your hand layer and then go to edit>define pattern. Define your pattern as ‘hand’. Then make your ‘swirls’ layer visible again and apply the ‘hand pattern’ as a pattern overlay (see settings for this below). Then hide your original hand layer.


Finally add a drop shadow to your swirls just to give them slightly more depth/impact.

You can see the final result below. I hope that you enjoyed this tutorial, and please feel free to comment or socially bookmark us.

Tom is the founder of PSDFAN. He loves writing tutorials, learning more about design and interacting with the community. On a more interesting note he can also play guitar hero drunk with his teeth.


Do you know the basic tools in Photoshop but feel that your work is still looking average? Join our creative community at FanExtra and get the direction you need to take your work to the next level.


damn…. that was sick….and easy
thanx a lot m8….
Cheers mate, glad you enjoyed it
Hi I’m confused can yo explain step#4 Now to work on your image’s background. Hide your hand layer. Then select your original photo layer and delete all data on it. Then fill it with a radial blur (181818 to 000000). What does (181818 to 000000)means?
Those numbers stand for hex codes, which are a way for Photoshop to recognize colors. 000000 for example is black.
will give this a try using my full body and face, hope the outcome will be something like the photo with the girl in this photo.
Cool! Feel free to post your end result here if you like, or in the Flickr group. The image with the girl is a very cool concept.
Tom tat was a great tutorial.. happy about tat u r updating daily.. keep up ur good works
Good Tut. Had a little problem with the background(i think something is up with my photoshop), but i got the design to work which is the real concept, now i just have to perfect artistict swirl patterns…2 thumbs for simple yet effective. will try on something else for my own personal touch now
Thanks guys.
Narc: I’m glad it worked out ok. You should add the final result to the Flickr group
Hi Tom
Nice tut. I am looking for this tutorial from along time. Its so simple and descriptive.
Tom, i need a favour … I am a newbie to designing and i want to make my career in designing. Can you please send me some tutorials link to learn these concepts of designig like this one.
I will be very thankful to you for your kind help.
Thanks & Regards
Lokesh Yadav
Amazing! Fab!….and easy…!
Fantastic, and surprisingly easy. Thanks so much for sharing!
Lucky: We have some other tutorials here discussing texturing and shape integration:
http://psdfan.com/designing/create-an-intensely-grungy-wallpaper/
http://psdfan.com/designing/create-a-shattered-face-graphic/
http://psdfan.com/designing/create-an-awesome-illustration-using-custom-brushes/
I hope that these help you
Laura: Thanks for the kind words!
Andrew: Cheers, I’m glad that you found it easy to do.
CRAP!
Who would ever use this!
Umm… the two artists shown at the start of the post? Plus hundreds of others currently interested in this kind of effect.
thanks for the tut Tom – I’ve seen this style around and didn’t know it was so straightforward to accomplish – keep it up!
Very nice tut. I really like it special the second image above.
Wow, can’t wait to try it out! I’ll get down to experimenting the technique to get it like the 2 reference pictures you showed in before the tutorial.
I’m really glad people seem to be enjoying this one I hope that everyone will share their results here.
Dude, uber thanks. Always wanted to know how to do this effect–I run into it all the time. Don’t worry about Zorb (some people have talent envy).
Don’t mean to be rude or anything, but the outcome wasn’t really thát… well you know. The left side of the hand with the blackness seems the effect was not used for the whole hand, while the blackness isn’t even the hand. But that is hard to notice. And it’s a bit blurry, which is a pity. But on the other hand. For a quick tut, the basics on how to do it and nice steps are included so cheers for that. Overal it’s quite ok, but liked some of your other tuts better. Keep it up.
Oh… and I would suggest the burn/dodge tool on the edges as well.
Red: No problem Thanks for the support!
Scaie: Of course you’re entitled to your opinion, and I’ll be the first to admit that the final result isn’t perfect. However, the reason why I called it a ‘mini tutorial’ is because it’s meant to very quickly show the simple steps to achieving this kind of effect. I could have done a complex image and corrected all imperfections, given it great composition etc… but I just wanted to share the technique with people for them to use as they want. I’ll be posting a full tutorial soon though of usual length
I love this tutorial. I love how simple it was. I tried a tutorial on psdtuts that achieved a very similar effect. http://psdtuts.com/tutorials/tutorials-effects/creating-a-vector-composite-effect-from-a-photo/
The other tutorial was way more complicated than this one. thanks for the great post! can’t wait until the next post!
Hey EML, thanks for commenting. I thought I’d seen pretty much every PSDTUTS tutorial out there, but I must have missed this one. It’s a cool tutorial, but I found it a little confusing too to be honest. Thanks for the link, and I hope that you’ll stick around
Question: How do you delete all data on a layer? I couldn’t figure this out. It still turned out cool, however the radial blur really didn’t pan out. Basically, I just ended up cutting out the hand in the background, filling in with black and adding different cloud effects. Because of this, the gradient washed it out a bit much, so I took that out as well. Great tutorial, just not sure about that deleting bit.
You just need to go to select>all and then hit backspace on your keyboard. I’m a little confused by your methods. Did you follow the tutorial exactly? I’ll try and help anyway I can.
I followed the tutorial, just did some minor adjustments. When I added the cloud effect as stated, it didn’t show up, so I kept it at normal and reduced the fill opacity (advanced blending) and opacity (general blending). I’ll try it again later today now that I know how to delete the data properly. I can send you my version if you’d like.
Umm, sorry but I’m not exactly sure what to suggest. I’ve got no idea why your clouds wouldn’t show up if you went to filter>render>clouds.
F*** man this is brilliant :O
hi mi name is alex,,very good tutorial!!!! but i`d like to know how to do an image with the siwrls in diferent colors,like the one that is on the top of this page.
i like alverto seveso work and i want to do something like that,,about diferent colors,,you know how to do things like that????
thanks
Thanks guys.
Alex: Personally I’m no expert on this technique, but to achieve different colors I would use one of two options:
You could either use the technique that I’ve demonstrated above and then go in and select each shape using the lasso tool and colorize each.
or… You could just use different colors for your swirly brush strokes. Then when applying the pattern overlay of your hand photo grayscale your hand, and set the pattern overlay’s blend mode to ‘multiply’ or possibly ‘overlay’. This should give your different colored swirls the light/shadow of the original photo, but none of the color.
Hope this helps
Holy shit, just stumbled upon this site(don’t know how I haven’t found it earlier.. :S) and it’s freaking awesome. This tutorial is great and so are your other tutorials! Very easy to follow yet a lot to learn from all of them and also they’ve got some awesome end results ! Thanks so much Tom, I will definatley keep reading around here.
To be a little more negative though, while the tutorial was great and the end achievement as well I didn’t like the lightning effect a lot… but maybe that’s just me, taste is subjective anyways .
.
Please, keep up the good work and thanks again.
Sorry for double posting… just had to ask; do you know where I can get those wicked brushes that are in the angel pic?
To the people wondering how to do the angel pic: it’s kinda easy if you think about it. It actually hasn’t got much to do with the technique posted in the tutorial. What he probably did or at least what I would have done is to split the image into a girl part and the wing part. On the right wing the person that made just had a selection of the wing and filled it in with some wicked brushwork, afterwards he/she added some additional brushes outside of the wing. For the body of the girl all he/she did when it was made was make a new layer over the girl, have the girls skin as selection and the layer type set to overlay and then just painted away with different brushes in different colours. On the left wing the person that did it kept a bit of the wing showing with some kinda fade effect, play around with gradient fill and layer mask and I think it won’t be very hard to acheive, and then over that the maker did just as she did on the other wing. Hope that helped people that were wondering.
hey..i love your tutorials.i’m really interested in doing this things..but sadly..sometimes i get confused with the terms and stuff if the tutorials are just by words..if you can put some mock ups of the photoshop while doing this..it will be really helpful for me and maybe to others?..anyways..cheers to your tutorials!..i really love it..thanks..
good
[...] 6. Mini Tutorial: Create a Swirly Masterpiece [...]
damn, I rarely feel excited seeing tutorials and outcomes – but this is sick, I am trying it out, that pattern step, my imagination already are thinking about many other things, what can be done with this technique! Thanks!
Thanks very much Dainis. Let me know what you come up with using the technique
Hi Tom!
This Tut ROCKS!! Been looking for this kind of digital art for ages! Keep it up! Please do post some more enlightening stuff for us
All the very best!
its alright i guess
Hello, after 5 hours of trial and error, i finally got it right. my question is! is there a way you can reverse the process to get a look similar to your second example picture of the lady?
Roland: Thanks for the kind words
Robert: I’m not exactly sure what you mean by reversing the process? This tutorial shows you how to make an image just like the second example of the woman. If you apply shapes over a photo of a woman on a black background you should get a similar effect.
oh okay, but i mean you got it so perfect with her body with her body barly showing but her face all there for the most part with little peices taken out
Yeah for that all it takes is positioning your shapes more carefully over the body and then putting more shapes on the face. If you want an area to remain complete, then just cover it completely with a selection and then your pattern overlay should fill in all original detail. If you want to fade out an area then put less shapes in it. Hope this helps
is it possible to send you some pics i just did, and get some input on what what else i could do to them???
Sure, feel free to post some screengrab urls here and I’ll get back to you Alternatively, the contact page will be working here later in the week.
i dont know how LOL
Simply awesome and very impressive. Thanks!
omg ^^ super cool! tut!!!
 thnx a lot for this tip!!
  i enjoyed it!
i will try to do it…but i always take like 1 hour to understand it very well… and i always get lost in one step! lol xD i dont have a great english grammar btw. sorry.
but THNX a LOT!
Then select your original photo layer and delete all data on it. Then fill it with a radial blur (181818 to 000000).
didn’t get this part.. :/
Oh my God. This is so easy and the result comes out great. Many thanks for this tut
instead of pattern of hand, you can use a lot quicker way of doing this by ctrl+click on the swirl layer and then click on the “add layer mask” button. sorry for my bad english
ya i instead of using the magic wand @ step.. 9 i ctrl clicked on the thumbnail of the hand….. well the legs i used lol looks fantastic n thx to u i learnt a beautiful technique thx babes XXX
k tom here my version .. 0_~ …. http://cid-9f014cac225e2f1a.skydrive.live.com/self.aspx/My%20Art%20Works/dont%20ya%20just^_ek75.png
Now you’ve got me thinking……….
good job
I am overwhelmed , definitely will give a try on number of images . Hope it becomes as attractive as yours . Thanks mate .
step 4
Then select your original photo layer and delete all data on it.