 Members Area Tutorial: Design an Action Packed Movie Poster
 Members Area Tutorial: Create a Cat in a Magical Pond Scene Photo Manipulation
 Photo Manipulate an Eerie Sea Cave Scene
Have every post delivered to your inbox and get access to hundreds of useful design freebies.
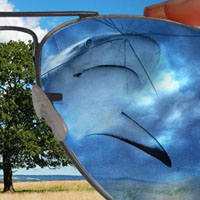
This is the final image that we’ll be creating:

Tree
Shark
Hand and Orange
Broken Glass Brushes
I’m sure we can all agree we love new tutorials, I created this tutorial initially thinking I could create the effect of a destroyed landscape through glasses as a kind of alternate view of nature in the future after global warming.
I settled on an animal landscape and decided the best contrast is between sea and land . The viewer is supposed to be looking through the glasses in first person but I think it can look like a reflection in the lenses. If you have any questions Iíll be available to answer them in the comments or give me a shout at my website: Digital Art Empire.
First things first, open up Photoshop and a document 1000 x 670 at 300 ppi.
Bring in this image of the tree . and resize the width to 1000 pixels using constrain proportions.

Next we’ll bring in the image of these glasses. Using your pen tool cut them out. Save the paths by double clicking them as we’ll use these later and save the document. The lens paths are the ones we’ll be using.
Place the cut out glasses in the centre of the document and resize so they are like this:

Resize the glasses to around 162 % larger and rotate them so the top bar of the glasses is about level with the top of the image
Get this image of the shark. Place it in the document then resize it and position it like this image, aim to have the shark half across each lens of the glasses. I reduced the opacity of the shark so you can see where to place it.

Next go to the glasses document we cut out earlier and grab those paths you saved. Using the direct selection tool drag them, holding shift, into the main document.

Now here comes the tricky part, resize the path to fit the glasses by selecting the entire path, use ctrl+ T to free transform as well and get the paths inside the glasses again. I chose to do it this way so we’ll learn a bit more about paths there are other ways to do this like filling the space with a color and dragging that shape into the doc and resizing.

Now with the shark and glasses images where we want them hit ctrl + J to duplicate the shark layer as we’ll need a copy for each lens. Then hide the shark copy. Right click the first path and hit make selection. This will select the inside shape of the first lens.

At the bottom of the layers panel hit the layer mask icon (the circle in a square) This will mask off the unwanted area of the shark image.

Repeat steps 9 and 10 for the other lens, so select and unhide the shark copy select the appropriate path and select make selection. Now with this selection active hit the layer mask icon again to mask out the unwanted parts of the image. You should be left with the following image:

Now with the main concept of the image in place we can sort out the details. With a black soft round brush at 250 px and 35 % opacity lightly brush the area behind the sharks tale and head. Make sure you select the layer mask and brush the appropriate lens. If you need to swap the colors to bring back the water and use varying opacities with the brush.

Now we’ll duplicate the background tree layer then select the lens shape use the paths we saved from earlier (or use reselect). With the first lens selected go to filter liquify. With the brush density set to 100 and pressure set to 50 use a brush size of 315 to start with right hand side and drag towards the lower left hand corner creating a wave effect. Click and hold down around the edges so it looks like water then hit ok. Repeat this for the other lens. You should have an image like this:


Next create a new layer and create a gradient from 00377d to 5582a5 and drag from the bottom to top holding shift.
The go to filter, distort, glass set to Distortion 20, Smoothness 7 and Scaling at 200 with texture set to frosted.
Select the gradient layer and create a duplicate of it (ctrl + J). Now select the lenses again and inverse the selections, then delete away the unwanted gradient.

Merge the gradient layers we just cut out and put their blend mode to multiply and then add a layer mask, set the foreground color to black, then with the gradient tool to set to foreground to transparent and opacity to 52% drag a gradient a quarter way up the glasses.
Create a new layer go to filter render clouds then filter render difference clouds
Free transform and resize the cloud layer so it covers where the left lens of the glasses are .Then using distort pull the top of this layer outwards holding shift and alt to constrain proportions. You should have the following image.
![]()

Next change this blend mode to color dodge. Holding alt with the move tool selected create a copy of this cloud layer and drag it over to the right. Make sure the lighter parts are over where the lens will be this will give the effect that the sun is streaming through the surface of the water.
Again with the lens selection from the path create a layer mask. So right click the lens path and make selection then with the cloud layer selected go to the layer mask at the bottom of the layers panel and create a layer mask. Repeat for the other lens, you should end up with the following.

Then in the cloud lens’ layer mask, with a large soft brush set to black and a low opacity erase the clouds a little from the shark. The ripple effect is in the whole lens while the surface of the water is blocked by the shark. Your layers palette should resemble the following.

Select the glasses layer and grab the eraser tool set to 40% opacity and erase away the excess of the rubber nose supports so they seem smaller.¨ You can use a path and create a selection or create a duplicate so its easier to correct any mistakes.

Now add a gradient map adjustment layer on top of all the others, with the first stop set to 00377d and the second to 5582a5 and set its blend mode to overlay. Use a brush set to black to bring back the shark. You should be pretty good with layer masks by now.
Download these smashed glass brushes thanks to kalijean and selecting a dark blue color from the water already in the image using the ink drop tool. Then in a new layer select the brush 8th from the end of the set. Click a 350 pixel break where the shark’s nose meets the glass like in this image.

Then add a layer mask with the lens selection active and with a soft black brush remove the line that makes the brush square.

Place this image of a hand holding an orange into the document resize it so the hand is holding the right side of the glasses; reduce the opacity of this layer to see where it’s going.
Then cut out the fingers with the pen tool, so the orange disappears and the hand is left holding the glasses like this.

Finally add a brightness contrast adjustment layer and set brightness to 12 and contrast to 7. If you’ve been following along the whole tutorial you will have noticed we use a lot of non destructive techniques which mean we can always go back and alter things at a later stage, this is the ideal way to design.
That’s a wrap folks you will now be fluent in layer masks, adjustment layers, paths, the liquify filter, blending modes and a few other good tips. If you like this tut you’ll find many more at my site Digital Art Empire


is a freelance digital artist and runs Digital Empire. He originally trained in film production at university.


Do you know the basic tools in Photoshop but feel that your work is still looking average? Join our creative community at FanExtra and get the direction you need to take your work to the next level.


Great tuts. Thank you!!!
Very very cool tut…thanks:)
really amazing mind set you have. thanks
Awesome tutorial, great work… Thanks
@Designect.Com
Cheers all im really glad you like it … reallly didnt know whether people would.
@d3nikk
your welcome would love to see what you guys come up with
@Dzinepress
tx for the comment : )
@Web 2.0 Tools isnt the blogshere a nice place to design ?
still glad you like it
Nice! Thanks!
C U P U
Wow wicked tutorial, I’ll be using these styles to implement in future projects…Ben Rama did you make this tutorial? if so then you have a really creative mind, would really like to see more posts from you!!
@ Vim yes I created this from my own mind – so thankyou – there’s definetly more on the way .
Wow really amazing, so unique and full of creativity
I like this but seems a little overexplosed on the gradiant
wow, thats great tutorial. thank you. i have given it a try and its easy to follow.
@ contractor web design thankyou
@ fair point i agree –
@oes tsetnoc – cheers glad you enjyed igt and found it easy and clear
Nice tutorial. Thank you
Your idea is great! very unique! Thanks for this tut^^
@ devdas & Lu your welcome – hope to speak again
This tutorials is amazing. Thanks for sharing.
Nice tutorial but not too sure about the masked gradients on the shark itself. I think I preferred it when there was more opacity on the actual shark layer so it covers the background a bit more. Nicely explained though.
Amazing idea, would love to try this myself.
@d3nikk
your welcome would love to see what you guys come up with