 Advanced Tonal Correction Via Subject Specific Histogram Adjustments
 Create a Simple, Professional Typographical Design
 Create a Surreal, Scenic Photo Manipulation
Have every post delivered to your inbox and get access to hundreds of useful design freebies.
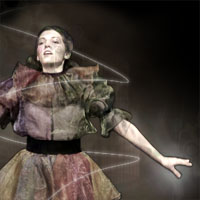
This is the final image that we’ll be creating.

Open up your image of a dancer. The original image can be found here: http://www.sxc.hu/photo/679992.

Now select around your dancer very carefully using the lasso selection tool. This may take a while, but it pays to take the time to get a really accurate selection. Once you’ve selected the entire form, copy/paste it onto a new layer. The image below shows the cut out image on a white background.

Now hide this new layer and go back to your original photo. Select the clone stamp tool and clone your background so that it covers the dancer. Remember to use the tool hold ‘alt’ and click on the part of your background that you want to clone, then release alt and click over your photo. If you like you can cover the top part of the dancer with a black paintbrush, but the area behind her feet will need to be cloned fairly carefully. The result of this should give you a new background something like the image below:

Now create a new layer above your original photo layer and below your dancer cut out layer called ‘clouds’. Go to filter>render>clouds to give a cloud backdrop behind your dancer. Then with your dancer layer visible, use a large, soft eraser brush to erase away all areas of cloud except those surrounding the dancer’s body. So what you’re basically doing is giving a cloud border to your dancer.
Then go to image>adjustments>color balance and apply the settings shown below. Finally reduce this layer’s opacity to 60% to achieve the result shown below:


Next select your dancer layer and go to image>adjustments>hue/saturation. Reduce your dancer layers saturation to -80.

Now duplicate your dancer layer and set the layer blending mode on the duplicate layer to soft light, then reducing it’s opacity to 20%. Then duplicate your dancer layer again and set this second duplicate layer’s blend mode to ‘hard light’, reducing it’s opacity to 10%. Then merge the three layers together. This gives your dancer a sharper, cleaner look.

Now select area your dancers outfit using the lasso tool. Copy and paste this onto a new layer. Then click somewhere outside of this using the magic wand tool and then go to select>inverse to invert your selection to select the outfit. Then go back to your original dancer photo and hit delete to delete the dancers outfit. This does a pretty good job, but leaves a thin outline where the original outfit was, so go in and erase this using a hard eraser brush. The images below show the image with just the outfit layer showing, then the remains of the dancer’s body showing, and then a close up of the thin line being erased.


Now grab a free vector brush set from Brusheezy: http://www.brusheezy.com/brush/437-Vector-Brush-Set. Create a new layer above your dancer body layer but below your dancer outfit layer and use various brushes from the set to paint different colored markings over your dancer. Try to pretty much completely cover her in vector shapes, and then once you’ve done this reduce your layer’s opacity to around 30%.
The image below shows the shapes painted over the dancer’s body:

Next select the great ‘vector curves vol. 1′ brush set (http://ihea.deviantart.com/art/VECTOR-CURVES-44197122) and brush the curved shapes over the arms, legs and face of your woman on a new layer named ‘curves’. Try to make different curves overlap each other, so that a kind of 3d effect is achieved. Also BE SURE TO USE A BLACK BRUSH COLOR.
Then duplicate your ‘curves’ layer and hide the duplicate – this is just to keep the original safe incase we need it later on. Then go back to your original ‘curves’ layer and apply a color overlay (8B7C70).
Then apply a drop shadow (settings shown below). Finally, duplicate your original pattern layer (the colored shapes, not the vector curves brush set) and move the duplicate below your original dancer layer. Then hide this duplicate pattern layer (again just to keep it safe for later).
Select your curved brush strokes layer (with color overlay and drop shadow) and then merge this layer down with the original colored pattern layer beneath it.


Now with your merged brush layer selected hide all other layers (including your original white background under your original photo). This should leave just your merged brush layer visible. Then go to edit>define pattern and define this pattern as ‘overlay pattern’. Then hide your merged layer and select your dancer body layer. Go to layer blending options and apply a pattern overlay, selecting your newly defined pattern. Then set the pattern’s blend mode to ‘linear dodge’ and it’s opacity to 50%.


Now select your dancer layer and apply a black outer glow, blend mode: normal, opacity: 50%, size: 1. Apply this to both your body and outfit layers, this should make them stand out a little more against your background.

If you remember we moved duplicates of our colored pattern and curved brush patterns beneath our dancer photo and made them invisible. Now make them both visible again and set their layer opacities to 5%. Also with your curved vector brush layer selected go to image>adjustments>invert to turn the brush strokes from black to white. Then apply a white outer glow to soften them and make them blend nicely with the background smoke.


Now create a new layer above your dancer body/outfit layers. Select your path tool and draw a winding path that flows up from below the dancers feet to above her head, winding around her body and limbs. Then with your curved brush set still selected reduce the brush size to 1, and make sure color is white. Then with your path tool selected right click on your path and click ‘stroke path’. This should stroke your path with a very faint white line. To make this line more obvious duplicate your layer about 7-8 times and then merge all of these path line layers together.


Now use your eraser brush to fade out the top/bottom of your path line. Also erase some parts of the line so that it appears to be weaving in front of and behind the dancer’s body. Then apply a subtle outer glow to the line layer (settings below).


Now duplicate your line layer and discard the outer glow effect. Move the duplicate below the original and then go to filter>blur>motion blur. Apply a motion blur at 90 degrees at a distance of 50 pixels. Then duplicate this layer 10 times to make the effect more obvious. Merge all of these duplicate layers with the original blur layer and then set the layer’s blending mode to ‘overlay’.

Now select the layer containing your dancers legs, arms and head of your dancer and duplicate it, moving the duplicate below the original and clearing all layer styles. Apply the motion blur settings used a second ago, but then instead of duplicate this layer multiple times simply set it’s blend mode to ‘linear dodge’ and reduce it’s opacity to 30%.

Now select your clouds layer and apply two lens flares where the dancer’s hands are. You can see the settings for this effect as well as the result below:


Finally, select your dancer outfit layer and apply a pattern overlay, using the same pattern that you used for the dancer’s body earlier. However, this time set the blend mode to linear burn and the opacity to 20%. This helps to just give a little final extra texture to the outfit.

I hope that you enjoyed this tutorial, and as always I’d love to see what you do with it.

Tom is the founder of PSDFAN. He loves writing tutorials, learning more about design and interacting with the community. On a more interesting note he can also play guitar hero drunk with his teeth.


Do you know the basic tools in Photoshop but feel that your work is still looking average? Join our creative community at FanExtra and get the direction you need to take your work to the next level.


wonderful!
thanks! very useful creativity!
Wow! It’s beautiful.
She seems like a ghost, it’s a great effect.
nice
Thanks so much guys, I’m glad that you liked it.
creative indeed
i like the effect Tom! rock on! \m/
Cheers guys!
very nice tutorial I really like the outcome. Thanx Tom!
NiCE!
Thanks raj and Tim
well explained.very nice:)keep up the good work as always:)
Thanks for the kind words as always
[...] 44. Creating Smokey Dancer Using Lighting/Texturing Effects [...]
very helpful! thanks tom
Thanks Christina, glad you enjoyed it.
really fantastic tutorial… very informative, image looks great. Thanks!
Nice man!!!…..creativetutorial …..
Wonderful tutorial and very helpful. Graze.
the step by step tutorial is very clear and easy to follow. simple tricks but it comes out great, thanks