 Creating Good Enough to Eat Typography
 Members Area Tutorial: How to Create a Flip Clock and Calendar in Adobe Photoshop
 Create a Fantasy Underwater Scene with Photoshop
Have every post delivered to your inbox and get access to hundreds of useful design freebies.
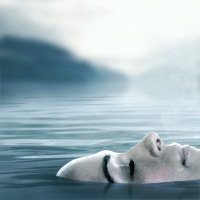
Here is a preview of the image that we are going to be creating:

Start by creating a new document.
Copy and paste in your ‘lake scene’ image from the resources section for this tutorial. Position and resize it within your canvas until it looks like the image below:

Go to filter>convert for smart filters. This will allow you to apply filters to your backgorund image non-destructively.
Go to filter>blur>gaussian blur and apply a 3.0 pixel strength gaussian blur. This is to help give depth to your image, by making your background out of focus:

Apply a hue/saturation and color balance adjustment layer. Be sure to create a clipping mask for each, so that your adjustments only effect your underlying backdrop layer.
Hue/Saturation Adjustment Layer Settings:
Hue: 0
Saturation: -15
Lightness: 0
Color Balance Adjustment Layer Settings:
Highlights: -11 / -8 / -11
Midtones: -15 / -2 / +12
Shadows: -12 / -4 / +2


Paste in your ‘water ripples’ image, positioning it in the bottom of your canvas.
I actually compressed the height of this image in order to make the perspective more accurate.

Apply a layer mask, and use a large, soft black paintbrush to mask off the top edges of your water image, blending it into your backdrop image:

Now apply a hue/saturation and color balance adjustment layer. Be sure to apply a clipping mask to each.
Hue/Saturation Adjustment Layer Settings:
Hue: 0
Saturation: -100
Lightness: 0
Color Balance Adjustment Layer Settings:
Highlights: -11 / -2 / +9
Midtones: -21 / +11 / +26
Shadows: -8 / -1 / +5


If you notice your water ripple image looks good, but consistently in focus, which seems strange when our backdrop is out of focus. Let’s fix this!
Select your water ripple layer as well as the corresponding adjustment layers and hit option+g to place them all in a layer folder.
Then right click on this layer folder in your layers palette and hit ‘duplicate layer group’.
In the duplicate layer group select your duplicated water ripple layer and apply a 3.0 pixel gaussian blur.
After blurring your duplicate water area, apply a layer mask. Then use a soft black paintbrush to mask off the central area of your blurred water area, exposing the underlying original sharp water image. Basically you want your water area to be blurry at the bottom of your canvas and at the top where it joins the mountain backdrop. However, you want it to be sharply focused in the middle section, to create a plane of focus:

You can see the effect of this technique better below:

Cut out the face area of the woman photo from the resources section for this tutorial.
Paste this into your main document:

Now resize and position this face to fit better in your composition. You want to give the impression of the face emerging slightly from the water. To achieve this, mask off the bottom of your woman’s face using your pen tool. You want to achieve a slight curved edge to the bottom of her face to simulate how water surrounds an object:

Apply a hue/saturation, levels and color balance adjustment layer to help blend the face with the rest of the composition. Remember to give each adjustment layer a clipping mask:
Hue/Saturation Adjustment Layer Settings:
Hue: 0
Saturation: -75
Lightness: 0
Levels Adjustment Layer Settings:
77 / 0.91 / 240
Color Balance Adjustment Layer Settings:
Highlights: -12 / -2 / +4
Midtones: -22 / +5 / +11
Shadows: -15 / +2 / +8


Now ensure that your face layer and all related adjustment layers are placed within a single layer group.
Then duplicate this layer group, moving it below the original. Select your duplicated face layer and go to edit>transform>flip vertical. Move your flipped face below the original to position it as a reflection:

You’ll notice that due to the curved edge of your face, the two faces aren’t lining up correctly at the minute. To fix this, go to edit>transform>warp and use your warp tool to join any gaps between the two faces:

Reduce the opacity of your face reflection layer to around 50%, and then accessing the layer mask created earlier, using a soft black paintbrush to mask off the edges of this face reflection, blending it into the main background:

Download the smoke/ink brush set from the resources for this tutorial.
Apply one of the brushes from the set using a white paintbrush, positioning the smoke just above the nose/mouth of your woman.

Reduce your smoke layer’s opacity to 30% to make the effect more subtle:

It’s time to apply some lighting to bring our image together!
It’s important to keep your lighting very subtle, to achieve as natural a feel as possible.
Start by creating a new layer called ‘shadow under face’. Set this layer’s blend mode to ‘overlay’.
Select a soft black paintbrush (around 20% opacity) and begin brushing in underneath your face, just where the water meets the edge of the woman’s face. The idea is to give the impression of shadow building up here, cast not only by the woman’s face obscuring the main background light source, but by the presence of the woman’s form underneath the water:

We also want the blue of the water to be casting a little color up on the woman’s face. This is all part of natural lighting.
To achieve this, create a new layer called ‘blue reflect on face’. Use your eye dropper tool to sample one of the blue hues from your water area. Then use a soft, 20% opacity paintbrush to brush over the bottom part of your woman’s face:

Now change this layer’s blend mode to ‘overlay’ and reduce it’s opacity to 50%:

Clearly the most prominent light source is coming from the center of your canvas between the mountain formations.
Create a new layer called ‘central lighting’. Select your lasso tool (applying a 30px feather). Now select the area covered by the light cast from this central area and fill it with white:

Change this layer’s blend mode to ‘overlay’ and reduce it’s opacity to 8%. This should create a really subtle light effect steming from this central region:

I can see a little yellow in the main light source, so create a new layer called ‘yellow lighting’. Select a soft, medium sized, 5% opacity, yellow paintbrush. Then make this layer’s blend mode ‘overlay’ and paint over the top edge of your woman’s face.
You want to give the impression that it’s just being kissed by the main light source.

The scene feels very foggy and misty, and we want to accentuate this.
Start by creating a new layer called ‘clouds’. Go to filter>render>clouds and render some black/white clouds over your canvas:

Now change this layer’s blend mode to ‘overlay’ and reduce it’s opacity to 15%. This should make your foggy effect more subtle:

Finally, create a new layer called ‘fog’.
Use a large, soft, white paintbrush at around 5% to paint random points of fog over your canvas. This important part of this step is to keep it barely visible, but just obvious enough to add something to your image:

Now create a new layer called ‘dodge/burn rough’.
Go to edit>fill and fill your canvas with 50% gray. Now change this layer’s blend mode to ‘overlay’. This will hide your 50% gray fill, but let you non-destructively dodge/burn your image. Simply use a low opacity, soft black paintbrush for your shadows and a soft, low opacity paintbrush for your highlights. For this layer simply dodge/burn the rough areas of lighting in your image.
I ended up reducing this layer’s opacity to 50% in order to make the effect more subtle.
The images below show your layer at ‘normal’ blend mode, 100% opacity, and then at ‘overlay’ blend mode, 50% opacity.


Create a new layer called ‘dodge/burn details’. Repeat step 13, this time focusing on dodging/burning the details of your image.
The images below show this layer at ‘normal’ blend mode, 100% opacity and then at ‘overlay’ blend mode, 50% opacity:


Apply a final levels/curves adjustment layer. With these adjustment layers DO NOT apply a clipping mask, as you want them to effect your entire canvas.
Levels Adjustment Layer Settings:
9 / 0.96 / 247
Curves Adjustment Layer Settings:
(see below):

You can view the final outcome below. I hope that you enjoyed this tutorial and would love to hear your feedback on the techniques and outcome.

Tom is the founder of PSDFAN. He loves writing tutorials, learning more about design and interacting with the community. On a more interesting note he can also play guitar hero drunk with his teeth.


Do you know the basic tools in Photoshop but feel that your work is still looking average? Join our creative community at FanExtra and get the direction you need to take your work to the next level.


It looks nice!