Have every post delivered to your inbox and get access to hundreds of useful design freebies.
Are you wary of using vectors in Photoshop? The truth is that Photoshop can be an excellent vector program if you get to learn it’s more advanced drawing features.
This tutorial we’re going to dive in and walk you through the basics of Photoshop’s drawing capabilities.
You’ll be learning how to create a realistic old photo film icon.
Let’s get started!
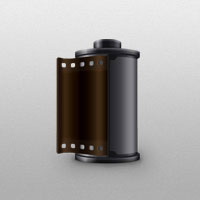
As always, this is the final image that we’ll be creating:

Open Photoshop and hit Control + N to create a new document. Enter all the data shown in the following image and click OK. Enable the Grid (View > Show > Grid) and the Snap to Grid (View > Snap To > Grid). For starters you will need a grid every 2px. Go to Edit > Preferences > Guides, Grid & Slices and focus on the Grid section. Enter 2 in the Gridline Every box and 1 in the Subdivision box. Also, set the color of the grid at #a7a7a7. Once you set all these properties click OK. Don’t get discouraged by all that grid. It will ease your work later. You should also open the Info panel (Window > Info) for a live preview with the size and position of your shapes.

Set the foreground color at #ebebeb, pick the Rectangle Tool and create a 130 by 208px vector shape.

Select the rectangle made in the previous step and focus on the top side. Grab the Ellipse Tool, check the Add button from the top bar and add a 130 by 16px squeezed circle as shown in the following image. Continue with the Ellipse Tool, move to the bottom and add a second 130 by 16px vector shape as shown below. Focus on the Layers panel, double click on this vector shape and simply name it "body".

For the following steps you will need a grid every 5px. Simply go to Edit > Preferences > Guides, Grid & Slices and enter 5 in the Gridline Every box. Focus on the top side of the shape made in the previous step. Set the foreground color at #6d7174, pick the Ellipse Tool, create a 140 by 20px vector shape and place it as shown in the first image. Make sure that this new shape stays selected and switch to the Rectangle Tool. Check the Add button from the top bar and add a 140 by 10px shape as shown in the second image. Return to the Ellipse Tool, check the Subtract button from the top bar and create a 140 by 20px vector shape as shown in the third image.

Set the foreground color at #232326, pick the Ellipse Tool, create a 140 by 20px vector shape and place it as shown in the first image. Select this squeezed circle along with the shape made in the previous step and send them to back (Shift + Control + [ ).

Focus on the Layers panel, select the two vector shapes made in the last two steps and duplicate them. Select these copies, go to Edit > Transform > Flip Vertical then drag them 220px down as shown in the following image.

Focus on the top side of your illustration. Set the foreground color at #9494949, pick the Rectangle Tool, create a 60 by 20px vector shape and place it as shown in the first image. Select this new shape, send it to back (Shift + Control + [ ) and grab the Ellipse Tool. Check the Add button from the top bar and add a 60 by 20px shape as shown in the second image.

Reselect the vector shape made in the fourth step and duplicate it (Control + J). Focus on the Layers panel, select this copy, lower the Fill to 0% then double click on it to open the Layer Style window. Activate the Drop Shadow, enter the properties shown in the following image and click OK.


Next you need to mask the shape made in the previous step. Focus on the Layers panel, hold Control and click on the vector shape made in the seventh step. This will load a simple selection around that shape. Make sure that your selection stays active, reselect the vector shape made in the previous step and click on the "Add layer mask" button from the bottom of the Appearance panel. Keep focusing on the Layers panel, double click on this masked vector shape and check the "Layer Mask Hidden Effects" box from the Layer Style panel.
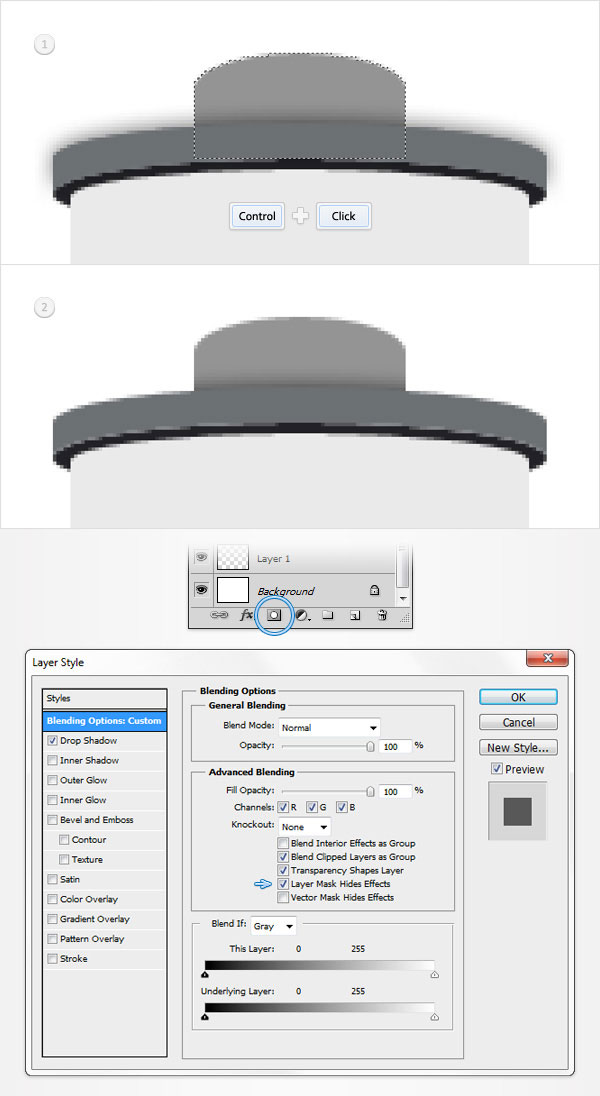
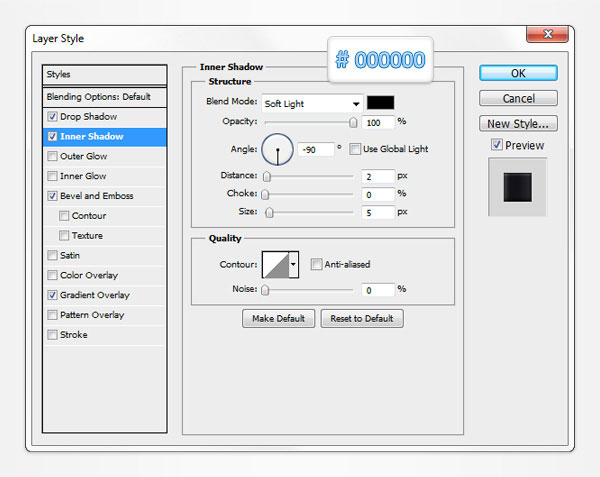
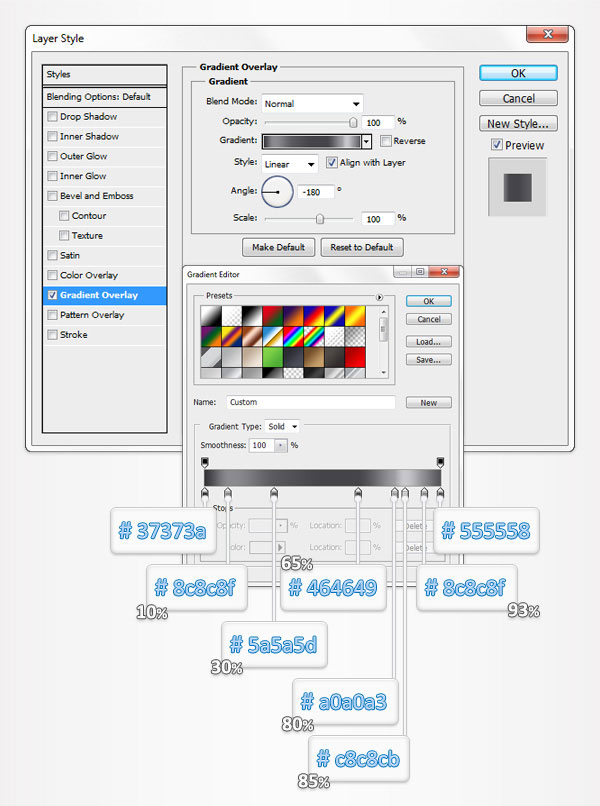
Focus on the Layers panel, open the Layer Style window for the vector shape made in the seventh step and enter the properties shown in the following images. When you get to the Gradient Overlay section make sure that you save that linear gradient by clicking on the "New" button. You'll find your saved gradient inside the "Presets" box.


Focus on the Layers panel, open the Layer Style window for the vector shape made in the fourth step and enter the properties shown in the following images. For the Gradient Overlay section use the linear gradient saved in the previous step.


Focus on the Layers panel, open the Layer Style window for the grey vector shape made in the sixth step and enter the properties shown in the following images. Again, for the Gradient Overlay section use the linear gradient saved in the tenth step.




Duplicate "body" (Control + J). Select this copy and replace the light grey used for the color with a light blue (#73c5ff). Make sure that this copy stays selected and pick the Rectangle Tool. Check the Intersect button from the top bar and draw a 70 by 230px vector path as shown in the second image. Lower its Fill to 0% then open the Layer Style window and enter the properties shown in the following image.


For the following steps you will need a grid every 2px. So go to Edit > Preferences > Guides, Grid & Slices and enter 2 in the Gridline Every box. Set the foreground color at #73c5ff, pick the Ellipse Tool, create a 130 by 16px vector shape and place it as shown in the first image. Make sure that this new shape stays selected and switch to the Rectangle Tool. Check the Add button from the top bar and add a 130 by 4px vector shape as shown in the second image. Return to the Ellipse Tool, check the Subtract button from the top bar and add a 130 by 16px vector shape as shown in the third image.

Select the vector shape made in the previous step, pick the Rectangle Tool, check the Subtract button from the top bar and draw a 70 by 20px vector shape as shown in the first image. Continue with the Rectangle Tool, check the Add button from the top bar and draw a 20 by 10px vector shape as shown in the second image. Focus on this little rectangle and switch to the Direct Selection Tool. Select the bottom, right anchor point and drag it 10px to the left. In the end your vector shape should look like in the third image.

Reselect the vector shape made in the last two steps and duplicate it (Control + J). Select this copy, go to Edit > Transform > Flip Vertical then drag it 204px down as shown in the second image.

Open the Layer Style window for the top, blue vector shape and enter the properties shown in the following images.


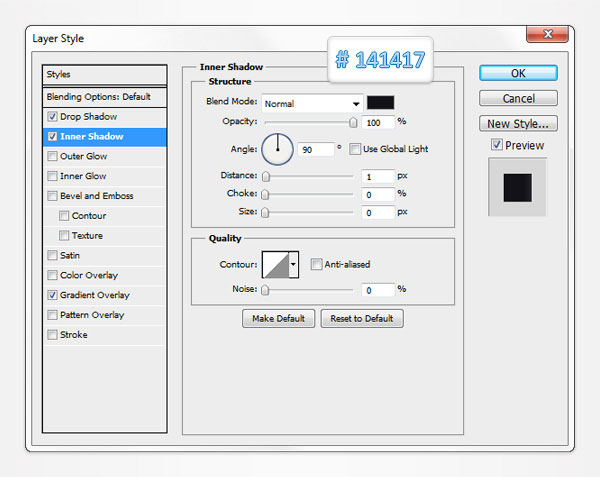

Focus on the Layers panel, right click on the vector shape edited in the previous step and click on Copy Layer Style. Move to the bottom, blue vector shape, right click on it then click on Paste Layer Style. Open the Layer Style window for this bottom, blue vector shape and inverse the angles used for the Drop Shadow and the Inner Shadow.

For the following steps you will need a grid every 5px. So go to Edit > Preferences > Guides, Grid & Slices and enter 5 in the Gridline Every box. First, duplicate "body" (Control + J). Select this copy and replace the light grey used for the color with a light blue (#73c5ff). Make sure that this copy stays selected and pick the Rectangle Tool. Check the Intersect button from the top bar and draw a 5 by 230px vector path as shown in the second image. Bring it to front (Shift + Control + ] ) then open the Layer Style window and enter the properties shown in the following image.


Duplicate "body" (Control + J). Select this copy, lower its Fill to 0% then open the Layer Style window and enter the properties shown in the following image.


Duplicate the vector shape made in the previous step (Control + J). Open the Layer Style window for this copy and edit the properties used for the Inner Shadow as shown in the following image.


Duplicate the vector shape made in the previous step (Control + J). Open the Layer Style window for this copy and edit the properties used for the Inner Shadow as shown in the following image.


Again, duplicate the vector shape made in the previous step (Control + J). Open the Layer Style window for this copy and edit the properties used for the Inner Shadow as shown in the following image.


Once again, duplicate the vector shape made in the previous step (Control + J). Open the Layer Style window for this copy and edit the properties used for the Inner Shadow as shown in the following image.


One last time, duplicate the vector shape made in the previous step (Control + J). Open the Layer Style window for this copy and edit the properties used for the Inner Shadow as shown in the following image.

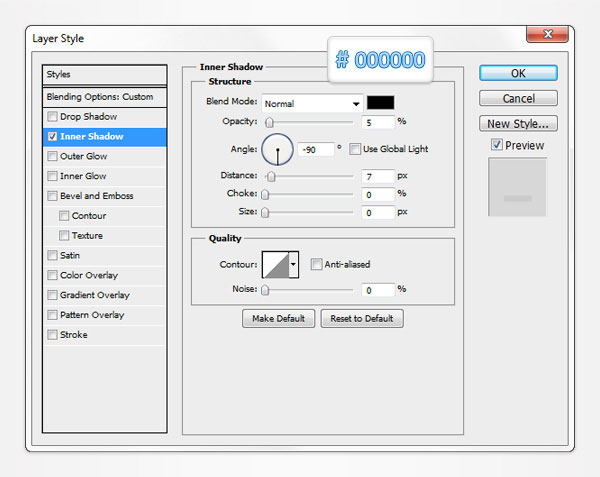
Set the foreground color at #73c5ff, pick the Rounded Rectangle Tool, set the radius at 5px, create a 115 by 210px vector shape and place it as shown in the first image. Make sure that this new shape stays selected and focus on the top side. Continue with the Rounded Rectangle Tool, set the radius at 3px, check the Subtract button from the top bar and create a 10 by 10px vector shape as shown in the second image. Using the Rounded Rectangle Tool, create four new rounded rectangles as shown in the third image. Move to the bottom side of this blue vector shape and create five new rounded rectangles as shown in the fourth image.

Select the vector shape made in the previous step and pick the Rectangle Tool. Check the Subtract button from the top bar and create a 5 by 210px vector shape as shown in the first image. Open the Layer Style window for this blue vector shape and enter the properties shown in the following image.


Set the foreground color at white, pick the Rounded Rectangle Tool, set the radius at 5px, create a 105 by 150px vector shape and place it as shown in the first image. Make sure that this new shape stays selected and switch to the Rectangle Tool. Check the Subtract button from the top bar and create a 5 by 150px vector shape as shown in the second image. Lower the Fill of this new vector shape to 0% then open the Layer Style window and enter the properties shown in the following images.


Focus on the Layers panel and select the two vector shapes made in the last three steps. Right click on one of these shaeps and go to Conver to Smart Object. Select this new smart object and go to Edit > Transform > Warp. Select Fish from the Warp drop-down menu, enter -3 in the Bend box and hit Enter. Open the Layer Style window for this smart object and enter the properties shown in the following images.


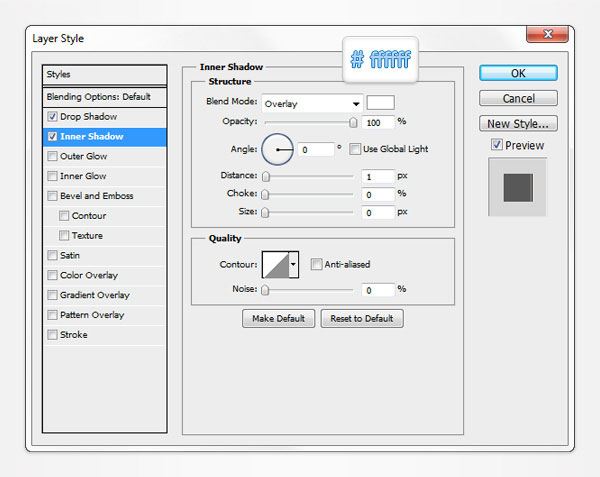
Duplicate the smart object made in the previous step (Control + J). Focus on the Layers panel, right click on this copy and go to Clear Layer Style. Select it, lower the Fill to 0% then open the Layer Style window and enter the properties shown in the following image.


Again, you need to mask the smart object made in the previous step. Load a simple selection around "body", select the smart object made in the previous step and click on the "Add layer mask" button from the bottom of the Layers panel. Open the Layer Style window for this masked smart object and check the "Layer Mask Hidden Effects" box from the Layer Style panel.

Set the foreground color at black, pick the Ellipse Tool, create a 150 by 25px vector shape and place it as shown in the first image. Send this new shape to back (Shift + Control + [ ), convert it to a smart object, lower its opacity to 25% and go to Effect > Blur > Gaussian Blur. Enter a 10px radius and click OK.

For the following steps you will need a grid every 1px. So go to Edit > Preferences > Guides, Grid & Slices and enter 1 in the Gridline Every box. Set the foreground color at black, pick the Ellipse Tool, create a 144 by 20px vector shape and place it as shown in the first image. Send this new shape to back (Shift + Control + [ ) and lower its opacity to 20%.

You won’t need the grid so you can disable it (View > Show > Grid). Focus on the Layers panel, open the Layer Style window for "body" and enter the properties shown in the following image.

Finally, here’s how you can easily recolor your film. First, duplicate the "body". Select this copy, clear the Layer Style, lower its Fill to 0% and open the Layer Style window. Activate the Color Overlay section and enter the properties shown in the following image. Feel free to try a different color, another blending mode or a lower opacity percentage.


Here is how your final result should look.

The source files for this tutorial are available to our FanExtra members community. If you want to access the source files for this tutorial (and all of our tutorials + thousands of other resources) then sign up here.
If you’re already a FanExtra member then you can login here to access the source files.
Thanks to our March sponsor Sticker Mule who enable us to keep providing great design content every day. We recommend their excellent die cut stickers to help promote your business.
I spend most of my time working in Adobe Illustrator and I have my own website that focuses on this program. So far, I published over 150 tutorials on my websites and on other vector-related websites. You can see them all on VForVectors
Do you know the basic tools in Photoshop but feel that your work is still looking average? Join our creative community at FanExtra and get the direction you need to take your work to the next level.
Leave a comment
0 Comments:
No comments have been posted yet. Be the first!