
 Creating the Surreal Photo Illustration ‘Checkmate’
 Design a High Intensity Video Game Cover
 Design an Abstract Photo-Manipulation Using Adjustment Layers
Have every post delivered to your inbox and get access to hundreds of useful design freebies.
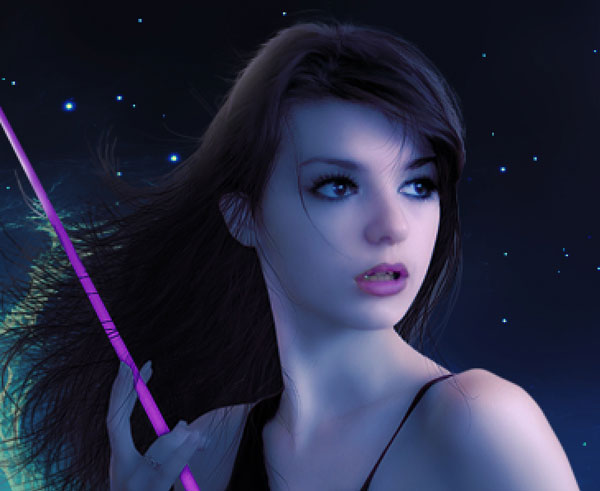
In this tutorial you will create a beautiful fantasy landscape of an angel playing in the cosmos.
You will learn how to manipulate simple stock images into a fantasy scene. You will learn skin retouching techniques, how to paint custom hair, blending, filtering and much more.
You’ll also apply a variety of custom lighting effects to create a bold, fantastic outcome:
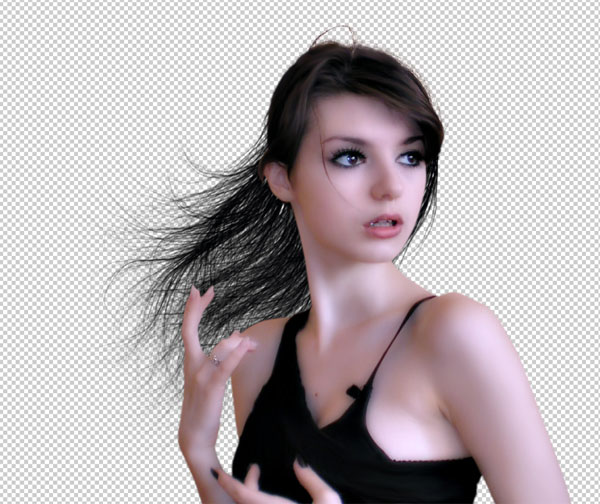
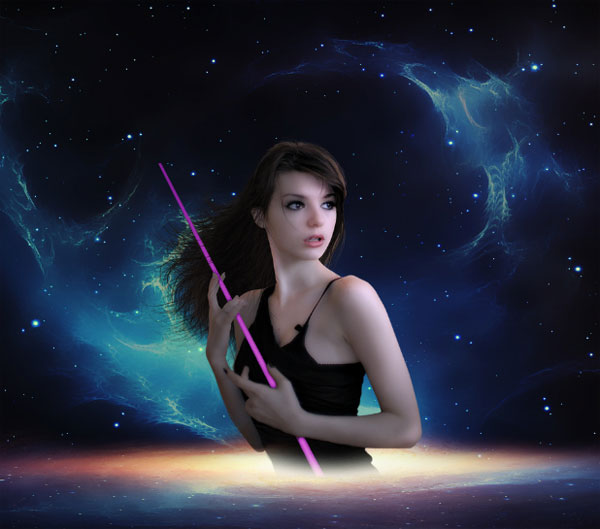
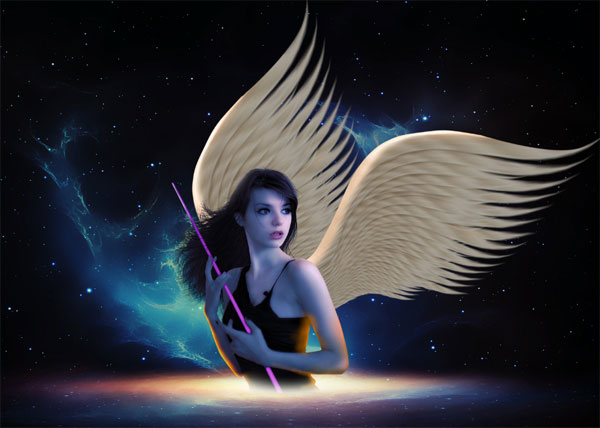
As always, this is the final image that we’ll be creating:

Start by opening the model image in photoshop. Go to image > image size. We will re-size the original image first.

Set the size of the image as the one in the screenshot below.

Here is the re-sized image.

Next, duplicate the image by hitting Ctrl+J. There will be a new layer above the original image named background copy. With the background copy layer selected, hit Ctrl+I to invert the layer. Here is the inverted image will look like:

Change the blending of the layer to overlay at 100% opacity.

Here is the result after changing the layer to overlay.

Now go to layer > smart objects > convert to smart objects. This will change the layer into a smart object.

Next, we will give a filter to the background copy layer. Go to filter > others > high pass

Set the radius of the filter to 4.2 pixels. This high pass filter will be a smart filter with a white mask thumbnail placed below the background copy smart layer in the layer panel. Note: this amount of high pass filter is the one for the model image with the resolution set for this tutorial. This amount might not give the best result for the other different sized images. All we have to do is to adjust the radius amount for the best desired result if we use the other different images with diffrent resolutions.

This is the result after filtering:

With the background copy smart layer still selected, click the layer mask icon located in the bottom of the layer panel. This will give the layer a layer mask indicated with a white thumbnail next to the layer.

Now Take the brush tool in the tool panel and choose a very soft round brush ( 0% hardness ). Set the opacity of the brush to 20-40% opacity. Next, with black color, stroke the brush on the areas around the eyes, lips, nose and hair to mask them.
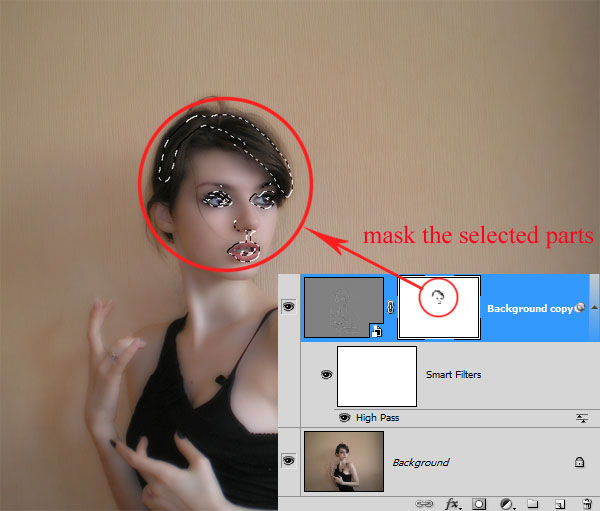
Here is the result:

Hit Shift+Ctrl+Alt+E to stamp all the layers. This will create a new single layer placed in the top most position. I named this new layer stamp.
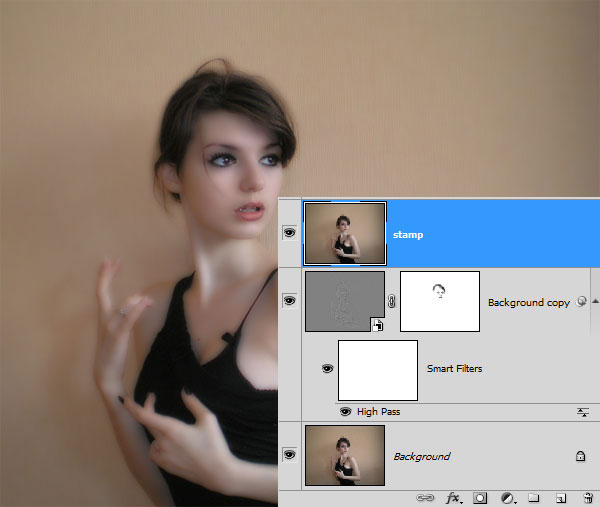
Convert this stamp layer into a smart object layer. After converting the layer, go again to filter > sharpen > unsharp mask. Set the unsharp mask filter to the amount shown in the screenshot.

This is the result

Now we will give color adjustment to the image. To do this purpose, go to layer > new adjustment layer > vibrance. We will give a new adjustment layer to the scene.
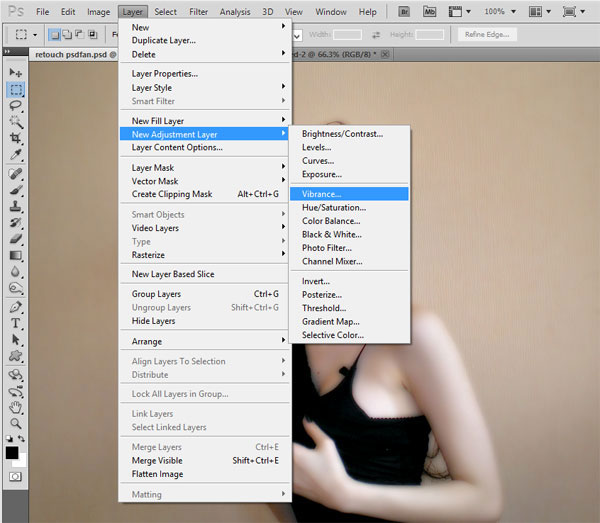
This is the setting for the adjustment layer. Make sure to set the blending of it to screen at 40% opacity.

This is the result should look like:

Create a new layer (Shift+Ctrl+N) above the vibrance layer. Next take the smudge tool in the tool panel. Set the setting of the tool as shown in the screenshot below:

On the new layer, smudge the skin of the model. Choose a very soft round brush to do smudging. Vary the size of the brush according to the size of the areas to be smudged. This is the result I created. I named this layer smudge.

This is the final result should look:

Next we will set another color adjustment for the scene. We give the filter adjustment layer for this purpose. Use color #9b1dea for the filter and set its density to 30%. Use normal as the blending mode at 100% opacity.

This is the look of the result:

Extract the model from its background. Use any extracting tool we like to do this purpose. I, myself, used pen tool to extract the model. Here it is:

Create a new layer above the cropped model layer. Take the pen tool and create path in this new layer like the one shown in the screenshot. This supposed to be a stick hold by the model. I named this layer stick.

When the path is created, right click on the document to show the path command options. Choose make selection option to change the path into a selection.

Finally, fill the selection ( Shift+F5) with color of #873fa0.

With the stick layer still selected, go to layer > layer styles. This will lead us the layer style option. We will use inner shadow and inner glow for the styles.

Here is the setting for each style:

And here is the stick. Mask the part of the stick overlapping the fingers.

In this step we will add custom hair to the model. Make sure we have installed the hair brush. We use the brush to paint the hair.

Create another new layer below the cropped model layer on which we will paint the hair. Choose one of the hair brush and paint black hair for the model.
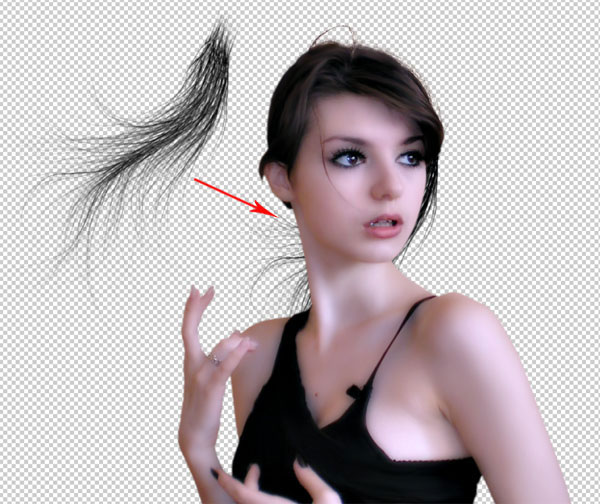
Proceed to paint more hair as the one shown in the screenshot.
After painting the hair, duplicate the hair layer. This will add more hairy effect so the hair will look thicker. Hit Ctrl+T to activate the free transform tool and rotate the duplicate to alter its position.

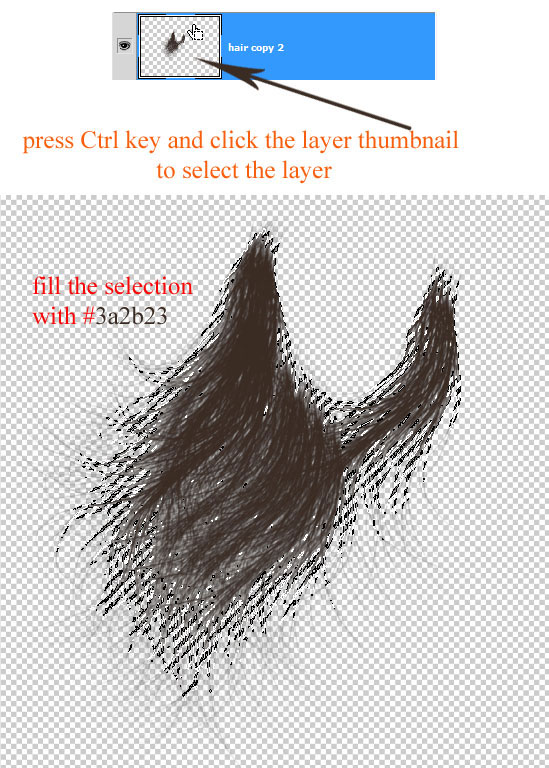
Duplicate again the original hair layer. Place the duplicate below the original layer. With the duplicate layer still activated, press Ctrl key on the keyboard and click the thumbnail of the duplicate layer. This will select the layer. When the layer is selected, hit Shift+F5 to fill the selection. Fill it with color #3a2b23.
Do the same to create the other two different colored hairs. Place them below the original one.

And select all the hair layer. Hit Ctrl+E to merge them into a single layer. I named this layer final hair. Here is the hair will look so far:

To complete the hair, we will add some texture to it. We will create this texture from custom filter in photoshop. To achieve this, firstly create a new document with size of about 800 pxl x 800 pxl. Make sure to set the foreground color to #261c19 and the background to #4d3b32. Create a new layer filled with any color. Then, go to filter > render > fibers.
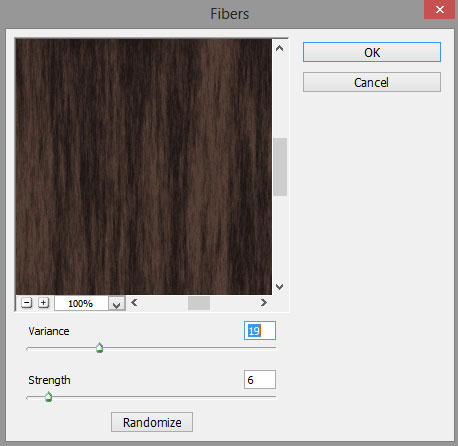
This is the texture create from the filter:

Now we will alter the shape of the texture. To do this purpose, we will give the texture some liquefy filter. We can find this filter by going to filter > liquify (Shift+Ctrl+X). Choose forward warp and warp the texture:

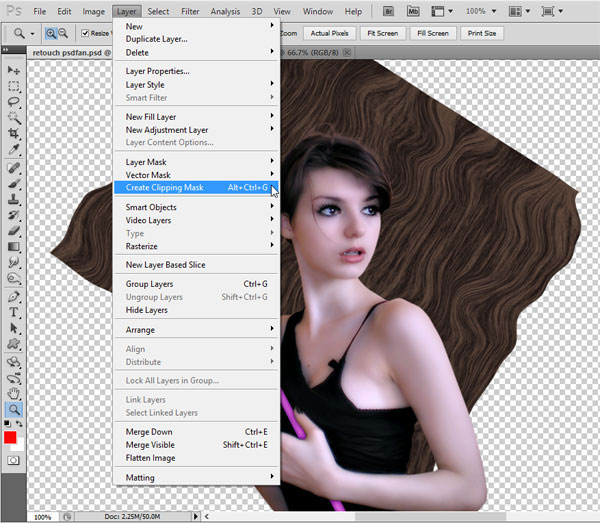
Copy-paste the texture to the main layer. Place this texture layer above the hair layer. Create a clipping mask for the texture. Scale its size and arrange its position to fit the hair.
Here is the texture will look like:
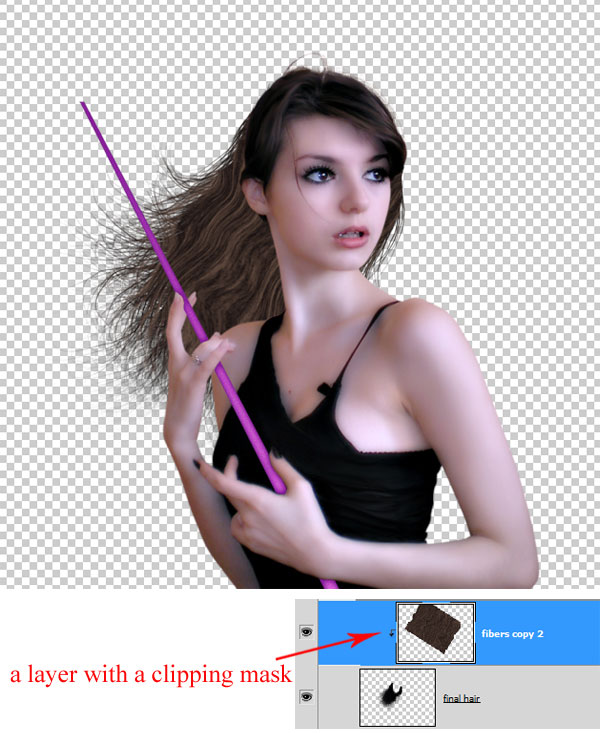
Finally, duplicate the final hair layer and place the duplicate above the texture layer. Make sure to give this layer a clipping mask. Set the texture and duplicate layer to normal blending at 70% opacity. Here is the hair looks:
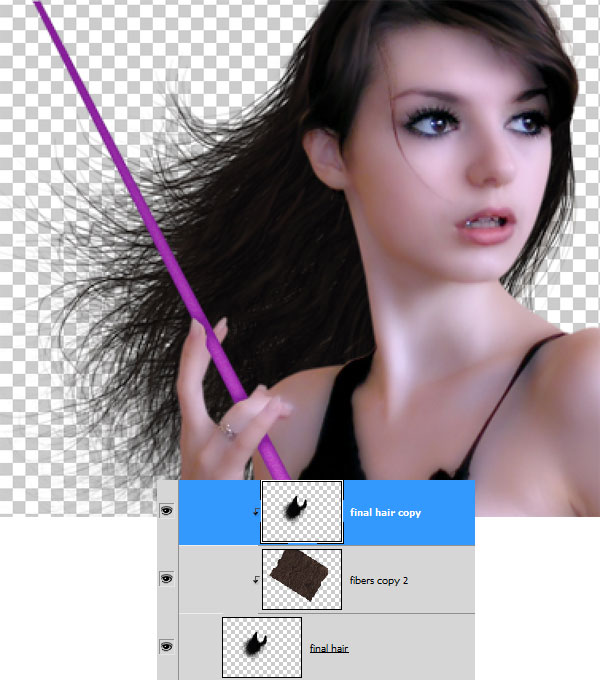
Create new layers on which we should add some hair strands as shown in the screenshot.

Here is the look of the model with custom hair:

We have done with the model. Now we will manipulate a background for the model. We do this on a new document so create a new document with size shown in the screenshot. Fill ( Shift+F5 ) this document with black color.

Open the cosmos image in the document. Scale its size to fit the document. To achieve this, take the free transform tool and click one of the transforming point, hold and drag it to scale up. Make sure to press Shift key on the keyboard while dragging the transforming point to maintain the pixel rasio.

This is the result should be:

Now convert this cosmos layer into a smart object and give it a smart filter: surface blur. This can be achieved by going to filter > blur > surface blur.

Here is the result:

Then we will give the adjustment layer to the scene. We will give it curve as set in the following amount:

Set the curve layer to overlay blending at 30% opacity to get this result:

In this step, we will manipulate a light surface supposed to be a place where the model is staying. To do this purpose, firstly open the other cosmos image to the document.

With the transform tool, alter the perspective of the image as the one I created in the screenshot.

Proceed to clean out the unneeded part of the image by masking the part.
Finally, set the layer to screen blending at 100%. Here is the result:

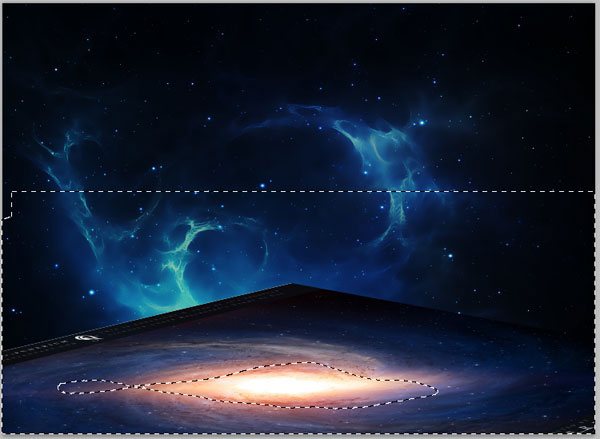
Now we will manipulate another light surface to the scene. To achieve this, duplicate the cosmos image and cut out the center part of it.

Then, with the other cosmos image, create another light surface by cutting out the part of it as the one shown below:

Finally, place the first cut out layer above the second cut out. Set the first cut out layer to screen blending at 100% and the second to normal at 100%. Hit Ctrl+E to merge them into a single layer. I named this layer surface.

Place this surface layer below the first light surface created in the previous step 16. Then, give this layer some surface blur:

This is the scene will look so far:

Duplicate the curve adjustment layer created in previous step 15 and place the duplicate above the surface layer. Make sure to give it a clipping mask. Mask a bit the lower part of the surface layer. Here is the result should look:

Finally, duplicate again the curve layer and place this duplicate above the previous duplicated one. Do not give this duplicate a clipping mask. So here is the result and the layers order so far. Select all the surface layers and hit Ctrl+G to group them into a new single layer group. I named this group surface.

Now we will add another color adjustment above the surface layer. This time we will add color balance as set in the screenshot. Keep this color balance layer in normal blending mode at 100% opacity.

This is the result should look like:

Proceed to add the model to the document. Place it in the middle of the brightest part of the light surface. Mask the lower part of this model so it will blend well with the background.

Now create a new adjustment layer above the model layer. We will add hue/saturation to the scene. Make sure to create a clipping for this adjustment layer. Set it to normal blending at 70% opacity.

Mask some part of the hue/saturation layer to hide its effect to the model image. Mask the parts in selection as shown below:

Give another adjustment layer with a clipping mask above the hue/saturation layer. This time we give brightness/contrast adjustment layer. Set this new adjustment layer to the amount set in the screenshot below. Mask some part of this layer to hide its effect to the model.

Here is the result:
Finally, create again another adjustment layer with a clipping mask: selective color. Make sure to set the amount of this layer as shown in the screenshot. Set this layer to normal at 80% opacity.

This is the look of the model now:

Create a new layer (Shift+Ctrl+N) with a clipping mask above the selective color layer.

Take the brush tool and choose a very soft round brush set to 10-20% opacity. Set the color #fc8a04. On the new layer, paint some highlight on the model layer. I named this new layer highlight.

Duplicate the highlight layer two times. Then, set the original highlight to screen blending at 60% opacity. Set the first duplicate to color dodge at 100% opacity and the second one to overlay at 100%.

This is the highlight will look like:

With the same color, make some more highlight on the other parts of the model.

In this step we will colorize the lips of the model. What we should do is firstly select the lips.

While the selection is activated, go to layer > new adjustment layers > hue/saturation. This will create another hue/saturation layer with a layer mask. Set the amount of this layer as shown in the screenshot.

Here is the new color of the lips now. Select all the angel layers and hit Ctrl+G to group them. I named this group angel.
To add more fantasy feels to the scene, we will give the angel a pair of wings. The wings is my own image that we can find in the psd file. We can use the other wing image we desire.
Select the cosmos layer and duplicate it one time. Move the cosmos duplicate to the top most position in the layer panel. Set this duplicate to screen mode at 71% opacity.

Here is the result:

Proceed to duplicate the previous curve layer in step 15 and place this duplicate above the cosmos layer with a clipping mask. Then, add more adjustment layer: levels with a clipping mask above the duplicate curve layer.

Then, select all the duplicate cosmos layers and group them into a new single folder. I named this group light. Here is the result so far:

Duplicate the light group layer one time. Create a layer mask for this duplicate group layer and mask some part of this group as shown in the selection below:

Here is the order of layers we have in the layer panel.

And this is the result so far:

In this step we will set overall color adjustment to the scene. To achieve this, firstly, we give the scene a new adjustment layer: channel mixer.

Here is the result after the addition of the channel mixer:

Then, give another adjustment layer: vibrance. Set this vibrance layer to normal at 51% opacity. Mask the lower part of this layer. Select the two adjustment layers and group them. I named this group adjustment.
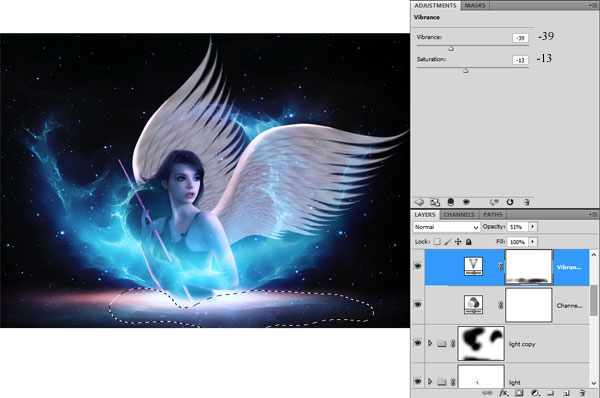
Here is the result:

We will enhance the scene by adding light flare to it. Firstly, open the light flare image and cut out one of the flare.

Copy-paste the flare image to add it to the document. Place it above the adjustment group.

With the flare layer selected, activate the free transform tool (Ctrl+T). Choose warp and alter the shape of the flare by warping it. Follow the setting of the warp to get the result as shown in the screenshot.

Set the flare layer to screen blending mode at 100% opacity. Scale down its size. Position it on the model’s head and rotate to fit the head.

Then, alter the color of this flare by giving a hue/saturation adjustment layer with a clipping mask.

And this is the model with its light stick will look so far after being added a light flare on the top of the stick.

Finally, hit Shift+Ctrl+Alt+E to stamp all the layers into a new single layer. I named this layer stamp. Convert this layer into smart object layer and give it high pass smart filter. Set the smart filter to overlay blending at 100% opacity.

Select the mask thumbnail and mask the part marked in the selection.

Here is the result:


You can view the final outcome below. I hope that you enjoyed this tutorial and would love to hear your feedback on the techniques and outcome.
The source files for this tutorial are available to our FanExtra members community. If you want to access the source files for this tutorial (and all of our tutorials + thousands of other resources) then sign up here.
If you’re already a FanExtra member then you can login here to access the source files.

I am a self-taught photoshop hobbyist from Bali, Indonesia. Photo manipulation is something I am keen on most and a music lover as well. Meet me here http://wprabu.blogspot.com/


Do you know the basic tools in Photoshop but feel that your work is still looking average? Join our creative community at FanExtra and get the direction you need to take your work to the next level.


Thank you for this new beautiful tutorial, with my participation:
http://www.chez-mireilled.com/article-scene-d-ange-du-cosmos-117545518.html
At soon!
You’re welcome Mireille. I really like your outcome on this piece, you’ve captured the fantasy element beautifully.
Tom, can I send you pic of my girlfrend, so you can do the same thnig with her pic?
This is really amazing!
I’m afraid I’m not currently available for freelance work Daky, but thanks for thinking of me . You should give it a try yourself, following the tutorial should make it achievable.
Great tutorial. I have learned some new tricks ! thank u
Thanks John! We always try to leave our readers with handy new techniques to use in their own work. I’m glad you enjoyed this tutorial.
wonderfuulllllllllllllllllllllllllllllllllllllllllllllllllllllllllllllllllllllllllllllllll
Very interesting this tutorial and higher level for me , but i will learn and try my it myself!
Thank a lot