 Give Your Photos Awesome Lighting in Just 10 Steps!
 Create a Dark and Mysterious Fantasy Portrait
 How to Turn Yourself Invisible
Have every post delivered to your inbox and get access to hundreds of useful design freebies.
Do you struggle with blending your images properly?
Don’t worry, you’re not alone.
So many Photoshop designs are poorly blended, and the end result is often a very unrealistic scene.
You should always spend a good amount of time blending your images perfectly, particularly when working with photo manipulation works.
Today you’ll learn how to blend a large number of different photographic elements into a single cohesive scene. You’ll learn how to pay attention to light and shadow, and how to manipulate color and shade in a non-destructive way.
To make things extra challenging, we’re going to be converting a daytime scene to a nighttime scene!
This is going to be fun, let’s dive right in.
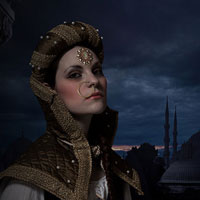
As always, this is the final image that we’ll be creating:

In this step we will start with the main character of the scene.
1) Cut the image of the princess from its original image using the Lasso Tool (L) and place it on the working canvas as shown.

2) Now create a new layer over the model layer. Then select Spot Healing Tool (J) and set the options to Content Aware and Sample All Layers. Now remove all the spots and imperfections on the face. This might take some time, but the more you spend the better result you get.

3) De-Saturate the image by -46 using the Hue-Saturation Adjustment layer.

4) Now create an Exposure Adjustment layer and set the Exposure level to +0.57 and Gamma Correction to 0.75.

In this step we are going to work on the make-up, to make the princess look prettier. (Use of Digital Pen Tablet is highly recommended.)
1) Create a new layer and set the Blending mode of the layer to Overlay. The paint the cheeks and lips pink as shown.

2) Now select Black color and paint dark circles around the eyes as shown to give the princess a slight gothic look.

3) Now de-select the Pen-Pressure option (If using a Pen Tablet.), and then paint dark black eye liner around the eyes as shown.

In this step we are going to create the Balcony behind the princess.
1) Import the image of the balcony on to the working canvas and place it behind the princess as shown.


I'm a freelance graphics designer and the Founder of Zillionarts and ZillionArts Workshop. Here we ought to provide the best training on Digital Painting and Visual Effects host by the experienced pros from the Hollywood and Gaming Industry. I work constantly to explore more possibilities and techniques to bring my imaginary worlds to live. You can follow me on Deviantart.


Do you know the basic tools in Photoshop but feel that your work is still looking average? Join our creative community at FanExtra and get the direction you need to take your work to the next level.


Thank you for this great tutorial, very well explained and easy to follow!
My work:
http://www.chez-mireilled.com/article-montage-princesse-arabe-avec-photoshop-119257622.html
I am a fan!
Thanks for commenting Mireille. Great blending work in your piece. The only area that doesn’t look quite right is the lantern. Did you struggle with this light effect?
No Tom, but certainly with fatigue, I did not see that I had put too much light.
Thank you for the corrections, I corrected and it’s better!
Bonsoir
Je me suis inscrit et abonné au paiement automatique mais je n’arrive pas a telecherger des fichiers, comment fait on ??
Merci
Hi Stephane, I will drop you an email about this. It sounds like a simple login issue.