 Premium Brush Set: Spider Webs
 Members Area Tutorial: Create a Beautiful Snow Queen Photo Manipulation
 Premium Vector Pack: Floral 4
Have every post delivered to your inbox and get access to hundreds of useful design freebies.
Today’s tutorial is something a little different, but is perfect if you’re interested in not just creating stunning artwork, but artwork that’s usable for real life projects.
We’re going to be learning how to create a dark photo manipulation scene, and then frame this scene within a video-game type screen.
In this sense the tutorial is really two tutorials in one, as you’re be working with photo manipulation techniques, but combining these with interface creation walkthroughs.
You’ll be mastering techniques such as:
Ok, let’s get started shall we?
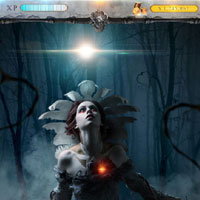
As always, this is the final image that we’ll be creating:

Create a new canvas in Photoshop and import the image of the model onto the canvas.

In this step we are going to add a background in the scene.
1) Import the image of the forest on to the canvas and place it beneath the model layer.

2) Now create an Exposure adjustment layer to the forest layer and set the Exposure to -1.79, Offset=-0.0434 and Gamma Correction = 0.69.

3) Now create a Curves adjustment layer to the model layer and set the RGB curves as shown.

4) Create a Hue/Saturation layer to the model layer and set the Saturation level to -42.

5) Now create a new layer and paint shadow at the bottom edges of model’s dress as shown.

In this step we are going to create a gothic tribal tattoo effect on the skin of the model.
1) Using the Brush Tool (B) draw a rough sketch of the tattoo design on model as shown.

2) Now select a mask in the shape of the tattoo using the Pen Tool (P), then separate the selection into a new layer.

3) Create an Exposure adjustment layer to the separated skin layer and set the Exposure level to +0.28, Offset=-0.0522 and Gamma Correction to 0.46.

4) Now create a Hue/Saturation adjustment layer and set the Saturation level to -57.

5) Repeat the same procedure and create the tattoo on the other side of the model’s neck as shown. Then create an Exposure adjustment layer to it and set the Exposure level to -0.05, Offset=-0.0043 and Gamma Correction to 0.87.

6) Now de-saturate the tattoo layer to -57 using the hue/Saturation layer.

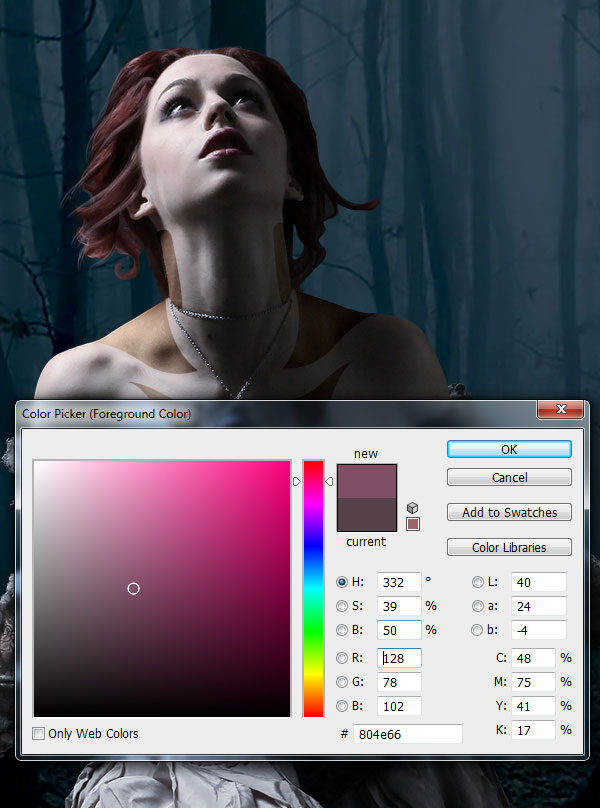
7) Select the color #804e66 and paint the hair strands as shown.
In this step we will be working on slight makeup re-touching on the model’s face.
1) Create a new layer above the model layer and paint black color above the eyes as shown and reduce the Opacity of the layer to 56%.

2) Now paint Red shade under the eyes as show in a new layer and set the Blending model of the layer to Overlay.

In this step we will be creating the feather prop to the model.
1) Import the image of the wings onto the canvas and place them behind the model as shown.

2) Now duplicate the image of the feathers and flip it horizontally and place it adjacent to the previous feather layer as shown.

3) Now select a rough mask cover half the portion of left side feathers and add a feather of 35px, then create an Exposure adjustment layer to it and set the Exposure to -0.93 Gamma Correction=0.57.

4) Using the Brush Tool (B) paint dark shadow as shown in a new layer placed in between the feathers and the model.

In this step we are going to paint the fog in the scene.
1) Create a new layer on the top of layers pallet and paint the white fog as shown using the fog brush.

2) Import the image of the dead branch on to the canvas and place it on the right side of the scene as shown.

3) Again paint the fog in a new layer.

4) Create a new layer and paint black fog at the bottom of the scene. Make sure to place this layer beneath the fog2 layer.

5) Create a black bokeh around the edges of the scene as shown.


I'm a freelance graphics designer and the Founder of Zillionarts and ZillionArts Workshop. Here we ought to provide the best training on Digital Painting and Visual Effects host by the experienced pros from the Hollywood and Gaming Industry. I work constantly to explore more possibilities and techniques to bring my imaginary worlds to live. You can follow me on Deviantart.


Do you know the basic tools in Photoshop but feel that your work is still looking average? Join our creative community at FanExtra and get the direction you need to take your work to the next level.


Thank you for this wonderful montage!
My work:
http://www.chez-mireilled.com/article-scene-de-jeu-video-avec-photoshop-115886635.html