
 Members Area Tutorial: Create an Incredible Typographic Illustration
 Create an Awesome Illustration Using Custom Brushes
 Design an Old-Style Safari Map
Have every post delivered to your inbox and get access to hundreds of useful design freebies.
My internet’s unfortunately been down for a few days, hence the lack of updates here. Apologies for the break in posting and replying to comments, but luckily I’ve managed to locate a handy coffee shop to work from while things get fixed. Enjoy the tutorial ![]() .
.
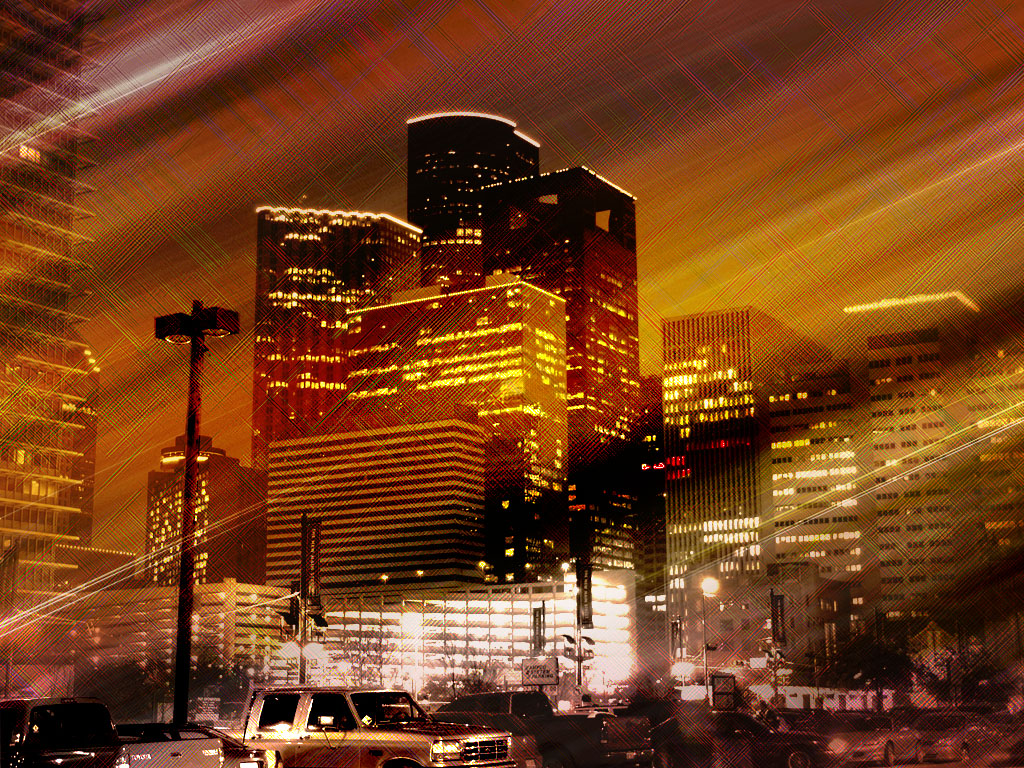
This is the final image that we’ll be creating:

Open up a new document 1024X768px and create a new layer called ‘clouds’. Then create some clouds by going to filter>render>difference clouds.

Now go to filter>blur>motion blur and apply the strongest motion blur (999 distance) at a 25 degree angle. Then go to image>adjustments>brightness/contrast and increase the contrast to +75. This is probably the quickest way to create a nice looking background from scratch. If you’re not bothered about creating a cityscape wallpaper then at least you’ve learn the basics of a professional looking background!


Now duplicate your clouds layer and go to filter>brush strokes>crosshatch. Apply the strongest crosshatch effect possible (stroke length: 50, sharpness: 18, strength: 3). Then set this duplicate layer’s blend mode to ‘overlay’ and reduce it’s opacity to 45%. Then merge the two layers.


Go to image>adjustments>shadows/highlights and then set shadows to 0% and highlights to 100%. The outcome should look something like the image below:

Now paste in a photo of a cool cityscape onto a new top layer (source: http://www.sxc.hu/photo/923333). Desaturate the image (image>adjustments>desaturate) and then set the layer’s blend mode to ‘overlay’.


Now duplicate your cityscape image and set the layer blend mode to ‘vivid light’. Then go to layer>create layer mask>reveal all. Drag a transparent to black radial gradient out from the center. This will fade out the edges of your vivid light layer, but leave the center in tact. This draws the eye to the focal point of your image, the large prominent building in the center.


Now select your original clouds layer. Apply a gradient overlay, and try to use one of the Photoshop present gradients, that consists of colors fairly different from your current image. As my current image is quite dull, orangy and rusty, I chose a bright blue-yellow-blue gradient. Then set the gradient blend mode to overlay and set it’s opacity to 50%. You can see that the image is coming together quite nicely now. The technique here is building up multiple layers of colors, effects and shades to achieve a really rich effect.


Now duplicate your photo layer and move it to be your top layer. Change it’s blending mode back to normal to make it easier to see what you’re doing. Then select around some key parts of your image using the lasso tool. I chose to select one of the cars, the lamppost and a few other pieces of my image. Invert your selection and hit delete to leave only these parts of the image remaining. Then set the layer blend mode to ‘vivid light’. This should give extra emphasis to these areas and help give a little more depth to your image by fore-grounding the parts of it that are nearer to you. The images below show the image before and after this effect.


Now select your original photo and go to select>color range. Then apply the settings below to select only the lightest parts of your image. It doesn’t matter that you’re on one layer only without merging the rest, as this technique will pick up the highlights in your image as a whole, not just within your selected layer.

With your highlighted area selection copy/paste to paste these highlights onto a new layer. Then set the layer blend mode to ‘color dodge’ and apply the strongest motion blur as shown early. Duplicate this highlight layer to make the effect stronger.
As you can see from the before and after images below this relatively simple set of techniques can really help to improve your images in a unique and interesting way. The best thing about this tutorial is that your outcome will be completely different with each image and each time you apply these effects. The fact that difference clouds are always different from the last that you rendered and that different images will have various levels of shadows/highlights to begin with mean that your images will never get predictable or boring. Try creating an album of your favorite images using these techniques, and try a different color gradient overlay to really mix things up. Click on the finished image below to view the full sized wallpaper.
The images below were just as quick to create but show how useful this effect can be using different photos:


Tom is the founder of PSDFAN. He loves writing tutorials, learning more about design and interacting with the community. On a more interesting note he can also play guitar hero drunk with his teeth.


Do you know the basic tools in Photoshop but feel that your work is still looking average? Join our creative community at FanExtra and get the direction you need to take your work to the next level.


I liked the effect, it’s simple and cool, but the effect doesn’t look good with all pictures, just comparing the compositions, the photo of the car is really awesome much better than the one with the girl…thanks for this excellent tut.
this is cool!!! thanks Tom
Good stuff Tom. Thanks for sharing the techniques. I really like the old car example.
yeah, good stuff. I agree with Andrew on the car one.
Quick and easy. Thanks a lot.
really cool effect……
thanx alot m8
Good job, waiting new tutorials for a long time.
thx..
That was a really cool effect! thanks 4 sharing your skills!
I have to try this on so many photos!
Wow this one is proving pretty popular. Thanks for all the great comments guys
I agree that the technique works better with certain pics, but with a little creativity most photos can be jazzed up nicely with these techniques. The car photo is probably my favorite also though.
Looked better before you did anything.
wow thats really cool,,,thanks
cool, I am traing to learn potoshop and tutorials lke that helping me..
but, well my finished result looks a bit different
Waow, Awsm work’
keep rawkin.. =]*
Baah, nothing special. Looked better b4.
Thanks guys! Sorry some of you didn’t like the overall result, but I hope you still learnt some fun techniques.
Thanks for this. I agree with the others that it doesn’t work with all images, but it’s certainly good to find new ways to use old filters. Great work!
simple but really nice effect Tom
Thanks guys
I’ve got a question… For step 2, how so you change the colour from the greyish clouds to the brownish one. sorry… still very noob in photoshop.
Hi Joshua. For this step you simply go to image>adjustments>brightness/contrast and then increase the contrast of your image to +75. By increasing the contrast the brightness of your colors should increase drastically. I hope this helps and that you’ll stick around and check out my other tutorials!
Thanks for a great tutorial! I didn’t follow the recipe exactly, but got a great effect and learned lots. Joshua might try using curves and changing the channel curves to colorize in step 2.
Thanks for commenting Nan I’m glad you enjoyed the tutorial. Would you be willing to show off your outcome here? Thanks for helping out Joshua btw.
thanks for great tutorial. im so glad and still trying..how todo it….still need help from you. thanks
ok, i give up, it doesn’t WORK!!!!
hi i’m just a beginner at photoshop.. well, i’m having trouble with step 5.. how can i paste the picture?
uhm.. got a problem.. the picture i pasted is small.. how can i resize the image so that it will perfectly fit the canvas size?
nevermind my question.. i know how to do it.. finally!
Sorry I didn’t get to your question in time Noelle, I’m glad that you figured out how to do it
If anyone else has questions I’ll try and get to them asap!
[...] 5. Give Your Photos Awesome Lighting in Just 10 Steps [...]
good one i will say….
The tutorial was kool but you have not mentioned the color code where u have used different colors be it in Clouds or in Gradient Overlay. Please mention that as to get the perfect effect.
Hey, it’s a great effect it’s really
nice, but on step one, I’m stuck :\
I mean I can’t get it to have that
sort of effect all that’s showing is
black? Is that suppose to happened?
You probably have your foreground and background colors set to black when rendering the clouds. Try setting them to black/white respectively.
For step 2, even after I have changed the contrast to +75, it still remains grey in colour. How to make it into brownish in colour?
I am stuck on step two i can’t not get the brown color result you do.
did i missed a step? or what am i doing wrong??
thank you
Awesome tutorial. Nice and easy explained . Thanks for sharing this well defined tutorial.
I tried this technique with Elements 7. Other than having to skip a couple of the steps, the result was very, very similar. Thanks for the tut–really enjoyed it.
hey thanks , cool steps but i got confuss . ahha . pretty work to.
regards,anis from Malaysia
Hi Tom,
This tutorial is amazing. I am trying my hands on photoshop.
Do you have a tutorial to delete a watermark on a pic?
Thanks,
Steffi.
agree with comments above. how did you make the clouds in brown colour?
what do you mean by “Try setting them to black/white respectively” ?