
 Start Your Journey Into the Imaginative World of Matte Painting
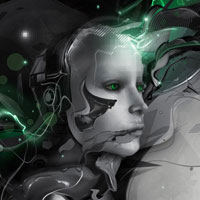 Members Area Tutorial: Follow an Expert Photo Manipulator’s Workflow
 Design a Sleek Diamond Poster Advert
Have every post delivered to your inbox and get access to hundreds of useful design freebies.
In this tutorial we are going to create an android with an organic brain.
This tutorial covers major topics like Advanced Skin Replacement, Digital Painting, Creating an Organic Android Brain (Inspired from the movie IROBOT), Creating 3D depth using Shadows, Advanced Color Correction using adjustment layers and much more interesting and informative topics.
As always, this is the final image that we’ll be creating:

In this step we are going to cut the image of the women for our scene without losing any details.
1) Import the image of the women with headphones into Photoshop and cut the head as shown using the Lasso Tool (L).


To make the skin look smooth add a Smart Blur of Radius 3 with Threshold 16.1.

In this step we are going to paint the shape of the skull of the women.
1) Create a mask in the skull shape of the women and fill in the selection with the color #ceac89.

2) Now by using the color #ebd8c5 paint the bright shade on the skull as shown to match with the lighting on the original skin of the model.

Stamp Tool (S) could be used to erase the hair on the head and neck of the model’s body but it would be a very time consuming process. So here we are going to use the texturing process by replacing the skin of the original model with the skin of another model.
1) Using the Magic Wand Tool (W) create a mask around the Jaw line and neck as shown on the second model and separate the selection into a new layer. Then import the skin on to the working canvas and place it on the Jaw line of the original model as shown.

2) Now create an Adjustment layer of Curves to the skin layer and set the curves as shown to blend with the color of the original skin.

Now by using the Stamp Tool (S) clone the skin of the original model on the head as shown to blend the digital painting and skin together.

In this step we will be using the texturing process to replace the skin on the neck.
1) Using the Magic Wand Tool (W) select a mask around the neck of the second model and separate the selection into a new layer and import it on to the working canvas and place it on the neck of the model as shown.


I'm a freelance graphics designer and the Founder of Zillionarts and ZillionArts Workshop. Here we ought to provide the best training on Digital Painting and Visual Effects host by the experienced pros from the Hollywood and Gaming Industry. I work constantly to explore more possibilities and techniques to bring my imaginary worlds to live. You can follow me on Deviantart.


Do you know the basic tools in Photoshop but feel that your work is still looking average? Join our creative community at FanExtra and get the direction you need to take your work to the next level.


Leave a comment
0 Comments:
No comments have been posted yet. Be the first!