
 Create a Fantastically Textured Flaming Portrait
 Members Area Tutorial: Photo Manipulate a Complex Surrogate Scene
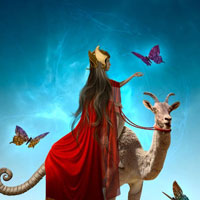 Members Area Tutorial: Photo Manipulate a Magical Desert Scene
Have every post delivered to your inbox and get access to hundreds of useful design freebies.
In this tutorial we are going to create a Medieval age environment. In this scene the mountain of doom constantly emits black smoke that covers the sky and prevents the light from sun touching the ground. But the rays of hope falls on a warrior who is destined to put an end to the evil.
This tutorial covers topics like, Concept sketching, Creating a landscape using multiple images, Creating flags using the Displacement Option, Importance of Depth Of Field in matte paintings, Complex extraction techniques Lighting, Cinematic Color Correction and more great techniques!
As always, this is the final image that we’ll be creating:

Sketching is always the best process to start with Matte Painting or while creating a cinematic scene. So here we have done a rough sketch of the scene that we are going to create.

Now let’s name the properties that are required in the scene. This makes our work much easier while searching for the suitable images to fit with our concept. The same can be applied while making a short film to calculate the budget.
-The best place to find free stock images is sxc.hu and if you are looking for a model or a character for your work we recommend you to check Deviantart.com. These are the treasure chests for all the digital artists.


In this step we will be creating background scenery.
1) Import the image of the hills onto the working canvas and place it on the left side of the canvas as shown.


2) Now import another image of the hills and place it as shown and erase the left side of the ‘hills 2′ layer using the Soft Eraser Tool (E) to blend both the hill layers perfectly.

In this step we are going to create an old destroyed gateway on the right side of the scene.
1) Import the image of the gateway onto the working canvas and place it on the right side of the canvas just as we sketched in our concept.


2) Now create a Curves Adjustment layer to the Gateway and set the curves as shown, then set the Opacity of the adjustment layer to 40%.

In this step we are going to create a ground on which our warrior will be placed.
1) Import the image of the graveled mud heap on to the canvas and place it as shown. Then by using the Lasso Tool (L) cut the mud in the shape of the selection as shown.


I'm a freelance graphics designer and the Founder of Zillionarts and ZillionArts Workshop. Here we ought to provide the best training on Digital Painting and Visual Effects host by the experienced pros from the Hollywood and Gaming Industry. I work constantly to explore more possibilities and techniques to bring my imaginary worlds to live. You can follow me on Deviantart.


Do you know the basic tools in Photoshop but feel that your work is still looking average? Join our creative community at FanExtra and get the direction you need to take your work to the next level.


Leave a comment
0 Comments:
No comments have been posted yet. Be the first!