
 Members Area Tutorial: Create the Colorful and Creative Photo Manipulation “Simple Life”
 Members Area Tutorial: Create a Beautiful Snow Queen Photo Manipulation
 Members Area Tutorial: Create a Sinister Little Red Riding Hood Photo Manipulation
Have every post delivered to your inbox and get access to hundreds of useful design freebies.
In this tutorial I’ll show you how to create a surreal and conceptual photo manipulation called “Daydream”. We’ll learn how to combine many stocks together, practice different retouching techniques, do coloring and blending, work with group, use your imagination… and more.
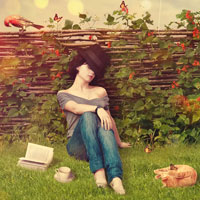
As always, this is the final image that we’ll be creating:

Create a new document and fill it with white ( remember to make the width larger than the height). I use the settings of 1200×1000 px.
Open sky stock ( you can use your own). Make a selection for a part of sky ( I choose a part with a good contrast) as shown below:

Use Move Tool ( press V key to active it) and drag it into our document and use transform tool ( Cmd/Ctrl+T) to resize it to be smaller and fit with background:

Call this layer as “sky”.
To brighten sky I use a Levels layer with Clipping Mask for it. On sky layer, go to Layer-New Adjustment Layer-Levels:


I want to brighten a part on sky part so make a new layer ( Cmd/Ctrl+Shift+N) and take soft brush with color #dbe2e5 ( that is picked from bright part of sky). Paint on this part as shown below:

Change the mode to Soft Light 100%:

Open ground stock ( I use a pavement photo ) . Copy the part of the middle section and place it at the picture bottom, transform it to get the look like below:


Add layer mask and use soft black brush to erase the hard edges of this ground and blend them with sky:

Duplicate this ground layer then go to Filter-Blur-Gassian Blur and set radius as 2 px:

On layer mask of ground copy use soft black brush with big size ( 350-400 px) to clear blurred effect of the ground middle:

This step is to add some depth for the picture.
To edit ground layers ( ground and ground copy) together I make group for them. Make these layers selected then press Cmd/Ctrl+G and we have a group. Click on small triangle beside this group to reveal all layers inside. Change the mode of this group from Pass Through (default mode group) to Normal 100%:

Now I use some adjustment layers to make ground brighter and reduce saturation. On ground copy layer, go to Layer-New Adjustment Layer-Levels:

Layer-New Adjustment Layer-Hue/Saturation:

Because the mode of this group changed to Normal 100% so these adjustment layers only affect the layers inside this group ( ground ones):

In this step we’ll make a hole for the ground. I position it at the right edge of this picture. Make a new layer above ground copy ( under adjustment layers) and use Polygonal Lass Tool to make a selection as shown below:

Go to Edit-Fill and fill it with black:

Now make a new layer above “black fill” one. Go to ground layer and make selection for the brick nearest the right edge then press Cmd/Ctrl+C to copy this part:

Choose new layer and hit Cmd/Ctrl+V to paste copied part into this one. Transform it by using Cmd/Ctrl+T combine key. Name this layer “brick 1″. We have a side for black hole.

Add layer mask for this brick and use hard black brush ( don’t use soft black brush as it will leave soft unatural edges) to remove the part outside the black hole:

Make a new layer again and use same method to create a new side for black hole. You can see how I position it in the screenshot below:

Call this layer as “brick 2″.
Because these bricks ( hole sides) are underground so they should be darker than the rest. To fix it, let’s make some adjustment layers with Clipping Mask for them ( you can use the kind of adjustment layers you want). About my part, I use Hue/Saturation for brick 1 and Curves for brick 2:


Thank you for reading this tutorial, I hope that you enjoyed it. If you want to view my other arts and tutorials you can look at my Deviantart page or follow me on Facebook.


Do you know the basic tools in Photoshop but feel that your work is still looking average? Join our creative community at FanExtra and get the direction you need to take your work to the next level.


Very well done. I like how you went to all these websites to find the right pic and then put them together to create such a dreamy illustration. Very creative!
My latest photo manip here: http://joelacevedo.com/fantasy/818673_36307830.jpg
Thanks Joel! I’m glad you enjoyed this tut.
I like your photo manipulation a lot, and it’s a cool, unique concept. Just a couple of tips:
- Part of it actually look over done. The background in particular no longer looks that natural due to various filters applied.
- I think the T-rex should be larger, it’s making the scale look off being so similar to the woman in size
- Some overlaid adjustment layers and further lighting would really help bring the piece and various elements together as a whole.
I hope this helps!