
 Design a Super Clean Blue Portfolio Website
 Design a Modern, Textured Portfolio Website
 Design a Professional Portfolio Web Layout
Have every post delivered to your inbox and get access to hundreds of useful design freebies.
This tutorial teaches you how to create a professional looking portfolio design using very basic techniques. The majority of online portfolio’s appear amateur, yet it really isn’t very difficult to produce a simple design, very quickly that can portray a professional image online.
This tutorial hopefully shows how a few simple techniques can bring great results.
This is the final image that we’ll be creating:

The following images will be used in this tutorial:
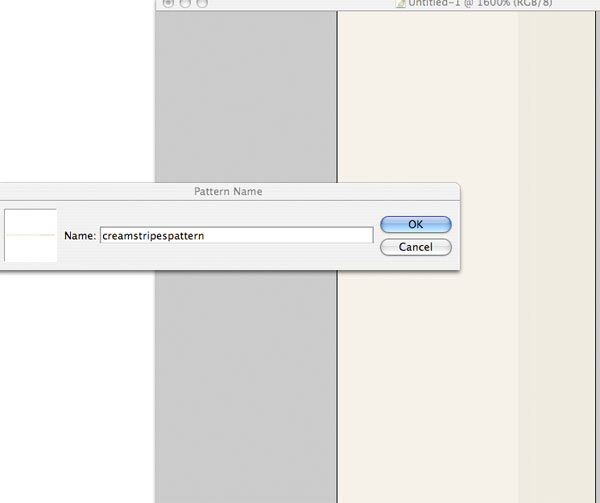
Open up a new document (20X900px). Select your entire canvas (option+a) and fill it with a light cream color (F6F3EA). Then use your rectangular marquee selection tool to create a thin, slightly darker line down the right side of your canvas. This bar should be EFEBE1 in color. Then go to edit>define pattern and define your pattern as ‘creamstripespattern’.
Now create a new document (960X900px). Create a new layer called ‘background’ and fill your entire canvas with any color you like. Then go to blending options for this layer and apply a pattern overlay effect, selecting your newly created ‘creamstripespattern’.

Now paste in a photo of some ripped cardboard. Position the cardboard in the top of your canvas and call this layer ‘header’. I cut out the photo from it’s original white background using the magic wand tool.

Now go to image>adjustments>desaturate to grayscale your cardboard layer.

Now go to blending options for this layer and apply a gradient overlay, ranging between very dark grays. Then reduce this overlay’s opacity to 90% to allow your cardboard to show through a little more. Then set your overlay’s blend mode to ‘multiply’.

Now duplicate your header layer and call the duplicate ‘footer’. Go to edit>transform>flip vertical, and then move the flipped cardboard down to the bottom of your canvas. I chose to crop away the bottom of my canvas, making the overall layout less tall. Finally, to make my footer area thinner than my header, I go to edit>transform>scale and then reduce the height of my footer area.

Now grab a radial gradient, ranging from white to transparent. Then create a new top layer called ‘header gradient’. Pull out your gradient from the top left of your dark header area.

Now reduce your gradient layer’s opacity to 15%. Also part of the gradient is jutting out into your cream area, which you don’t want. Therefore select your header area and click beneath your header area using your magic wand tool (to select the cream area beneath your header). Then return to your gradient layer and hit delete.
This should give you a subtle highlighted effect in the top left part of your header.

Now repeat the same step but in the center of your cream background area. To do this create a layer called ‘background gradient’ below your header/footer layers but above your main cream background layer. Then create a much larger radial white-transparent gradient ranging from the center of your canvas outwards. To measure exactly from the center go to view>rulers to turn on your rulers. To make the effect more subtle reduce this layer’s opacity to around 30%.

Now type out some text for your logo, using the free font Museo. Apply the blending options shown below.


Now to make a sleek logo icon. Start by making a rounded rectangle. Now create a smaller rounded rectangle above your main shape. Option+click on your layer in your layers palette to select all of your smaller shape. Then go to select>modify>contract and contract your selection by 4px. Then hit delete. This should leave you with a briefcase shape created by your two shapes.
Finally, right click on your logo font layer and click ‘copy layer styles’. Then right click on your icon layer and click ‘paste layer styles’.


Now add some menu text. I went with Arial, at -50 kerning.

Now type out some full stop marks multiple times to create dividers between your menu links. Once you’ve typed a line of dots, go to edit>transform>rotate 90 clockwise. Then duplicate this layer each time you want another menu divider.

Add some text to your footer.

Paste in a thumbnail of a website that you want to display in your portfolio. Then go to edit>transform>scale and resize it to fit into your cream area. Then go to blending options and apply a stroke effect.


Add some text to the left of your thumbnail. Be sure to give plenty of line padding, and keep your text nice and dark to give contrast against your light background.

Now create a button using your rounded rectangle shape tool. Then apply the blending options shown below:


I really hope that you enjoyed this tutorial, and as always would love to hear your comments.
You can view the full sized version by clicking on the image below:


Tom is the founder of PSDFAN. He loves writing tutorials, learning more about design and interacting with the community. On a more interesting note he can also play guitar hero drunk with his teeth.


Do you know the basic tools in Photoshop but feel that your work is still looking average? Join our creative community at FanExtra and get the direction you need to take your work to the next level.


man i have nothink to say….good job
great tutorial.
Thanks a lot guys. This tut is very simple, but that’s the point. I wanted to show how just about anyone can come up with a nice looking design, without spending too much effort.
Nice tutorial! The outcome was great too. You should offer up the PSD and/or do a tutorial on the xhtml/css coding for the layout. Would do really well I think.
Mike
Thanks Mike. The members area will be launching really soon with the PSD file, and I may well consider getting it coded.
What version of PS are you using? I was trying this out and when I got to the layers style – pattern overlay part the window looked entirely different ( I tried it in both CS3 and PS CS2) and I could not find either phrase in the Photoshop help screen! It’s very odd. (oh and small thing: in your intro it should read portfolios, not portfolio’s FYI).
Any help or suggestions would be appreciated.
Hi Pam, I’m using version CS until I can afford to upgrade. You should still be able to apply a basic pattern overlay in CS2 or 3 though, just in your blending options window. Hope this helps…
[...] Create a Professional Portfolio Design in 17 Easy Steps Great Tutorial for creating a Professional Design Portfolio! [...]
nice tutorial thank you..
hey, great tutorial. It looks really nice. I like the bright spot in the background.
Hi, Tom,
Yes, Blending Options window, that’s where I am at…only I’m getting weird bubbles on the overlay not lines, and it looks very odd… I can’t seem to find a way to change the bubbles. I’m sure it is in a window somewhere only I can’t find it. The Layer Style Blending Options window looks nothing like yours… totally different buttons and options in it. Got no help with the Adobe help menu either. I’ve not tried using this feature but one would think they would say something about it in the help menu. I have no manual since I believe the online help is all they offer now. Will check a few of my Photoshop books this weekend to see what I can find out. No time to mess with it today as I have projects to crank out.
thanks,
Pam
Hi Pam. The bubbles pattern is the default pattern overlay. All you need to do is change this pattern to your saved pattern of choice. Try clicking on the thumbnail bubbles pattern in your blending options menu.
Great stuff ! Now a second tutorial for the slicing and coding would complete it
great post
thanks
No problem Webdesigner, I’m glad you liked it
simpel job
what colors did you use for the gradient in step 5?
Hi Mike. I don’t actually have the exact colors to hand, but basically just use very dark grays and it should look ok.
easy and cool job……………
Thanks for sharing! I love the simplicity of this mainpage design. I guess I will be redesigning my site – AGAIN!! A designer’s work is never done!
HAppy Day and Thank you!
-Rachel
Heh, I’d love to see the final product when you’re done. And it’s true, a good designer never stops redesigning!
wow! i was amazed.
Thanks insic!
Not complex. Good tutorial for a simple site with only a couple pages.
nice tutorial, thanks buddy
No problem Vicky
Awesome… very useful…
Good Tutorial, we used it for an artist website and we might take it online!
Awesome, I’d love to see it.
thanks, nice tutorial…
can you tell me how to paste photo of cardboard in step 3. I’m a benginner to photoshop
Great tutorial i love the design thanks
Great tutorial And very inspiring And also useful
great tut, very nice design
[...] Create a Professional Portfolio Design [...]
Hey man!! what a great tutorial, I love it! and Museo is simply amazing, recently I published a web design tutorial on my blog using Museo.. in spanish
Really nice work.
cool and easy.
excellent job…help me a lot
Great tutorial . Useful for all new persons as well as the web developers ..
Good job done.
clean dsign.nice
what agreat job hope you send me moor on my email because I’m trying to do professional design , would you please .
regards
Hi!
Wonder if you can use this on a website? mayby an stupid quistion but…..
This is really cool. Is it possible to put something like this on joomla?
Great job! Your design is really nice. Also, thanks for the tutorial!
I’m looking forward to see more posts like this one from you!
For me, as a beginner, the tutorial is very useful, but the question is how the layout can be maked-up?
Fantastic!
I’m working on my portfolio, I would like to criticize to improve.
http://www.joseacreative.com/
Hi Tom, I landed here from your New Year Post, and may I know do you also design for other people too? If you do, how much do you charge in average?
Regards
Thanx…. buddy…It helps me a lot…….
It is a really great tutorial…well explained and very informative, Excellent job!!!!
this information most important for me.
thanks…
These are very good steps to create professional portfolio.
Interesting tutorial. The content is amazing and easy to understand. Good post!!!
Thanx for this great tuto !
Much appreciated
Best Regards
Thanks for great Tutorial
Great tutorial as always Tom, was exceptionally easy to follow and the finished design looks awesome. Thanks
Nice job done
Very nice post. It’s great. Thumbs up
nice job………………
Easy and interesting.
Great tutorial and very easy to follow. I really like how you achieved the end result without a lot of effort. Thanks for sharing.
good job……. keep it…
Thanks for this great tutorial! i will do practict about! And if some one need back ground for this kind desing i have got enought..!
Great posting ! Thanks for sharing !
Thanx for this great tuto !
Much appreciated
Best Regards hali yikama
Thanks for this nice guide.Having a good portfolio is one of an important thing for a designer and you have posted a nice guide.It really helps.
This tutorial will be helpful for those are beginner in the field of website design.
Great Professional Portfolio Design in 17 Easy Steps. Really great!
Really nice article and step by step guide. I like this.
Nice Design. Love the use of the cardboard. Keep up the good work.
very nice tutorial and easy to underand, but I have a question! if the monitor is more than 24 inches what will happend to the beckground? will it repeat or not or will it expand. And can you please make a tutorial on how to cut and code as well please.
Thank you.
tank for sharing
very usefull thank you
Thanks for this nice guide.Having a good portfolio is one of an important thing for a designer and you have posted a nice guide.It really helps.
hey nice job. it helped me in doing my final year portfolio in fashion design
thnx
having a good portfolio is an important thing for a designer and you have posted a nice guide which is really helpful.
I love this tutorial, nice and easy to follow. thanks for sharing it, cheers mate.
Wow, you’re create a great post plus with complete portfolio tutorial..
i need to bookmark this post because i do believe someday i will need portfolio tutorial..
Thanks..
thanks admin. great post.
nice tutorial, but if we move Angle other than 120 then we can change design
nice tutorial, but if we move Angle other than 120 then we can change design..
great post thanks i loved this site
Professional Portfolio Design are nice!! Thanks. Just the info I needed.
Hi,
Really nice and helpful tutorial. Would like to know does this tutorial has the second part in which we can learn the slicing and XHTML/CSS conversion tutorial…
If yes then please provide the link to the same…
Cheers
Ashish
This is lovely and looks so simple! However, I was wondering if there is a tutorial somewhere on how to convert a Photoshop layout into an HTML layout for the web? That is what I would really love to know, and see a tutorial on. =) Thank you for your hard work!
I just loved and enjoyed your work.
GUD WORK MAN
it will be nice to have another tutorial explaining how to convert this PSD to html/css. but i love it
amen
thx, was good
Thanks…Very good info, I feel a lot more people need to read this.
very good tutorial but only helpful for those who create full website in photoshop
Nice works
Great job! wonderful tutorial. Thanks a lot for sharing.
good tutorial, but you should add more designs in this tutorial
u taught me more about building web pages in PSD more than my instructor @ school thank you.
Cool designs and really awesome ones that are easy to do. Am very grateful to know this. Would like to try this now.
Great to know the — in depth from this blog.This will really help for my forward steps to be taken.
thanks for great efect
thanks very much for your great
very nice job. thanks.
great really very nice job
this is amazing! so simple, and so effective, great job!
hi. i didn’t know any thing about websites and how they born in to their life..
i’m glad to see this tutorials anddd now i’m interested.
i really like to know how we can convert this PSD to html?
maybe you can tell us here how we can do that, please?
thanks for your help
Great tips I am learning how to build a site and this tutorial is really awesome thanks
gunluk kiralik ev This is lovely and looks so simple! However, I was wondering if there is a tutorial somewhere on how to convert a Photoshop layout into an HTML layout for the web? That is what I would really love to know, and see a tutorial on. =) Thank you for your hard work!thanks
very nice tutorial
thanks nice site.
this is amazing! so simple, and so effective, great job!aluminyum
great post thanks i loved this site serdar
gr8 tutorial..its will really helpful to my web designing campaign..loving it..thanks a lot..!
Great tut. Well laid out and easy to follow. I like the use and simplification of the torn cardboard.
Great Tutorial for all those who needs to have a profession portfolio.
Great tutorial! Just what I was after – thanks for sharing.
Is a great design Thank for the tutorial.
GOOD! That’s excellent! Thanks a lot!
Very helpful tutorial for graphic designer. Thanks for share to everyone
Very nice tutorial.Nice one its relay helpful. Thanks for share
Nice one thanks for posting.
Great tutorial! I’ve been looking for one like this for some time. I can’t wait to code it next. My goal is to take the psd I created for my site to html/css then to wordpress.
Thanks again
Good post. Thanks for sharing this useful information with us.
very helpful tutorial i really impressed
I’m going to work on a a bit of CSS and HTML to compliment this. I’ll send it your way through your contact area if you’d like to use it! Great tutorial. I’ll be linking to it shortly
nice teaching…its very helpful….thanks
Quite brilliant tutorial, excellent teaching method. thanks…
I love Photoshop and web design. You made both combination and superb theme. I really like it. Thanks a lot for such tutorial.
I hope other will get the same benefit like I’ve got.
Good job ! ty.