 Design a Clean Corporate Website Layout
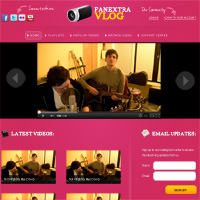 Design a Colorful Vlogging Web Layout
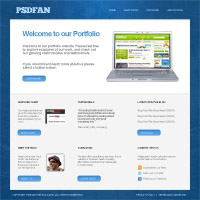
 Design a Professional Portfolio Web Layout
Have every post delivered to your inbox and get access to hundreds of useful design freebies.
As always, this is the final image that we’ll be creating:

Creating a new document (1000X1000px) and fill your canvas with 0e4b7f:

Now create a new layer called ‘header highlight’ and drag out a radial gradient (white to transparent) from the top-center of your canvas. Then change this layer’s blend mode to ‘overlay’ and reduce it’s opacity to 50%


Now download this great metal texture. Paste it into your document, and then go to image>adjustments>desaturate to grayscale it.
Then go to image>adjustments>levels and apply the adjustments shown below:

Now reduce you metal texture layer’s opacity to 10%.

Now apply some guides to your document, set at 50px and 950px (vertical) and 100px and 950px (horizontal). Then fill the inside area with white, using your marquee tool and paintbucket tool:

Add some text to your header (b7dbfe) to construct a logo and menu.

Now cut out this photo of a laptop and paste it into your document.
Then adjust the levels of your image to give it more impact:

Now paste in a screen grab of one of your client’s websites. Go to edit>transform>distort and distort the image to fit over your laptop screen. Then to give it a subtle border, apply a stroke blending option (settings below):

Now add some text to the left of your laptop. I used Arial (-50 kerning) and made the heading 408dd0 and the body text 8e8e8e.

Now use your rounded rectangle shape tool (10px radius) and create a button under your welcome text. Apply an inner shadow and gradient overlay blending option (settings below):


Create a new layer called ‘bottom area’. Use your marquee tool and fill the bottom part of your white content area with . Then apply an inner shadow blending option (settings below) in order to create a subtle divider.

Now add in some content to the bottom half of your layout. I just used Arial for my text, and then for the buttons duplicated the button layer I had already created in the top half of my layout:

To finish up, add a simple copyright notice at the footer of your design.
You can view the final outcome below. I hope that you enjoyed this tutorial and would love to hear your feedback on the techniques and outcome:

Tom is the founder of PSDFAN. He loves writing tutorials, learning more about design and interacting with the community. On a more interesting note he can also play guitar hero drunk with his teeth.


Do you know the basic tools in Photoshop but feel that your work is still looking average? Join our creative community at FanExtra and get the direction you need to take your work to the next level.


Perfect
Hope to see the PSD TO HTML Tutorial
Clean , Neat and minimal design.
well done Tom.
We are Waiting That We Will See PSD To HTML
Fabulous work. Thanks for the posting
Great tutorial, easy to follow and a nice, clean outcome. I always like to see clean and minimal websites as they are easy to look at and don’t take a long time to load.
as said before would really welcome psd to html tutorials as well
these are coming really soon Martina. I’m working hard on it
Hi, what would happen to the metal texture when this layout is converted to HTML? Will that repeat too as a pattern?
wow, cool design..
thank tom, i like it..
awesome, nice and simple.
im also lookin forward to the psd to html tut…i always get stuck there.
cheers!
oranje!
nice
nice one i got it also tnx
I like the method creating background, easy and nice result.
Hey i love your tutorials on all these websites but i had a question because i am just beginning. How do you turn these into wordpress themes?
amazing work well done
what about when you slice the back ground can you please tell us you goiong to do it
Wow! i’m beginner in creating layouts, but your tutorials so easy that I feel like professionals )
excellent work.
Nice Impressive. Background is very light texture but gives good look and center content area is very clear.